• Skip to main content
  • Skip to primary sidebar

Learn how food affects your body. Get Free Nutrition Info Today

the-lean-green-bean-logo
  • Home
  • Recipes
  • Kids
  • Resources
    • Ebooks
    • Food Prep
    • Videos
    • Snack Round-Ups
    • Gift Guides
  • About
    • Become An RD
    • Work With Me
  • Search
the-lean-green-bean-logo
  • Home
  • Recipes
  • Kids
  • Resources
    • Ebooks
    • Food Prep
    • Videos
    • Snack Round-Ups
    • Gift Guides
  • About
    • Become An RD
    • Work With Me
  • Search

blog

SRC: Avocado Dipped Sweet Potato Fries

May 7, 2012 by Lindsay 34 Comments

Hi Friends!

It’s time for another Secret Recipe Club reveal day and this month is a real winner let me tell you!


This month I was assigned to Alessio’s blog: Recipe Taster. It’s filled with beautiful photos and so many unique recipes. I was immediately intrigued by these Avocado Fries. Mainly because of the spicy peach salsa, which i will definitely be making this summer when peaches are in season.

It just so happened that I needed to use up some avocados…but there was one small problem: I don’t like just plain avocado. Gasp! I know. I love it in things, on top of things, to dip my chips in, etc….but when it comes to just taking a big scoop of plain avocado and eating it- not for me. So, I wasn’t sure if I would like avocado fries.

I do, however, LOVE sweet potato fries. And avocado and sweet potato go really well together, right?

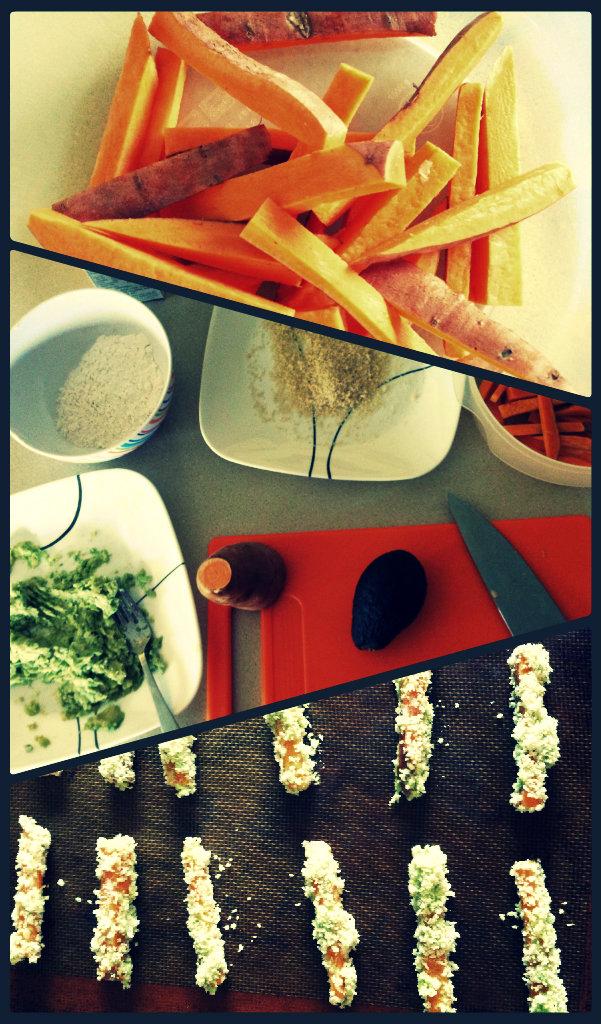
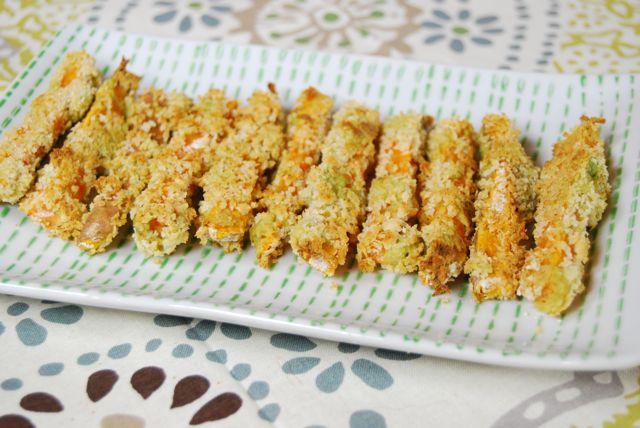
Well that’s where this idea was born. Since my avocados were a little past ripe anyways, I just mashed them up on a plate, then I got out some flour and panko breadcrumbs and got to work:

fries1


This is so easy I’m not sure it can really be called a recipe, but here you go:

Avocado Dipped Sweet Potato Fries

by Lindsay L

Prep Time: 10 min

Cook Time: 15 min

Keywords: bake appetizer side snack healthy vegetarian avocado sweet potato

6023582


Ingredients

  • 1 sweet potato
  • 1 medium avocado
  • 1/2 c panko breadcrumbs
  • 1/4 c flour
  • cayenne pepper

Instructions

1. Mash the avocado on a plate. Put the breadcrumbs on another plate and the flour on a third plate.
2. Slice the sweet potato into fries.
3. Drizzle with olive oil and microwave for 1 min.
4. Let cool slightly, then dredge lightly in flour, roll in avocado and panko and place on a baking sheet.
5. Sprinkle with cayenne pepper.
6. Bake at 400 degrees for 15 min, flipping once.

Notes

It’s kinda hard to get the avocado to stick to the sweet potato so don’t expect an even coating. At first I was worried about this but I decided that just a taste of avocado would actually be nice, instead of a solid coating.

Powered by Recipage


I chose to microwave these for a minute so that they wouldn’t need to be in the oven as long. I was a little worried about burning the panko before the fries were cooked. Microwaving solved this problem and they were perfect after 15 min in the oven!

DSC 2074
Like I said, getting the avocado to stick was a little tricky, but I was able to get some to stick to each fry and it ended up being just the right amount in my opinion.

DSC 2078

The hubby & I enjoyed these for lunch and they were a big hit. I’ll definitely be making them again. Thanks for the inspiration, Alessio!

–Lindsay–

Filed Under: Side Dish Tagged With: Avocado, Sweet Potato

April Photo-A-Day: Part 2

May 5, 2012 by Lindsay 8 Comments

Hi Friends-

Just popping in for a quick recap.

In case you missed the first part, click here.

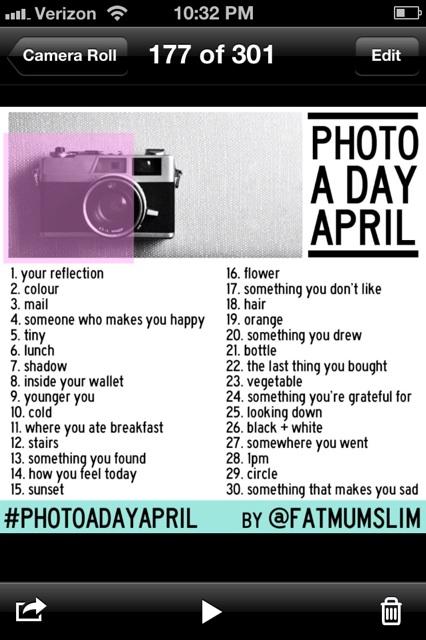
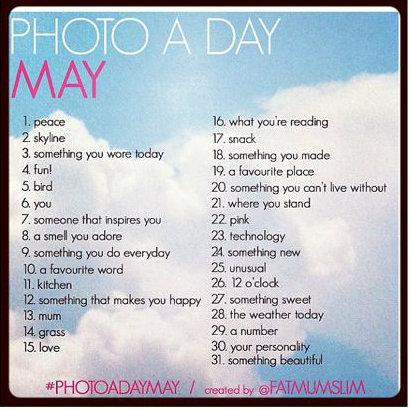
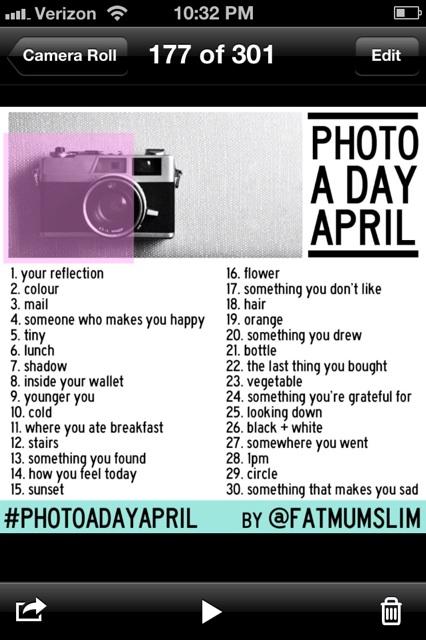
In case you missed the prompts, here they are:

photo 3


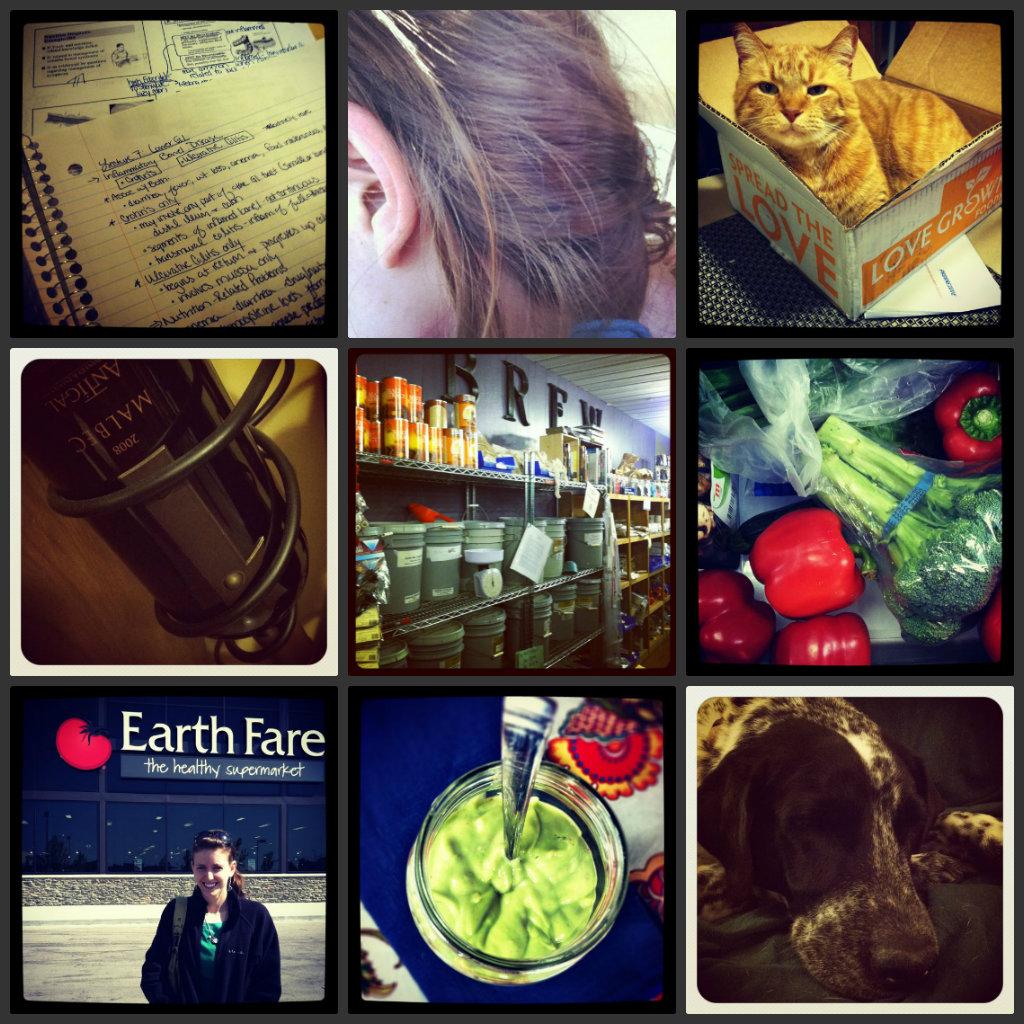
In case you’re interested in the second half, here you go:

picaday1

17: something you don’t like- studying
18: hair- a hot mess like usual
19: orange- the boss
20: whoops! skipped this one
21: bottle- wine
22: last thing you bought- beer brewing supplies
23: vegetable- an assortment from the veggie drawer
24: something you’re grateful for- healthy grocery stores
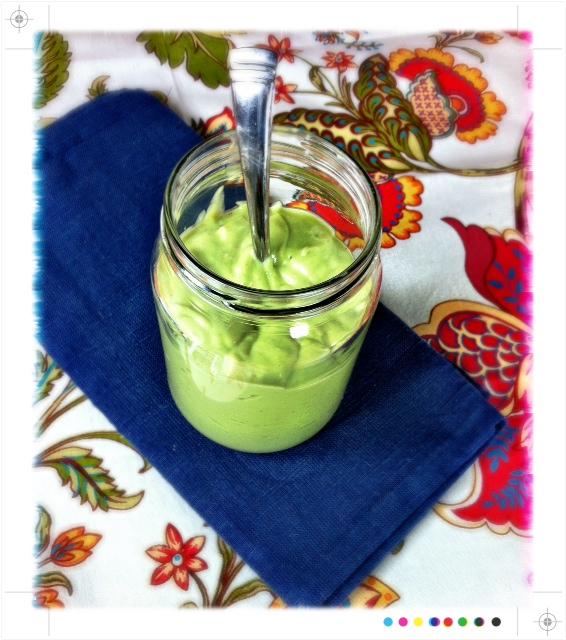
25: looking down: at this dressing
26: black & white: Abner

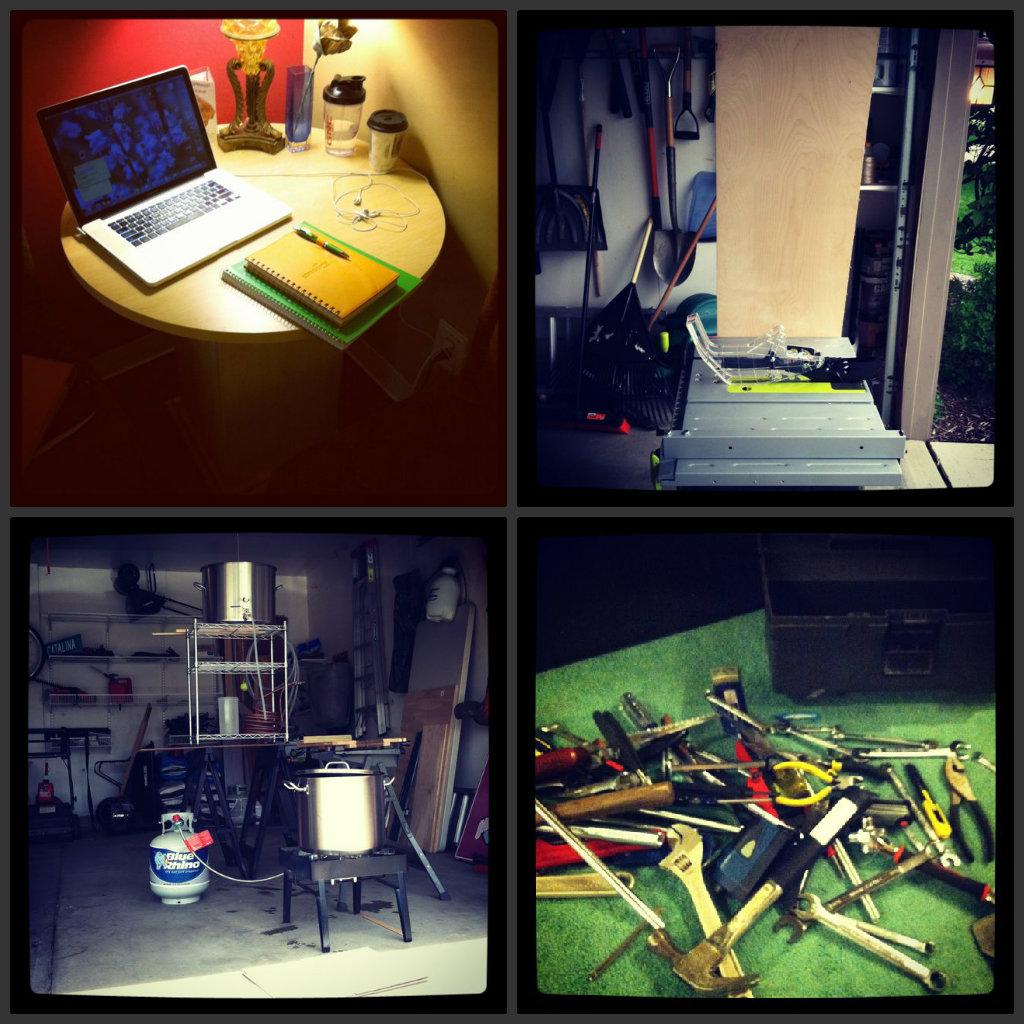
picaday2

27: somewhere you went- coffeeshop to study
28: 1pm: building the treadmill laptop stand
29: circles: watching hubby brew beer
30: something that makes you sad- water leak = wet tools

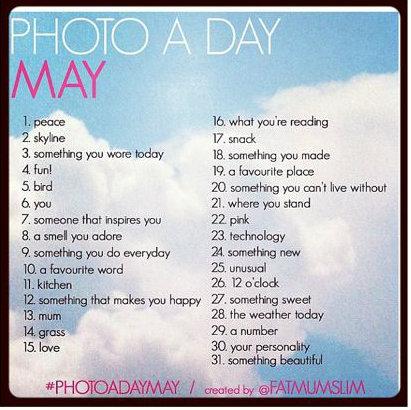
In case you want to participate in May, here you go:

IMG 3667

Happy Saturday 🙂

–Lindsay–

Filed Under: Uncategorized

Chocolate Dipped Frozen Yogurt Bites

May 3, 2012 by Lindsay 89 Comments

Hi Friends!

So here’s the deal. Bright and early tomorrow morning, I leave to go to Blend Retreat! I can’t believe it’s finally here! I have approximately 9,280 things to do before my flight so I don’t have much time to chat.

But I just HAD to share these with you. HAD TO!

So let’s dive right in, shall we?

I don’t think it’s any secret that I adore these two companies:

bites2

They go together like peanut butter and jelly. And mixing them together is one of my favorite snacks. It also just so happens that they’re both Blend sponsors! Totally coincidental…but I guess these could also be called Blend Bites!

So here’s the deal. I love yogurt and granola mixed together. Usually I mix them together and put them on my oatmeal…but summer’s coming. And i’m not a huge fan of hot oatmeal when it’s hot out. So I decided I needed a new way to eat my favorite snack.

I’ve heard that you can freeze Chobani, but I’d never tried it. Until yesterday.

Yesterday I dumped a container of Chobani in a bowl, added some LGF granola and stirred it all up. Then I spooned the mixture into an ice cube tray and stuck it in the freezer.

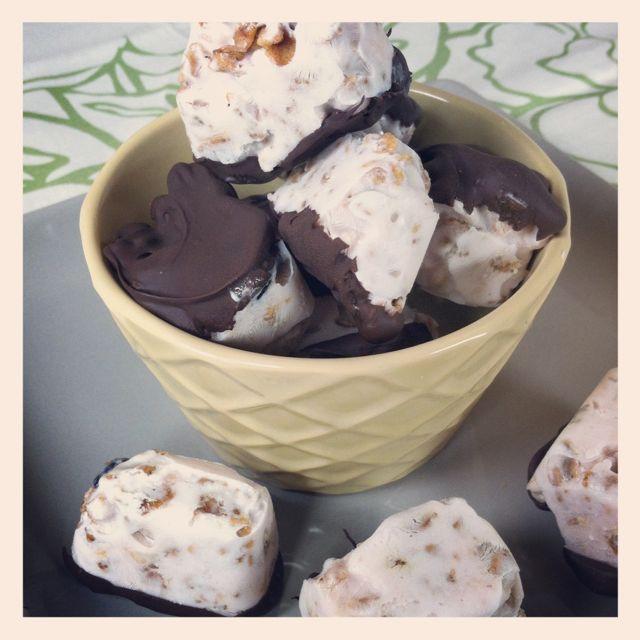
After a few hours, out popped some frozen yogurt granola bites. As I was munching on one I decided some chocolate would really kick things up a notch. So I grabbed some chocolate chips, melted them and dipped my cubes in the bowl one at a time.

bites3

Then I put a picture on instagram (are you following me? theleangreenbean) & twitter to taunt you guys!

These Chocolate Dipped Frozen Yogurt Bites are sweet enough for dessert and healthy enough for a snack!
And then I made you wait until today for the “recipe”. That wasn’t very nice was it?

Well here it is. You need exactly 3 things:

Chocolate Dipped Frozen Yogurt Bites

by Lindsay L

Keywords: snack dessert greek yogurt granola no bake

6023616


Ingredients

  • 6 oz  Greek Yogurt
  • 1/2 – 3/4 c  Granola
  • 1/3 c dark chocolate chips

Instructions

Mix the yogurt and granola together and spoon into ice cube trays.

Freeze until set.

Remove from ice cube tray and dip in melted chocolate.

Freeze until set.

Enjoy.

Powered by Recipage


So easy!

Friends, go make these now!

These Chocolate Dipped Frozen Yogurt Bites are sweet enough for dessert and healthy enough for a snack!

Also, some of you have asked what programs I use to play with my pictures. The one above was done in picassa….the two below were done with ipiccy.

These Chocolate Dipped Frozen Yogurt Bites are sweet enough for dessert and healthy enough for a snack!bite5

Because really, every once and while you just need something a little more exciting than this:

These Chocolate Dipped Frozen Yogurt Bites are sweet enough for dessert and healthy enough for a snack!


Anyways, my mind is already spinning with what to do for my next batch. I think i’m going to put a banana slice between the yogurt and the chocolate. Or maybe stick an almond in the middle of each one. If I’m feeling adventurous, I might even try putting the melted chocolate on the top before even sticking them in the freezer! That would be easiest, if I could get them out of the ice cube trays without breaking the chocolate.

Oh, and because I know someone will ask…yes I did try coating one entirely in chocolate. It worked, but it wasn’t easy. The cold cubes make the chocolate sieze up and it was just a lot more work. I think dipping is the way to go for sure.

Enjoy!
–Lindsay–

Filed Under: Dessert, Snack

Take Time to Say Thanks

May 1, 2012 by Lindsay 95 Comments

Hi Friends-

As you guys know, this is mostly a food and fitness blog. I don’t write a whole lot of posts that are super deep, heavy or from the heart. In fact, it’s been about two months since my last one (What’s in a Jean Size?). But yesterday something happened that really tugged at my heart strings and it brought to mind something that I’ve found myself thinking about a lot lately- saying “thank you”.

ty

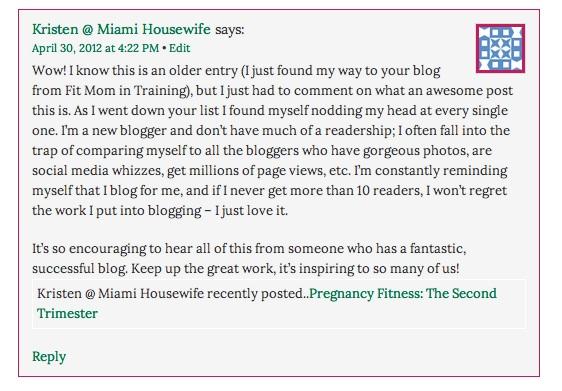
Let me back up. Yesterday, as most of you know, was Foodie Penpals Reveal Day. (ps…there’s still time to jump onboard for May!) After I got out of class yesterday, I was checking my email and a comment notification popped up on one of my posts from a few months ago. Remember back in January when I wrote this post called Things Blogging Has Taught Me?  A sweet woman named Kristen, who blogs over at Miami Housewife, found that post and left a comment. Here’s what she said:

comment

I read her comment several times because I was so touched by it. I’m always so happy to hear people say they can relate to my posts, and it made my day to hear that she liked my blog and found it inspiring. And after thinking about it the whole way home, all I really wanted to do was say thank you to her.

Thank you:

  • For reading my blog.
  • For taking the time to look around and read more than just one post.
  • For making an effort to tell me how much she liked my blog.

It means so much.

I’m just as guilty as anyone else of not saying thank you as often as I should. But I’m working on it. In fact, this post is probably a long time coming.

————————————————

I was raised to say please and thank you for everything and I was raised to write thank you notes all.the.time.

  • When someone gives you a present…write a thank you note.
  • When someone acts as your reference….write a thank you note.
  • When someone takes the time to help you….write a thank you note.

It’s something I got annoyed with my mom for making me do when I was younger, but it’s one of the things I appreciate most now that I’m an adult.  And it’s definitely something I plan to teach my children someday.
—————————————————————–

Because I think a lot of people truly underestimate the power of a simple “thank you”.

—————————————————————-

I get legitimate road rage when someone flies by me in the left lane and then cuts over into my lane at the last minute to get on the highway. But it’s amazing how much calmer I remain if that person waves “thank you” as they’re switching lanes.

I spend a lot of time working on Foodie Penpals and I don’t get paid a dime…but when someone replies to one of my emails and says “thank you” for organizing or thanks me for helping connect them with a new friend…every single second is totally worth it.

But, this post is not me digging for compliments or a thank you for anything i’ve done. This post was written as a reminder to all of you….to take the time to say thank you the next time one is deserved.

  • If someone sends you something awesome in the mail, SAY THANK YOU. Tell them how much you appreciated it.
  • If someone sits there and listens to you complain about something, whether it be important or trivial….say hey, thanks for listening.
  • If someone writes a blog post that inspires you to make a positive change, or motivates you to try harder…TELL THEM. Say thank you.
——————————————————————–

Because you never know how much it might mean to someone.

Or how much it may validate all the work they put into something.

Or how what a big smile it might bring to their face.

———————————————————————

So go out today and say thank you:

  • Call your family and say thanks for being there for me.
  • Leave a comment on your favorite blog, especially if you’ve never commented before, and say thanks for writing.
  • Leave an extra tip for your waiter/waitress and say thanks for a great meal.
  • Thank a member of the armed forces for their service to our country.
  • Thank someone you see doing a usually thankless job like collecting trash or cleaning the bathroom.
  • Send a note to a friend and say thanks for sticking by your side over the years.

Every single one of us has so much to be thankful for. So give thanks for it. And SAY THANKS FOR IT!

Trust me…it’ll be worth your while.

So this is me saying thank you to all of you.

  • To every single person who reads my blog- whether it’s one time, or every single day.
  • To everyone who has taken the time to tell me how much they appreciate and enjoy Foodie Penpals.
  • To all of my Fitfluential friends who motivate me every single day.
  • To anyone that has ever tried one of my recipes or workouts and told me how much they enjoyed it.
  • To my husband- for everything he does around the house.
  • To my family- for constantly reminding me how important I am, even when I’m far away.
  • To my entire support system- for everything you do every.single.day.
I know I don’t say it enough….but thank you.

–Lindsay–

Filed Under: Uncategorized

April Foodie Penpals Reveal Day

April 30, 2012 by Lindsay 47 Comments

Hi Friends!

Happy Monday. A few quick announcements before we get started! If you didn’t read The Bean over the weekend, you missed out on a couple of AWESOME posts, so I thought i’d just take a second to point them out to you.

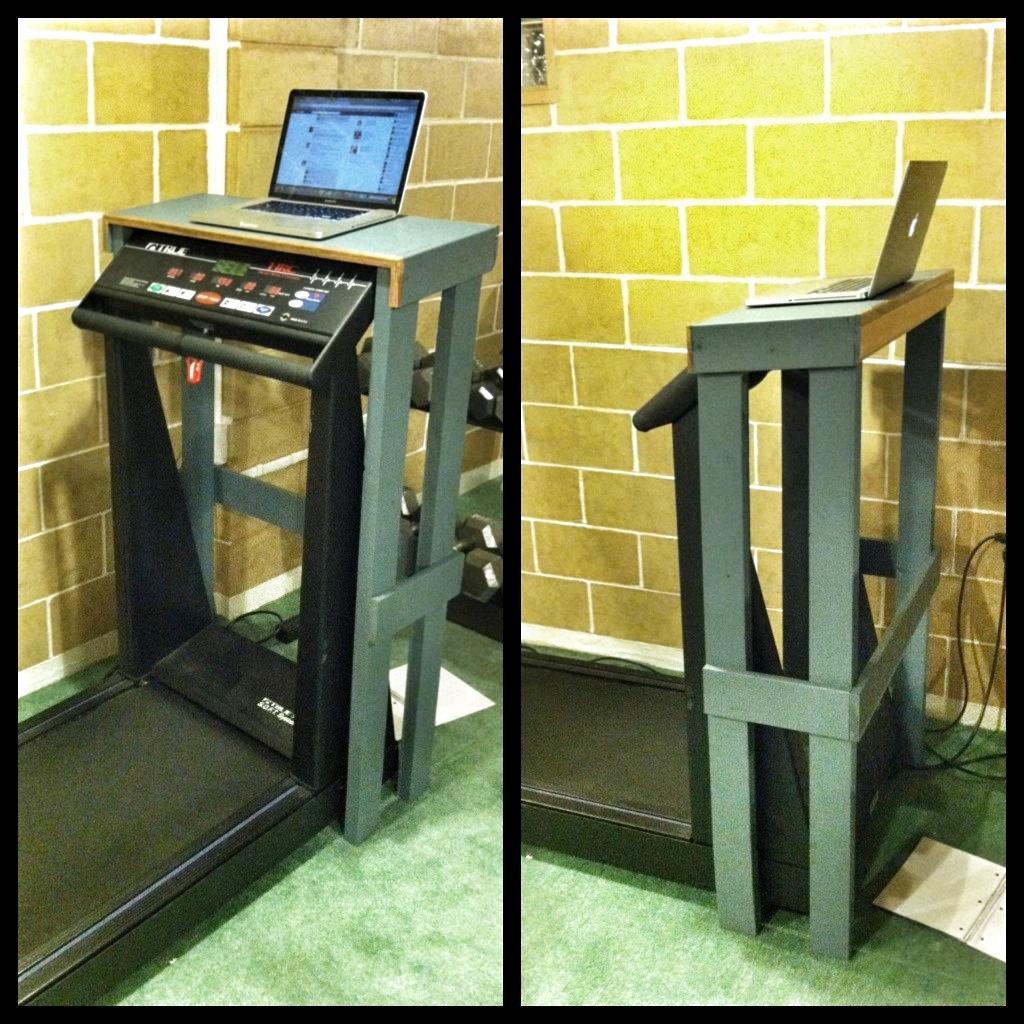
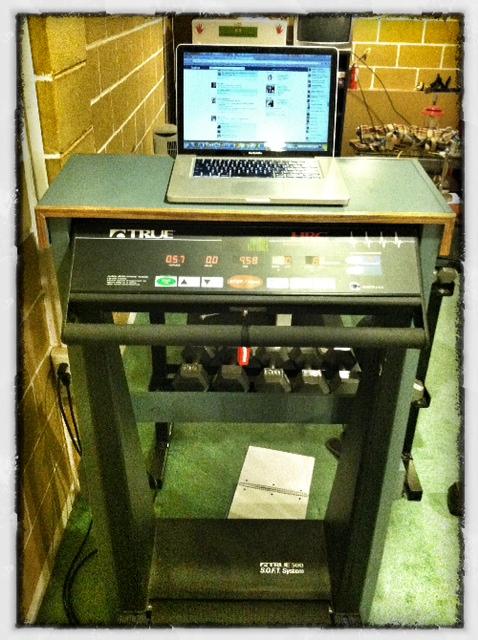
1. My hubby built me pretty much the best thing ever this weekend. It’s a stand that fits around my treadmill so that I can use my laptop while I’m walking. It’s seriously amazing. Definitely check it out…and then build one for yourself! Bonus- all the wood and paint we used was from leftover projects that have been done previously around the house so it’s totally green! CLICK HERE TO LEARN MORE ABOUT IT!

Snapseed 11


Ok, moving on…Can you believe it’s already time for another Foodie Penpals reveal day?

The Lean Green Bean
 
 
Time flies! This month I lucked out with another great penpal. Ashley from Freckles & Spice hooked me up with an awesome package. I love Ashley and am so excited that I actually get to meet her this weekend at Blend!!!
 
Let’s take a look at what she sent me:
 
fpp1
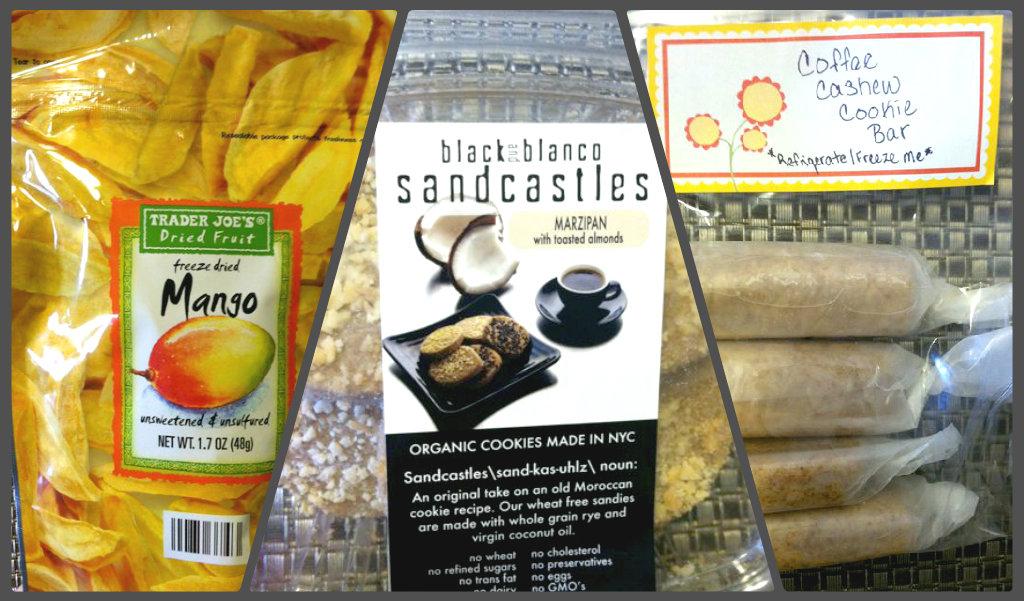
  • Freeze-dried mango, which I’d never tried before. Definitely making some tropical granola bars with that!
  • Some locally made cookies. I always say I don’t like coconut but I must be coming around slightly because I don’t mind coconut milk in my curry and I actually liked these cookies. I’m trying to save them so I’ve just been having a nibble here and there. They’re like fun little shortbread cookies, except better!
  • Homemade Coffee Cashew Cookie Bars! She posted the recipe on her blog (click here to see it!) and she kindly left the coconut out of mine. I was surprised how much I liked the coffee flavor in these. A delicious little treat!
fpp2
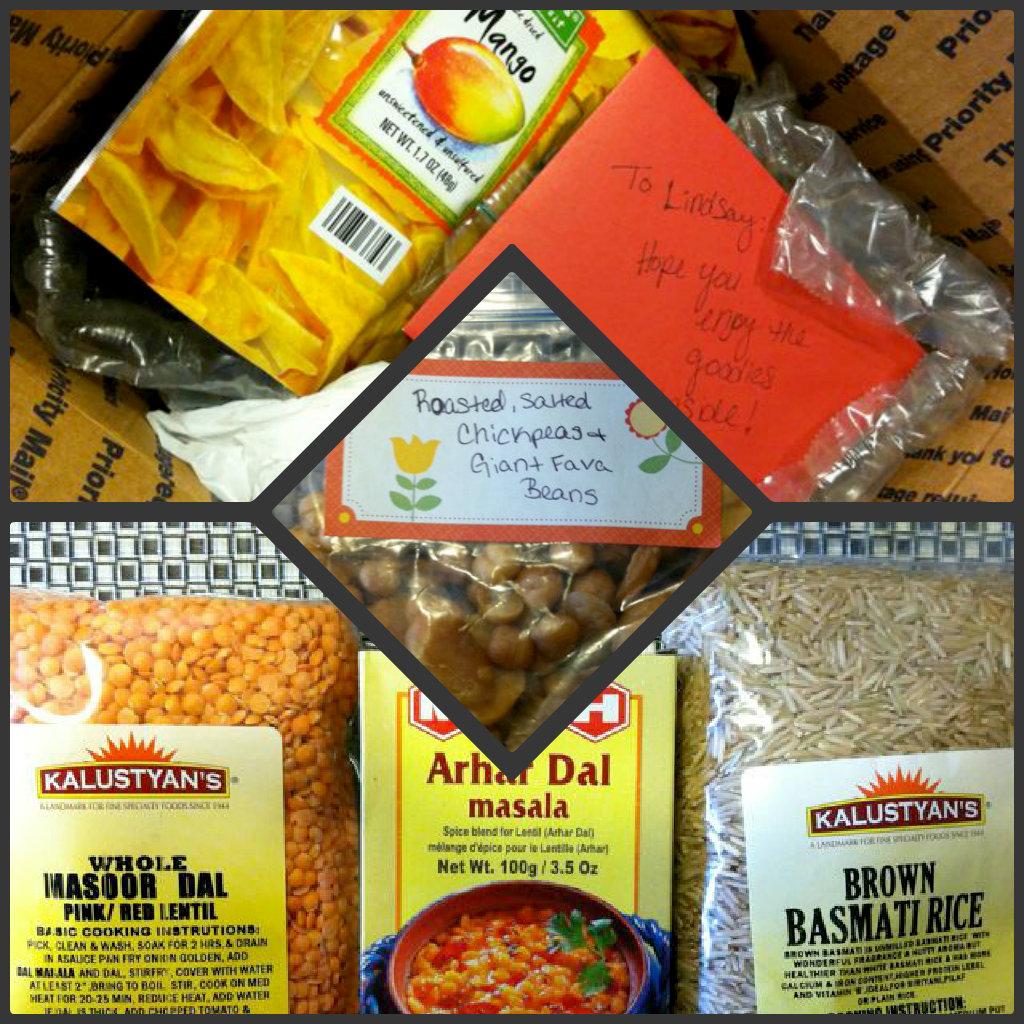
  • Roasted chickpeas and fava beans– another homemade treat! i LOVE roasted chickpeas and had no idea you could even roast fava beans. Very cool!
  • Red lentils– my favorite kind! How did she know?
  • Brown Basmati rice– we go through this stuff so fast in my house!
  • Indian spices– she knows we love Indian food and it was sweet that she sent us stuff to make our own at home- which we do about once a week 🙂
Thank you so much Ash!!!!
 
And now, in case you’re new and wondering what Foodie Penpals is all about:

Here’s a detailed explanation of the program:

-On the 5th of the month, you will receive your penpal pairing via email. It will be your responsibility to contact your penpal and get their mailing address and any other information you might need like allergies or dietary restrictions.

-You will have until the 15th of the month to put your box of goodies in the mail. On the last day of the month, you will post about the goodies you received from your penpal!

-The boxes are to be filled with fun foodie things, local food items or even homemade treats! The spending limit is $15. The box must also include something written. This can be anything from a note explaining what’s in the box, to a fun recipe…use your imagination!

-You are responsible for figuring out the best way to ship your items depending on their size and how fragile they are. (Don’t forget about flat rate boxes!)

-Foodie Penpals is open to blog readers as well as bloggers. If you’re a reader and you get paired with a blogger, you can choose to write a short guest post for your penpal to post on their blog about what you received. If two readers are paired together, neither needs to worry about writing a post for that month.

– Foodie Penpals is open to US, Canadian residents & UK residents.  Please note, Canadian Residents will be paired with other Canadians only. We’ve determined things might get too slow and backed up if we’re trying to send foods through customs across the border from US to Canada and vice versa. So, I’m going to keep two separate lists and match US w/ US and Canada w/ Canada!

***If you’re in Europe, please contact Carol Anne from This Is Rock Salt at [email protected] to get involved!

If you live in Asia or Australia and want to get involved, email me and I’ll see if we get enough interest.

–Lindsay–

Filed Under: Uncategorized

Treadmill Laptop Stand

April 29, 2012 by Lindsay 68 Comments

Hi Guys!

This weekend the hubby was busy with a fun little project I asked him to do for me.

I came up with the idea a few weeks ago, and I was so excited about it that I immediately asked him if he would build it for me. As you may recall, the hubby is quite handy. This was a pretty simple project and I knew he’d have no trouble with it.

Here’s the situation: I’ve walked at least 10,000 steps every single day since I got my FitBit on April 8th. However, on most days, almost all of my steps take place in the afternoon and evening. I’m just not very active in the morning. I’m always looking for ways to sneak in more steps, which is what sparked this idea in the first place.

Every morning, I leave the dogs in the bedroom with the hubby and I come down to eat my cereal. Then I sit down on the couch with the cat and check my email/read blogs/etc for a while. When hubby leaves for work, the dogs come down and join us on the couch. Next, I usually work on school work which means I sit on the couch some more…and before I know it, it’s lunchtime and I’ve barely walked at all.

IMG 3648

So I thought,  what if I could read blogs and check my email while I was on the treadmill? Sure, I could technically use my phone…but it’s small and my hand bounces around and quite frankly, I like using my computer…especially in the morning.

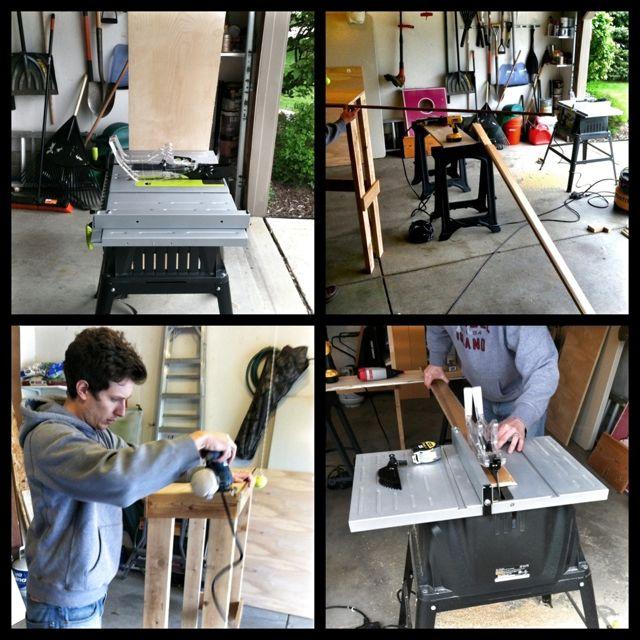
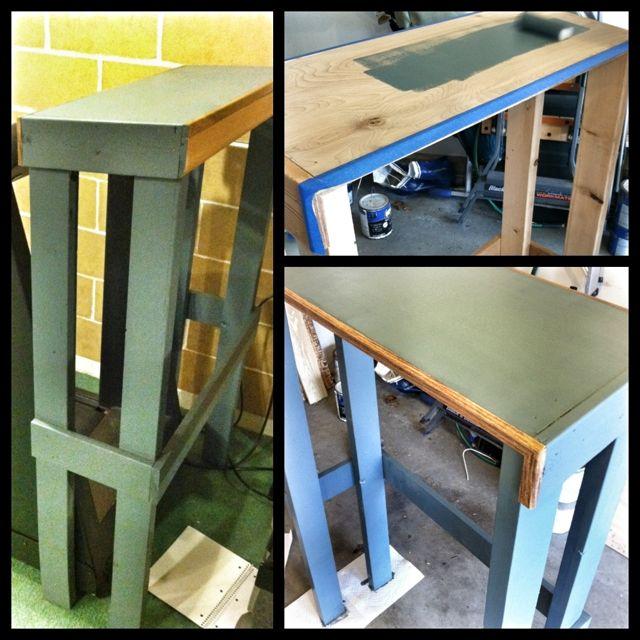
So I asked the hubby to build me some sort of stand that would fit around the treadmill that my computer could sit on. He agreed, because he is awesome…and this weekend he got to work. He spent all day in his workshop (the garage) using all his tools. :

IMG 3635

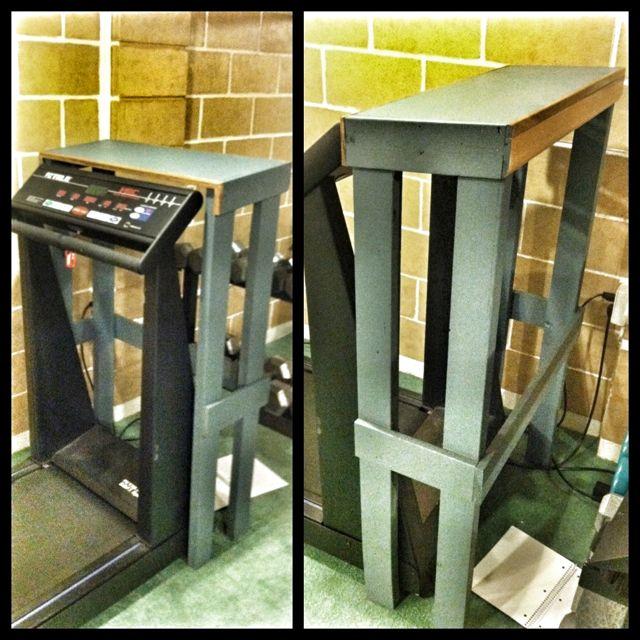
This project was totally green. All the wood he used was leftover from various other projects we’ve done around the house!!! Pretty cool, right?! Once he was done, we carried it downstairs to test it out.

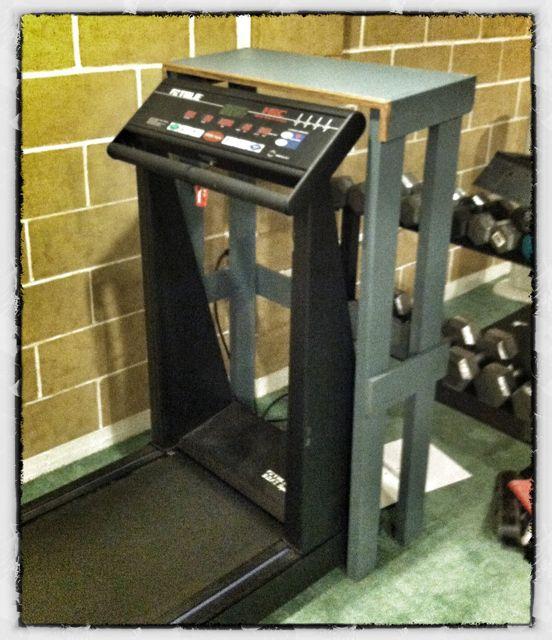
IMG 3633

It was perfect! He brought it back out to the garage and added a few more boards to make it more stable and some trim to fancy it up a bit (also leftover from a project). Then, we painted it using some sample paint we bought when we were trying to choose what color to paint our house a couple years ago.

IMG 3640

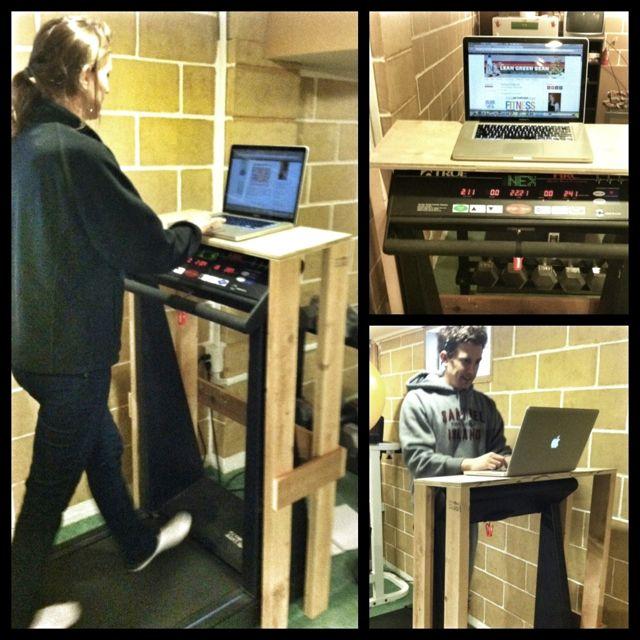
Isn’t it awesome?! Now I can grab my computer, head downstairs after breakfast in the morning and plod along while I get things done. Sure, I won’t be going very fast…but I’ll still be getting my steps in…and that’s better than sitting on the couch!

IMG 3641

I’m so completely in love with it! And with my hubby for making it for me 🙂

IMG 3642

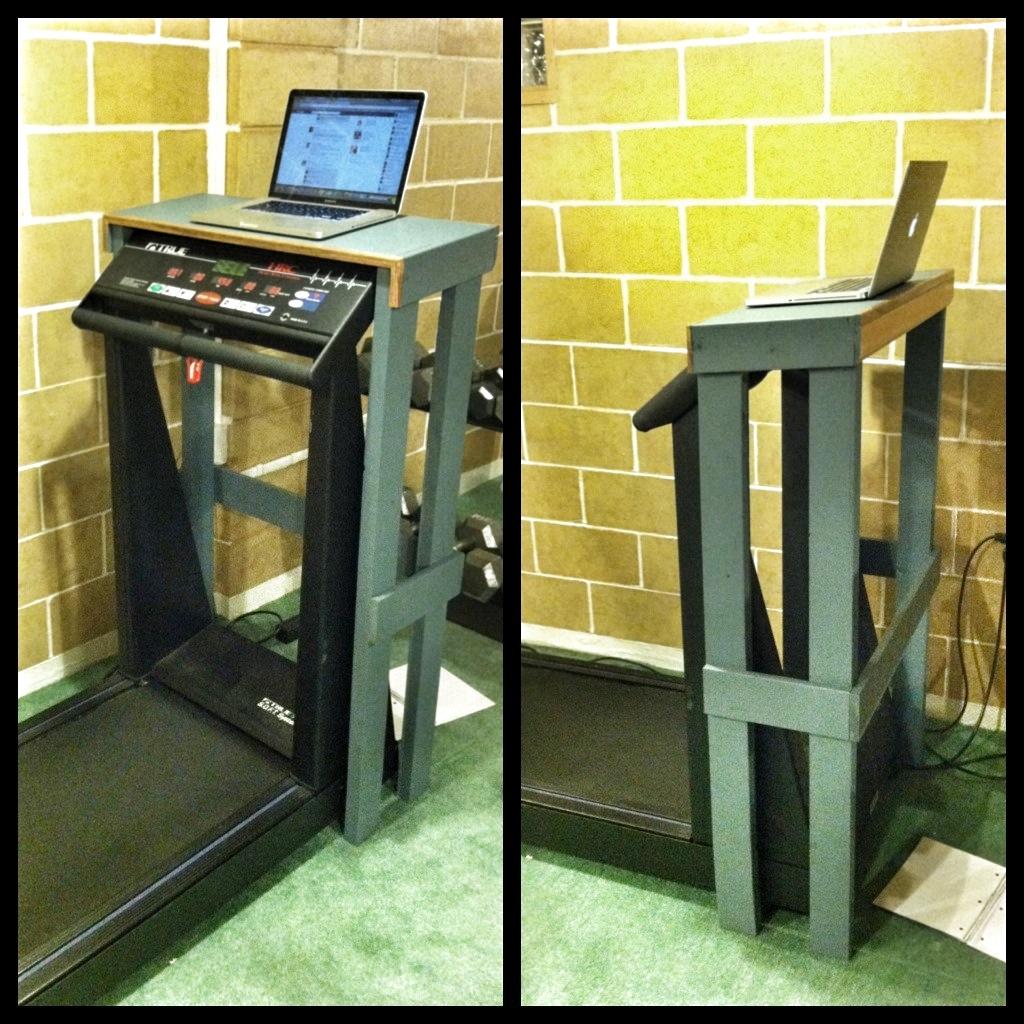
After the paint dried, we did a final test with the computer. And yes, I tested it out in my bare feet 🙂 Marcus also gave his seal of approval.

Snapseed

The finished product:

Snapseed 1

I’ve never been so excited to wake up and walk!

Snapseed 2

 If you’re impressed by the hubby’s handiwork, be sure to check out this post to see what he did to our master bathroom!

What do you do to sneak some extra steps into your day?

–Lindsay–

Filed Under: Workouts

Ginger Citrus Avocado Dressing

April 26, 2012 by Lindsay 57 Comments

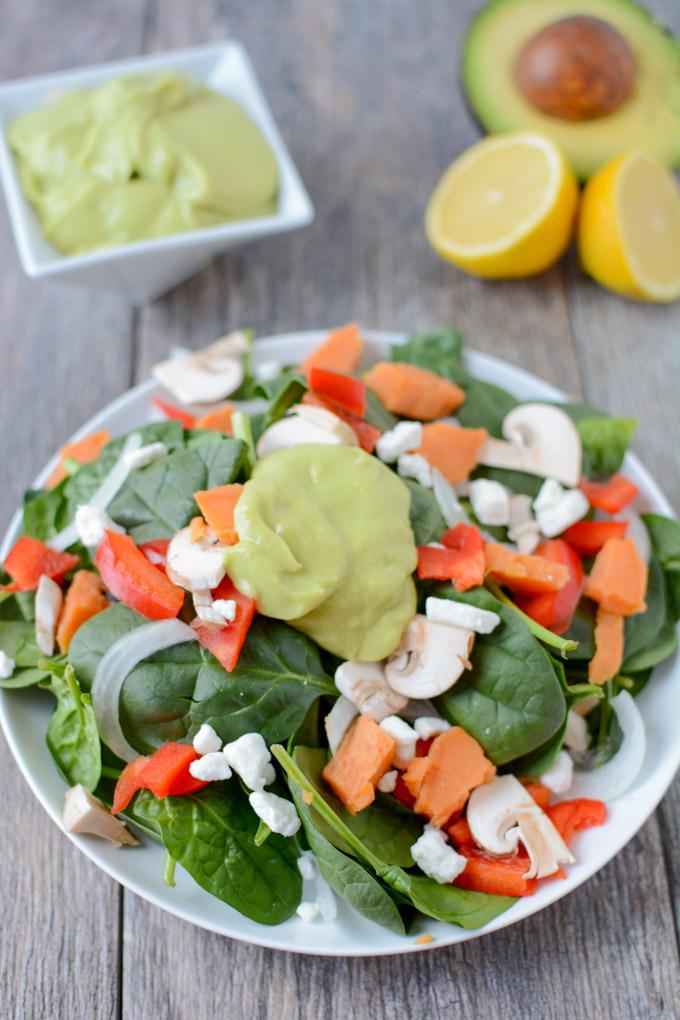
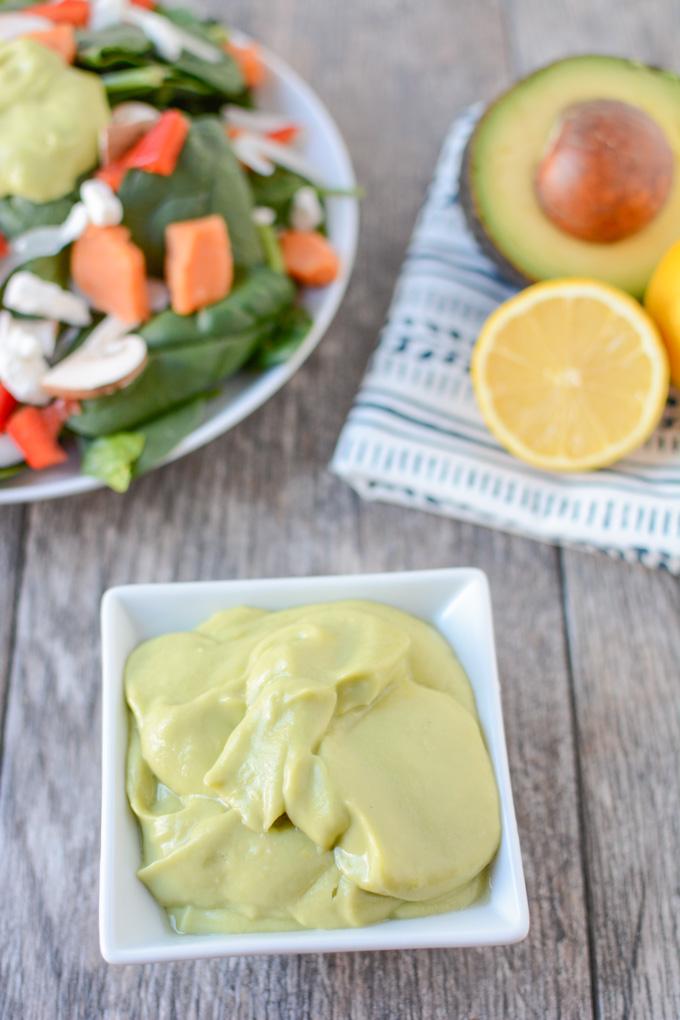
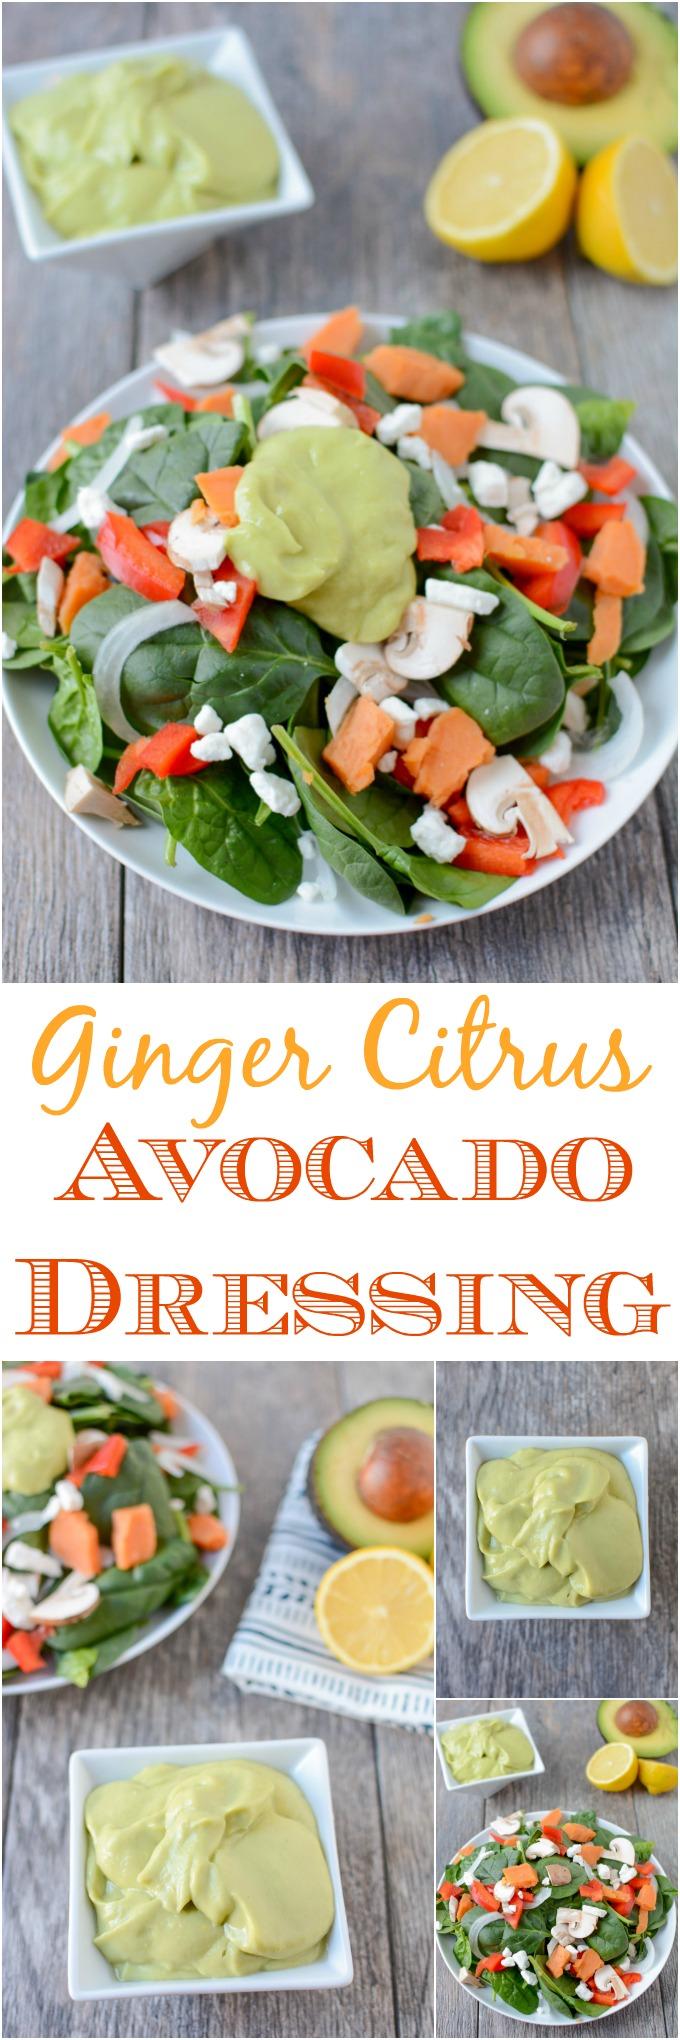
Thick, creamy and full of flavor, this Ginger Citrus Avocado Dressing recipe will take your salad to the next level. It’s gluten-free, vegan, paleo and ready in minutes!

Thick, creamy and full of flavor, this Ginger Citrus Avocado Dressing recipe will take your salad to the next level. It's gluten-free, vegan, paleo and ready in minutes!

**Post and photos updated 1/14/16**

Hi Friends!

There are days when you feel like getting a little fancy and cooking a nice warm dinner and there are days when you just don’t have the energy to anything but pull some leftovers from the fridge, chop them up and throw them over a big bowl of greens and call it a night. Am I right?!

The good news is, there’s nothing wrong with salad for dinner. In fact, it’s one of my favorite ways to clean out the fridge! The problem often lies in the dressing. Store-boughtt dressing, while convenient, isn’t always the healthiest choice. They’re often loaded with weird ingredients, added sugars, etc.

Thick, creamy and full of flavor, this Ginger Citrus Avocado Dressing recipe will take your salad to the next level. It's gluten-free, vegan, paleo and ready in minutes!

But, as we all know, a good dressing can really take your salad to the next level! So that’s why it’s good to have a few recipes like this in your back pocket! Dressing recipes that you can whip up in about 60 seconds that are made with simple ingredients and packed with flavor.

This one is for all of you avocado lovers. It’s perfect for adding some healthy fats to your meal and a great way to use up ripe avocados if you’re not in the mood for homemade guac! It’s super thick and creamy- without any cream- which makes it great for coating every bite of salad! However, if you prever a thinner, more pourable dressing, you can just add a little extra liquid!


This Ginger Citrus Avocado Dressing is full of flavor and healthy fats! The perfect addition to your lunch salad!

Original photo

Ready to whip up a batch of your own? Here’s how you make it:

Print

Ginger Citrus Avocado Dressing

Ginger Citrus Avocado Dressing 2
Print Recipe

5 Stars 4 Stars 3 Stars 2 Stars 1 Star

No reviews

Thick, creamy & flavorful, this Ginger Citrus Avocado Dressing will take your salad to the next level. It’s gluten-free, vegan, paleo & ready in minutes!

  • Prep Time: 2 minutes
  • Total Time: 2 minutes

Ingredients

Scale
  • 1 large or 2 small avocados
  • 1/2 cup orange juice
  • juice and zest from 1 lemon
  • 1 – 2 tsp freshly grated ginger
  • 1/2 tsp cayenne pepper, optional
  • splash of maple syrup or honey for sweetness, optional

Instructions

  1. Combine first 5 ingredients in a blender or food processor and process until smooth.
  2. Taste and add sweetener if desired.
  3. For a thinner dressing, add additional citrus juice or water until desired consistency is reached.

Did you make this recipe?

Tag @theleangreenbean on Instagram

Like I mentioned, you can adjust the sweet or spicy factor by adding cayenne pepper or a splash of sweetener if desired. I like mine with extra cayenne and no sweetener 🙂

Thick, creamy & flavorful, this Ginger Citrus Avocado Dressing recipe will take your salad to the next level. It's gluten-free, vegan, paleo & ready in minutes!

[Tweet “This Ginger Citrus Avocado Dressing from @leangrnbeanblog is great on any salad!”]

Enjoy!
–Lindsay–
Filed Under: Dinner, Lunch, Soup & Salad Tagged With: Avocado

Salmon & Goat Cheese Puffs

April 24, 2012 by Lindsay 29 Comments

Hi Friends!

Today I’ve got some nice little puffs of deliciousness to share with you! These would make a great party appetizer. They’re super easy to make and come together in a flash, especially if you use leftover salmon so it’s already cooked! But even if you have to cook the salmon, they still don’t take long…
I made these over lunch 🙂

salmon5

These only require a few ingredients. You could add some roasted red peppers if you want to but I didn’t have any on hand and was too lazy to roast one! These could also be made with wonton wrappers, but I like the cresecent roll dough because it stretches more and it’s easier to fit everything inside if you accidentally scoop too much.

Salmon & Goat Cheese Puffs


by Lindsay L

Prep Time: 15 min

Cook Time: 12 min

Keywords: bake appetizer side vegetarian goat cheese salmon spinach

6022825


Ingredients (12 puffs)

  • 5 oz salmon, cooked
  • 5 oz goat cheese, softened
  • 1/4 c spinach, cooked
  • 1/2 c artichokes, chopped (optional)
  • 1/2 tsp paprika
  • 1/2 tsp cayenne pepper
  • 1 tube crescent roll dough (preferably seamless)

Instructions

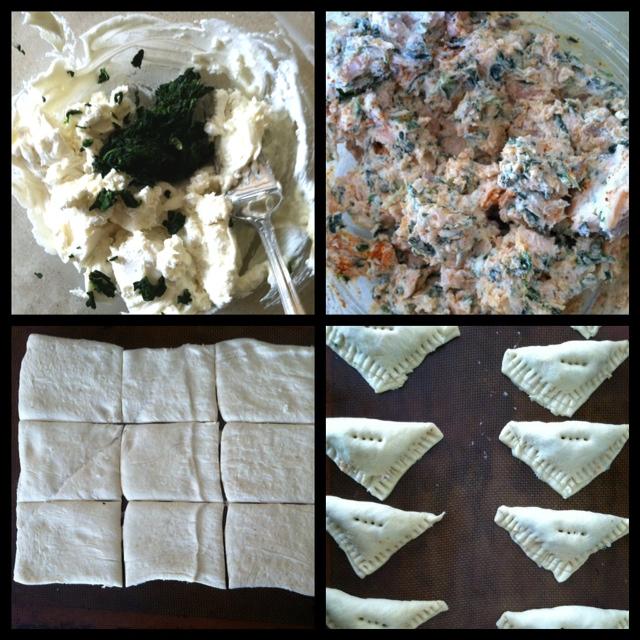
1. In a small bowl, mix the goat cheese and spinach together.
2. Add the salmon and artichokes (if using) and mix well.
3. Stir in the spices.
4. Unroll the dough, pressing the seams together if necessary.
5. Cut the dough into 12 squares.
6. Scoop a small spoonful of the salmon mixture into each square.
7. Fold one corner over making a triangle.
8. Use a fork to press the edges together and poke a hole in the top.
9. Bake at 375 degrees for 12 minutes, or until golden brown.

Powered by Recipage


It really couldn’t get much easier:

Diptic 9

salmon1

Enjoy! I’m off to plan a get-together so I can make these again.
What’s your favorite party appetizer?
–Lindsay–

Filed Under: Appetizer

Recipe Remix: Gluten-Free Zucchini Carrot Apple Bars

April 23, 2012 by Lindsay 30 Comments

Hi Friends-

Happy Monday. It’s been a while since I did a recipe remix so I thought it was about time. Last September, I posted these Zucchini Carrot Apple Muffins. I’m not exaggerating when I say that these the best muffins I’ve ever made. I love a good banana muffin, but these muffins are a bit unique, packed with flavor, and healthy!

13

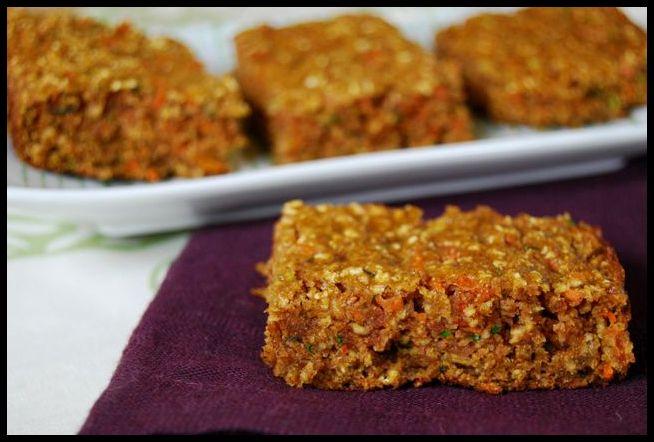
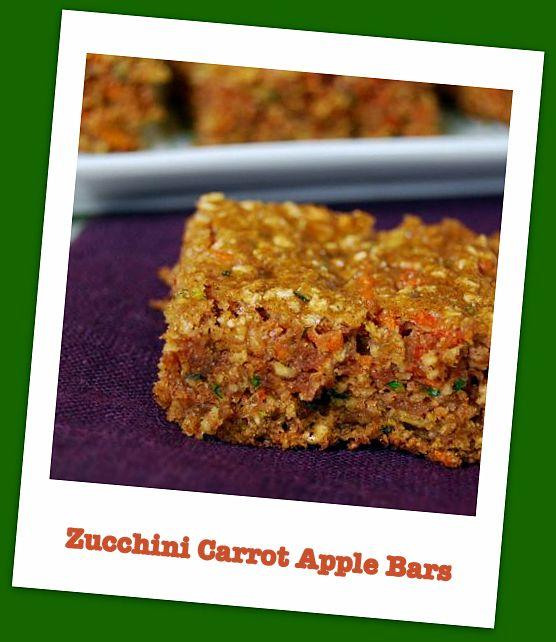
I had plans to make them again when I got the idea to change them up a bit. With some very minor changes, I made them gluten-free and they can EASILY be made vegan with a flax egg. I also decided to make them in bar form just to change things up a bit.

I shredded, mixed, spread and baked…and crossed my fingers they would turn out well!

And they did. The gluten-free version has a bit of a grainer texture because of the oat flour, but the taste is still delicious!

Here’s the original recipe:

Zucchini Carrot Apple Muffins

by Lindsay L

Prep Time: 10 min

Cook Time: 25 min

Keywords: bake muffins breakfast snack healthy vegetarian apple zucchini fall summer

6012608


Ingredients (12 muffins)

  • 2 c white whole wheat flour
  • 1 medium zucchini
  • 1 large handful of baby carrots (approx. 10-15)
  • 1 medium apple, cored and quartered
  • 1 egg
  • 1/3 c sugar
  • ¼ c honey
  • 1 tsp vanilla
  • 1/3 c unsweetened applesauce
  • 2 Tbsp vegetable/canola oil
  • 1 ½ tsp baking soda
  • 1 tsp cinnamon
  • ½ tsp ground ginger

Instructions

1. Preheat oven to 350 F. Grease or line muffin tins.

2. Grate zucchini, apple and carrots (or use a food processor). Place in a towel and wring out the excess water. You should have just over 2 cups shredded fruits and veggies.

3. In a medium-sized bowl, combine the egg, vanilla, sugar, honey, applesauce, oil and grated fruits and veggies.

4. Stir in the flour, cinnamon, ginger and baking soda until just combine.

5. Scoop into muffin tins and bake for 25 minutes or until a toothpick is inserted and comes out clean.

Powered by Recipage


Here are the changes I made:

– I used 1 cup chickpea flour and 1 cup oat flour instead of the whole wheat flour.
– I used brown rice syrup instead of honey
– I used 2 large carrots (peeled) instead of baby carrots
– I spread the batter in a greased 9×13 pan instead using muffin tins.

Like I said, to make these vegan, just use a flax egg  instead of the regular egg. If you want thicker bars, use a smaller pan.

2

I have a slight preference for the muffin version, but both taste great!

zuccbars

Enjoy!

–Lindsay–
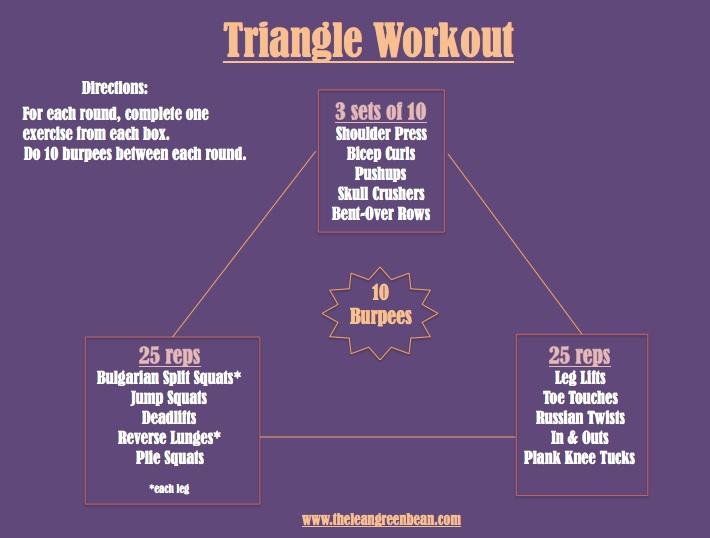
Filed Under: Baking, Breakfast, Snack Tagged With: Apple

April Photo-A-Day: Part 1

April 21, 2012 by Lindsay 13 Comments

Hi Friends!

I’m sure a lot of you have seen these #photoaday challenges floating around. I’ve tried multiple times to participate but I always fall off the wagon after about 4 days. Well, not this time! I’m rockin’ the month of April so today I thought I’d share my pictures from the first half of the month!

Here are the prompts:

photo 3

Ready?

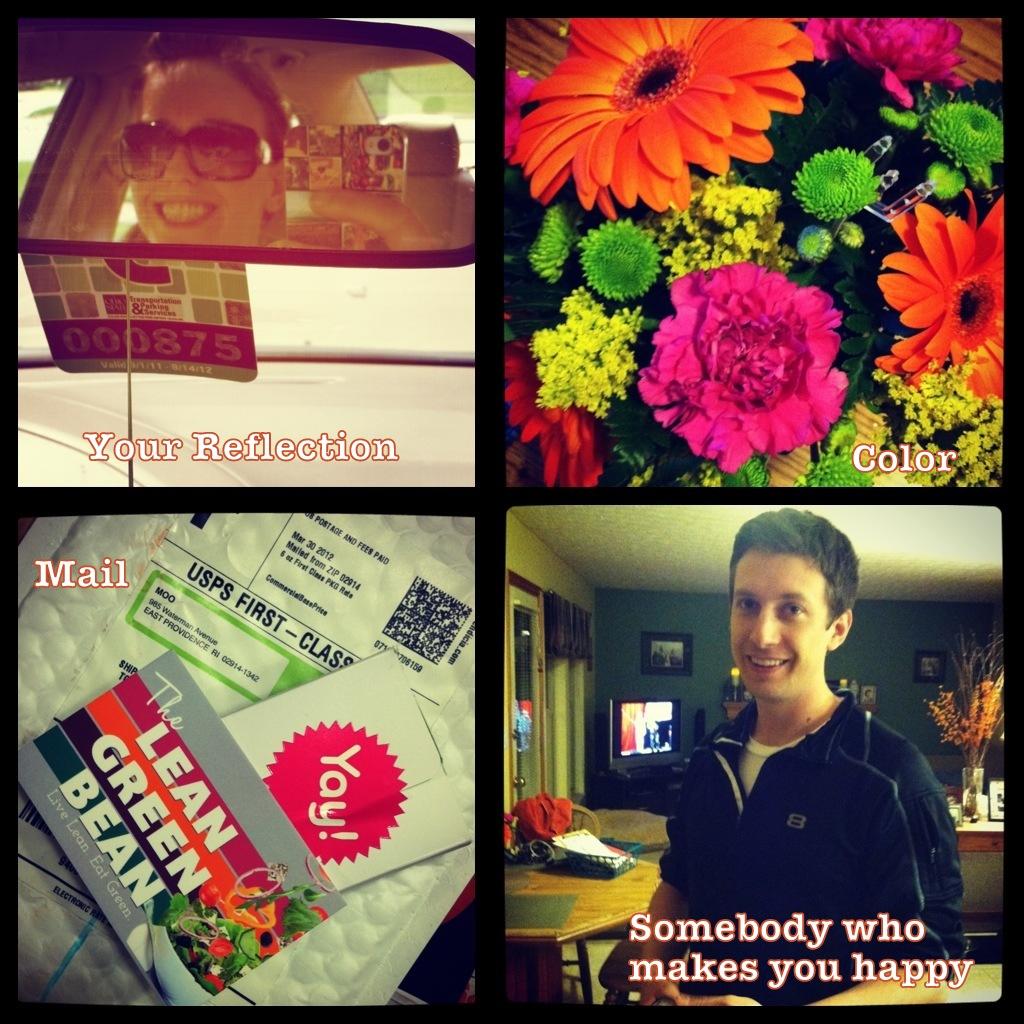
aday1

Of note- on the 4th, hubby had just gotten back from a business trip-
so I was extra happy to see him day 🙂

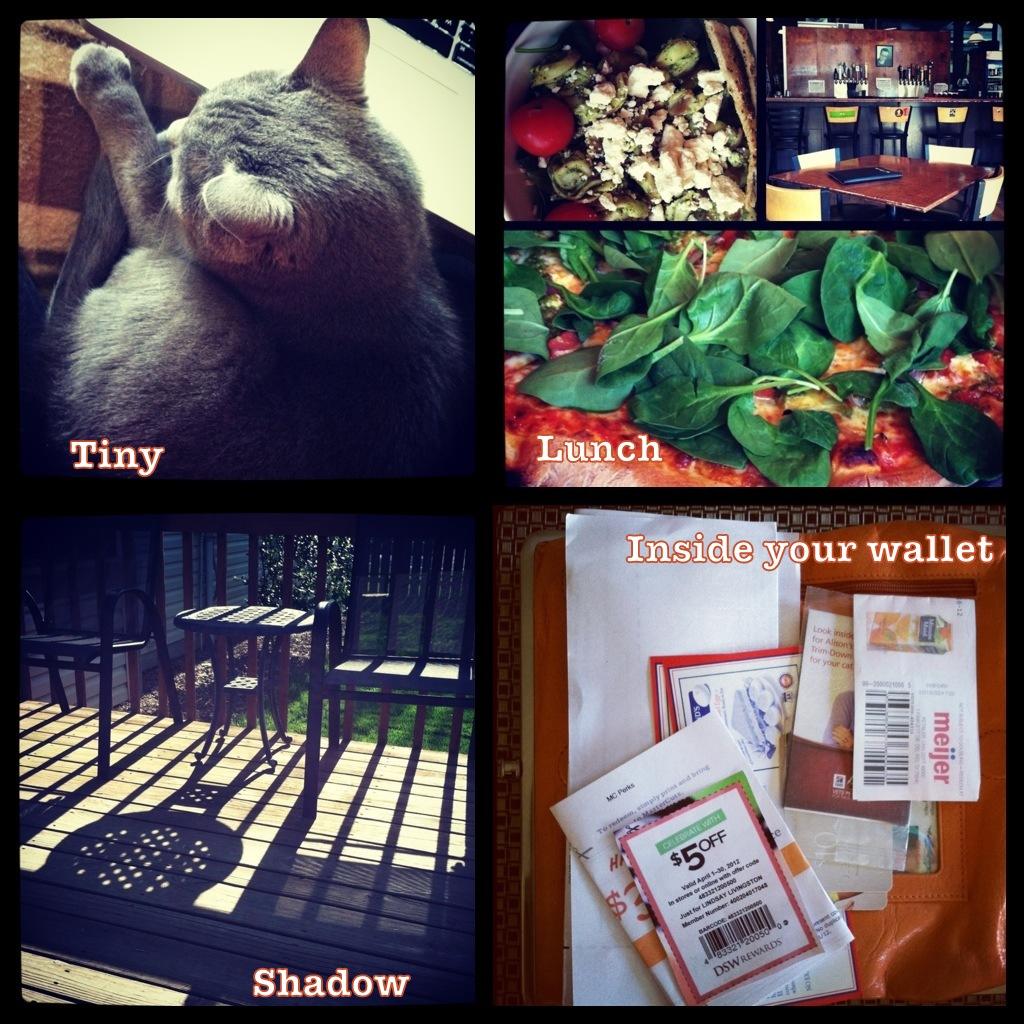
aday2

Of note- on the 5th, I kept finding my smallest cat curled up in a tiny ball

aday3

Of note- The 9th was my mom’s birthday!

aday4

Of note- hubby found craft beer in cans and his mind was blown!
Those sunset pics were randomly collected from twitter-
it was super cloudy at my house that day.

Have you ever done a photo-a-day challenge?

–Lindsay–

Filed Under: Uncategorized

Sweet & Spicy Roasted Chickpeas

April 19, 2012 by Lindsay 65 Comments

These sweet and spicy chickpeas are a delicious and quick snack, and you can adjust the ingredients to your own flavor preferences!

Hi Friends-

Not a whole lot going on over here today. Just popping in to share a fun little snack recipe with you!

Roasted chickpeas are one of my favorite snacks. I usually make a double batch to munch on during the week. I also add them to my trail mixes. If you haven’t tried them yet, you’re missing out.

Usually I just make them with a little oil and some paprika. But…after devouring an entire package of those sweet and spicy pecans from Trader Joes’s that I mentioned yesterday, I’ve been craving that combo.

My original plan was to try to recreate the pecans….but if you’re not lucky enough to live in Texas, or somewhere that they have pecan trees…those lovely little nuts cost a pretty penny. SO, I decided to start with a more budget friendly option and go from there 🙂

This was my first attempt, and although they aren’t exactly like the pecans…they’re pretty darn good. You taste the sweet first, and then they leave a nice spicy aftertaste. I love them.

These Sweet and Spicy Roasted Chickpeas make a delicious and healthy snack!
The best part is you only need five ingredients!

Print

Sweet & Spicy Roasted Chickpeas

Want to know the secret to perfectly roasted chickpeas? Click to find out how to make them yourself!
Print Recipe

5 Stars 4 Stars 3 Stars 2 Stars 1 Star

5 from 1 review

These sweet and spicy chickpeas are a delicious and quick snack, and you can adjust the ingredients to your own flavor preferences!

  • Author: Lindsay Livingston
  • Prep Time: 5
  • Cook Time: 40
  • Total Time: 45 minutes

Ingredients

Scale
  • 1 can chickpeas, drained and rinsed
  • 1 tsp canola oil
  • 2 tsp brown sugar
  • 1/2 tsp paprika
  • 1/2 tsp cayenne pepper

Instructions

1. Place the chickpeas in a tupperware container.

2. Add the oil and shake well to coat.

3. Add the sugar and spices and shake well.

4. Spread on a baking sheet (with edges) and bake at 375 degrees for 40-45 minutes, stirring every 15 minutes.

Did you make this recipe?

Tag @theleangreenbean on Instagram

Doesn’t get any easier than that my friends.

pea3

Play around with the ingredient amounts. I’ll probably use a little less sugar last time and kick up the spice a tiny bit. But that’s just me 🙂

These Sweet and Spicy Roasted Chickpeas make a delicious and healthy snack!


These Sweet and Spicy Roasted Chickpeas make a delicious and healthy snack!

Do you make roasted chickpeas? What’s your favorite flavor combo?

Enjoy!
–Lindsay–
 

Filed Under: Snack

Birthday Weekend

April 16, 2012 by Lindsay 55 Comments

Hi Friends!

As most of you guys know, yesterday was my birthday. Thank you SO much to everyone who tweeted and facebooked birthday wishes my way!  I spent the whole day feeling very loved 🙂 I feel like there are two camps when it comes to birthdays. Those who love them, and those who just treat them like any other day.

I’m definitely in the those who love them camp. I LOVE birthdays! When I was younger, we had the birthday fairy in our house. She visited the night before our birthday and decorated our room with balloons and streamers so our rooms were fun and festive when we woke up on our birthday morning! I looked forward to it every year!

Luckily for me, I have a husband who indulges me and treats me like a princess every year on my birthday 🙂

Since my birthday was on a Sunday this year, we spent the whole weekend celebrating! Friday afternoon I got a pedicure (my first of the year!) to kick off the weekend. Then I came home and ran 4 miles while I waited for the hubby.

IMG 3179
Hubby came home and surprised me with some flowers and some delicious treats from Trader Joes! We enjoyed a few beers on the deck and then headed out to our favorite Thai place for dinner. And then we stopped for some fro-yo for dessert 🙂

IMG 3190
Saturday morning we woke up bright and early to do yardwork! We got 2 cubic yards of topsoil delivered on Friday night and this year we finally decided to buy a wheel barrow instead of dragging the dirt around to the backyard on tarps. However, the wheel barrow didn’t fit in our car. SO, I walked it home 🙂 We only live half a mile from Home Depot so it didn’t take long. I’m sure I was quite a sight 🙂

IMG 3213

We just got a new mailbox so this weekend we made a little bed around it so we can plant some flowers. We also turned the garden and added some dirt to get it ready for planting. Finally, we expanded one of our back flower beds to add a new bush and did some leveling in one of our other beds!

IMG 3203

IMG 3204

Oh, and did I mention that all of this took us about 5 hours, it was only 50 degrees and it rained almost the whole time?

IMG 3212

Saturday night we headed out to dinner with my in-laws. Good food, good times 🙂

us

IMG 3238

Aren’t we lovely?! 🙂

IMG 3260

Sunday was the best day! This is what I saw when I woke up, lol 🙂

IMG 3266

Hubby served me breakfast in bed. It started with coffee:

IMG 3269

Is he the best or what?! Look at this amazing breakfast!!

IMG 3273

French toast made from a pretzel roll, scrambled eggs with leftover mexican couscous, a honeycrisp apple, Chobani and LGF granola, and a little bowl of Kix!

The boys watched me carefully the whole time!

IMG 3279

After breakfast we headed out for a bike ride. We covered about 11.5 miles on a beautiful but WINDY morning!

IMG 3281

He gave me my present- planter boxes for the deck so I can grow my herbs in them this year!

IMG 3284

The we headed out to do some shopping at my favorite stores!

IMG 3285

We bought a random assortment of things including a new rug, a new dog doy, a planter, a new dress, a clutch, some cutting boards….

IMG 3287

and this beauty…

IMG 3295

LOVE IT 🙂

Next we headed to World Market to spend my $10 bday coupon:

IMG 3290

IMG 3294

Afterwards the hubby treated me to an afternoon beer and snack!

IMG 3292

We stopped by the grocery store to pick up some things for dinner:

Crab cakes that are so packed with crab that they don’t like to stay together….but taste delicious!

IMG 3297

And hubby made me pan-seared scallops and roasted asparagus:

IMG 3305

All in all, a pretty darn good birthday if you ask me 🙂

IMG 3304

How was your weekend?

–Lindsay–


Filed Under: Uncategorized

Should I Get a Fitbit?

April 13, 2012 by Lindsay 66 Comments

Hi Friends!

Should I get a Fitbit? That’s the question I’d been asking myself FOREVER! I knew lots of people that had them and talked about how amazing they were…but really, I just didn’t want to spend the money- they are $99.

12

When my mom asked me what I wanted for my birthday, I bit the bullet and asked for one! Ask and you shall receive. My brand new Fitbut Ultra showed up last Friday and since then I’ve fallen in LOVE!

In fact, you might go so far as to say I’m obsessed. Just as the hubby. In fact, hubby- you should stop reading this post right now. It’s all about the Fitbit and I know you don’t care how many steps I’ve taken 🙂

I thought I’d use today to share a little bit about the Fitbit with you guys in case you’re on the fence about getting one like I was. We’re skipping Fitness Friday one more time because I’m still finishing up my antibiotics for my sinus infection and after running three miles one day earlier this week and feeling like I was going to puke the whole time, I decided to focus my efforts on walking until those pills are gone.

So, I got my present in the mail Friday afternoon. I charged it up Friday night and was off to the races on Saturday when I used it for the first time.

The fitbit is small. It’s about the size of a USB drive. During the day I usually wear it clipped onto my tanktop…or the waistband of my pants.

photo 209

It’s a simple device. It only has one button. You press the button once to light up the display and the first thing it shows you is your steps so far that day. If you press the button again, it moves to miles, then calories, vertical flights, a flower that grows based on how active you are, and the time.  I know the pics are blurry but it doesn’t stay lit very long!

photo 208

When you go to bed, you clip the fitbit to a wristband that it comes with. It’s super soft and closes with velcro so you can adjust it to fit your wrist.

photo 207

When you’re ready to go to sleep, you hold down the button until a timer starts. When you wake up, you do the same thing and the time stops. The fitbit tracks your sleep during the time when the timer is on.

The fitbit syncs wirelessly when you’re within 15 feet of your computer, as long as you have the dock plugged into the usb port. This is what the charging dock looks like. I just leave mine plugged into the computer all the time and then every time I go near it, it syncs.

photo 210

This is also what you use to charge the fitbit, but please note I’ve been using this continuously since Saturday, have not charged it yet and am still at medium battery!

To view all the info your fitbit collects, you visit your online dashboard at fitbit.com. All your info is automatically loaded there. You can see how many steps you walked on a particular day, floors climbed, miles traveled, calories burned and your active score.

The first day I wore it (Saturday), I didn’t do anything extra. It was just a day of running errands with the hubby. I didn’t go to work, I didn’t work out, I didn’t put in any extra effort and I only walked 5,800 steps.

sat

Sunday, I decided I wanted to get at least 10,000 steps for the rest of the week. I went to work and even though it was a super slow day, I was shocked to see that I walked almost 6,500 steps while I was at work!

sun

On Monday, I didn’t work, but I walked to class and took the dogs for a long walk, did a tabata workout and did a bunch of stuff around the house.

mon

Tuesday was by far my most active day. I went to work- it was busy so I walked about 7,500 steps there, plus I ran/walked 3 miles when I got home. I hit 15,000 steps!

tues

For each day, you can scroll down even further and see charts and graphs about your activity level throughout the day. You can see calories burned:

tues1

You can see that when I was at work from 4-7 my activity level increased to fairly active, and then that I was very active while doing my three mile workout later that night. You can also see how imbalanced my days are. I tend to be not very active in the mornings when I’m blogging and working on schoolwork and then cram a lot of activity into the second half of the day.

And you can also switch from calories to steps/floors/active score and watch the graph change. The graph below shows steps:

tues2

Finally, you can see how you slept the night before. When you start the timer, it tracks how long it takes you to fall asleep- or basically stop moving. It keeps track of how many times you wake up, etc. As you can see, I wake up every night between 3 and 4 to feed the dogs. It’s weird, I know…but it’s just easier for me to do it then, then to try to fight them off until a more “normal” time. It also tells you your sleep efficiency. My score is always pretty high, which surprised me.

tues3

One thing I did notice is that since the fitbit isn’t really hooked up to you and officially monitoring your sleep, more your movement, one night it thought I was asleep when really I was just lying in bed reading. So, after that I decided to not start the timer until I actually turn out the light and lay down to go to sleep.

Wednesday was another fairly active day. I didn’t want to run, but I took the dogs on a two mile walk and then walked two miles on the treadmill.

wed

This was a more typical night of how often I wake up throughout the night.

wed3

The fitbit also has a lot of other features that I’m not using yet. You can track your food and water intake, your weight, your blood pressure and glucose if you monitor those and you can write journal entries about how you’re feeling each day.

food

I don’t track my food so I haven’t really done much with this, but if you do, and you use apps like My Fitness Pal, you can synch those with your fitbit so they all work together using apps. You can also use apps like EarnedIt where you get points for your activity levels and you can redeem those points for prizes.

apps

You can also use apps to sync with your Nike+ workouts, set up alerts to get emails or texts when your fitbit battery is getting low or do more analysis of your sleep patterns:

app2

There’s also a fitbit app for your phone that you can use to track your water intake throughout the day. It shows your steps and all that info, but just like the webpage, it only updates when you’re within 15 feet of the docking station.

Finally, you can always see your overall achievements, like your Lifetime steps, stairs, etc…as well as your best days for each. You earn badges for getting certain achievements and you can connect with other friends who have a fitbit. As you can see, I have no friends 🙁 Lol, but I haven’t actually looked for anyone yet! If you have a fitbit, find me!

achieve

There’s even a community section where you can join groups for support or just read the forums:

comm

So there you have it. More than you probably ever wanted to know about the Fitbit.

I have to tell you guys, this little thing is making me do crazy things…like running in place in the basement, walked around while tweeting or reading my book, taking the long way to walk to class and leaving my laundry basket farther away from my dresser when I put my clothes away, just so I can get extra steps!!!

I LOVE the challenge of trying to get a certain number of steps each day and it’s definitely motivating me to move more.

If you’ve been thinking about trying to be more active, I’d definitely recommend a pedometer. It doesn’t even have to be as fancy as a Fitbit. Just get something that can track your steps. It can be a super motivating way to kick your butt in gear when you look down at 2pm and see you’ve only walked 1,000 steps for the day!

Do you wear a pedometer?

–Lindsay–

PS. I was not asked to write this review. I was not compensated for this review.  Fitbit has no idea who I am. My mom bought this fitbit for the full retail price. All thoughts and opinons are my own. I just wanted to share this cool little gadget with you guys!

Filed Under: Uncategorized

Mexican Couscous- Three Ways

April 12, 2012 by Lindsay 29 Comments

Hi Guys!

If you visited my post yesterday about How To Eat Healthy During the Week, you know that I promised to tell you about the big batch of Mexican couscous I made over the weekend.

One of my favorite ways to make meals easier is to make a base, like this mexican couscous, that can be used in a variety of different ways. Do some experimenting and find some combos that work with your tastebuds. These bases are totally customizable.

Here’s what you need:
-a grain (rice, couscous, quinoa, farro, etc)
-a protein source (meat, beans, lentils, etc)
-vegetables (any combination you happen to have on hand)
-optional: a fresh herb that goes with your base’s theme (cilantro, parsley, etc)

Here’s what I used for my Mexican Couscous base:

-1 cup pearl couscous, uncooked
-1.5 cups black beans
-1/2 cup corn
-1 cup diced red pepper
-1 cup diced tomato
-2 Tbsp fresh cilantro

Directions:
1. Cook the couscous according to package directions.
2. Combine with remaining ingredients in a large container and store in the fridge.

IMG 30521

The key is to not add too many spices right now. This is just a base. When you decide how you want to use a portion of it, that’s when you customize it to that specific dish.

Here’s how I used mine:

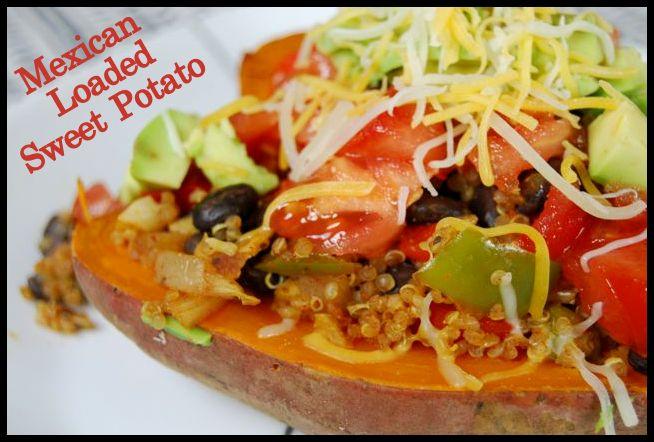
#1- Sunday Night Dinner: Loaded Sweet Potatoes

I work Sunday nights so I’m always looking for a quick easy dinner when I get home. Loaded sweet potatoes are a staple in our house.

To make these:
1. Prick 2 sweet potatoes with a fork all over and microwave for 5-6 minutes, flipping once.
2. Slice the potatoes in half lengthwise and place on a plate.
3. Scoop about 1.5 c of the mexican couscous into a bowl. Stir in 1/3 c shredded Mexican cheese and season with a little paprika and cayenne pepper.
4. Microwave until the couscous is warm and the cheese in melted. Spoon the mixture on top of the sweet potatoes, top with salsa (if desired) and enjoy!

photo 202

Hubby had his with salsa, I had mine without. I also would have added some avocado but mine weren’t ripe yet.

#2- Tuesday Night Dinner: Tortilla Soup

Spend 5 minutes chopping some extra veggies and adding some extra beans to boost the nutrition and you can have yourself a delicious pot of tortilla soup in no time!

Here’s what you need:
-1 cup black beans
-1 cup peppers and onions, diced
-1 jalapeno, diced
-2 cloves garlic, diced
-1 can diced tomatoes
-1 quart veggie broth
-2 tsp chili powder
-2 tsp cumin
-1 – 1.5 c mexican couscuos
-avocado and cheese to garnish

Directions:
1. Roughly chop the veggies, jalapeno and garlic and add to a large pot.
2. Saute until crisp tender, then add the beans, tomatoes, broth and spices.
3. Add the mexican couscous and simmer for 20 minutes.
4. Serve in bowls and garnish with avocado and cheese.

Diptic 2

Serve with a sandwich- we had grilled cheese 🙂

photo 205

This made enough soup for us each to have some for dinner & leftovers for lunch!

#3 – Wednesday Lunch: Tuna Salad w/ Couscous

For the third meal I decided to make some tuna salad. Everyone has their own favorite way to make it.

Here’s what I did:

In a bowl, combine a can of lower-sodium tuna (drained), a couple tablespoons of plain greek yogurt and half and avocado. Throw some hummus in there too if you have it! Mash it all together. Add 1 cup of the Mexican couscous and stir to combine. Add spices of your choice. If you want to stick with the Mexican theme, use cumin, chili powder, etc. Since I’m weird, and I love curry powder on my tuna salad, I used curry powder, ground mustard and cayenne pepper. Add some green onions and mix well.

Diptic 3
You can serve this a variety of way. I like to scoop mine up with crackers, but it would also be great in a wrap, on some toast, or stuffed into a bell pepper!

photo 206

 I ate about half and saved the rest for the next day.

So there you have it! One base, 3 totally different meals!!

If you liked this post and want to see another one, leave you suggestions from themes, ingredients, requests…and i’ll see what i can do!

Enjoy!
–Lindsay

Filed Under: Side Dish

How To Eat Healthy During The Week

April 11, 2012 by Lindsay 74 Comments

Hi Friends!

I’ve you follow me on instagram (The Lean Green Bean), you may have seen me go on a little bit of a kitchen rampage for an hour or so on Saturday afternoon.

People always ask me how I have time to eat healthy during the week. My answer is simple: Preparation is key! An hour on the weekend can save you oodles of time during the week and it makes it MUCH easier to throw together healthy meals when you’re busy or tired after a long day of work or school.

I thought I’d take a minute to recap some of the stuff I prepped this weekend to show you guys what I’m talking about!

Like I said, I spent a little over an hour in the kitchen, and here’s what I got accomplished:

Have trouble eating healthy during busy weeks? Here are some tips from a Registered Dietitian

First off, I put my pressure cooker to work to prep some eggs and beans. If you don’t have a pressure cooker, this can all be done on the stovetop, it will just take a little longer. The good news is, pretty much all you have to do is set the timer and walk away. These activities don’t require much supervision. So you can get a lot done in the meantime.

I started with eggs. I put some eggs in the pressure cooker and hard boiled them. When they were done, I cooled them in cold water, placed them in a tupperware and stuck them in the fridge.

IMG 2025

These are great to eat as a quick snack after a workout or when you’re running out the door. You can also slice them up an add them to salads for some extra protein or turn them into egg salad for a sandwich or wrap. Try some of the avocado egg salad sliders I posted about here.

IMG 2062

When the eggs were done I moved onto beans. One of the #1 reasons to get a pressure cooker? You can throw a bag of dried beans in, cover with water and in 20 minutes have perfectly cooked beans! No soaking required. Beans are a STAPLE in my freezer. I realized this weekend that a lot of people didn’t know you could cook them before freezing!

Here’s what I do: If you have a pressure cooker, consult a time chart to see how long to cook the kind you’re making. Before I got mine, I used the quick-soak method on the back of the bag and then cooked them on the stove. They can still be done in about an hour and a half that way, making it an easy weekend project while you’re doing laundry or other things around the house.

This weekend I cooked three different kinds of beans to replenish my freezer supply: black beans, great northern white beans and pinto beans. So, cook them and then let them cool completely. I usually undercook mine by just a few minutes.

IMG 3053

Once they’re cool, scoop them into ziploc bags and flatten to remove an excess air. Store in the freezer. When you’re ready to use them, pull out a bag, whack it against the counter a few times, and then dump directly into whatever you’re making. That’s why I under-cook them slightly. Then if I’m making a stir-fry or fritatta I can just dump them into the pan frozen and they will thaw out and cook just a little bit more, but won’t end up overly mushy. If you’re using them for something like a taco bar or on a salad and don’t want to heat them in a pan, dump some in a bowl and just defrost them in the microwave! Voila! A super easy source of protein to add to anything you’re making. And with less sodium than the canned versions. You can also pre-cook and freeze lentils and chickpeas the same way!!

IMG 3054

Don’t be fooled though, I definitely always have a can or two of beans in the pantry for backup. Sometimes I run out of frozen and need some before I get around to prepping more. I just look for the no-salt-added kind and give them a good rinse before using them!

While the beans were cooking, I got to work on my next project: burritos for the freezer. Even with the amount of prep work I do, there are still nights when I get home and just don’t feel like cooking. There are also still afternoons when the hubby comes home for lunch and we have no leftovers, or we haven’t been to the grocery store in two weeks. On those days, he usually turns to burritos. We recently found some frozen vegetarian burritos at Costco and have been buying those. They’ve got fairly good nutrition stats and I felt ok about him eating them a few times a week. But I knew I could make better ones myself. So this past weekend I quit thinking about it and just did it!

I made two versions- breakfast burritos with scrambled eggs and black beans and regular rice and bean burritos.

Here’s what you need:

-scrambled eggs (I used one per burrito)
-beans of your choice (about 1/4 c per burrito)
-sauteed peppers and onions
-cooked brown rice (perfect way to use up leftover rice)
-shredded mexican cheese
-salsa
-jalapenos or green chilis (if desired)
-whole wheat tortillas

Here’s what you do:

-Cook the eggs and set aside to let cool.
-Saute the veggies and set aside to let cool.
-Cook the rice, if necessary, and set aside to let cool

Once everything has cooled, begin assembling!

IMG 3044

Lay out several tortillas and add the rice (or eggs) and beans.

IMG 3045

Add the sauteed veggies.

IMG 3046

Top with a little salsa, some jalapenos or chilis and cheese.

IMG 3047

Tear off a piece of saran wrap and lay in on the counter.
Place the loaded tortilla on top.
To roll: fold the top over, then fold the sides in, then roll closed.
Pull the saran wrap over top to help hold it closed.
Wrap completely in saran wrap.
Place the burritos in a ziploc bag and freeze.
When you’re ready to eat, unwrap, wrap in a damp paper towel.
Microwave for 2-3 minutes until warm.

health2

I made 4 egg and bean and 6 rice and bean burritos. After they’re warmed you can top with tomatos, avocado and hot sauce! Another tip- microwave them half way and then cut them in half before heating the rest of the way. This will help them warm more evenly.

While I was prepping the burritos, I had a batch of pearl couscous cooking away on the stove as well. I used that to make a big batch of Mexican couscous.

IMG 3052

Come back tomorrow to see how I used this base to make three different meals during the week!

Finally I did some other basic prep work like peeling and chopping veggies to snack on during the week. If they’re pre-cut and ready to go, you’re more likely to eat them.

IMG 3051

IMG 2942

Other suggestions:

-Pre-cut some fruit to use as a topping on your cereal, oatmeal and yogurt.
-Roast a batch of chickpeas to snack on during the day.
-Put together a batch of your own trailmix with some nuts, seeds and dried fruit to throw in your bag and eat before you workout.
-Make a batch of no-bake granola bars and take one to work each day.
-Make a batch of hummus to eat with your veggies. I posted a video on how to make my favorite kind here.
-Make a batch of tuna salad to eat throughout the week for lunch.
-Similar to the burritos, make some homemade lean pockets like I posted about here.
-Make a giant salad and then you can just scoop out a portion for your meals during the week.
-If you eat meat, cook several chicken breasts in the crockpot. Cut or shred & freeze for easy use later.
-Roast a tray of veggies to eat alongside your dinners throughout the week. Add balsamic vinegar for extra flavor!

-Click here for another post I did over the summer about prepping food for the week.

–> EDITED TO ADD: Some other make-ahead tips from the comments of this post:

-Freeze cooked rice. Pack it in your lunch so it can thaw throughout the morning, then nuke for 30 secs and eat at lunch
-Make a big batch of soup packed with veggies and protein to eat throughout the week
-Make a few frozen casseroles like veggie lasagna or cook an extra meatloaf or meatballs. Freeze with instructions so your family can eat them when you’re not around.
-Make a batch of egg muffins or mini fritattas to eat for breakfast
-Pre-chop veggies to make a quick stir-fry.

So there you go, friends! Trust me when I say that an hour or two on the weekend makes life SO much easier during the week. Set yourself up for success by taking a little time to prep some healthy meals, sides and snacks for you and your family to enjoy!

So tell me, do you prep food on the weekend?

Enjoy!
–Lindsay–
If you liked this post, you’ll love my ebook – The Ultimate Guide To Food Prep. It dives into even more detail about how to food prep, troubleshoots common problems and provides tons of tips to make it easier! Click the image below for more details.

The Ultimate Guide To Food Prep Ebook

Filed Under: Food Prep

Five Layer Reese’s Bars

April 10, 2012 by Lindsay 83 Comments

Hi Friends!

Because it’s Tuesday.
Because it’s the Tuesday after Easter and you just may have some extra Reese’s laying around.
But mostly because I’ve been taunting you with pictures of this since last week…

Five Layer Reese's Bars: Cookies bars stuffed with candy- what could be better?

I have a Tuesday Treat for you!

Five Layer Reese's Bars: Cookies bars stuffed with candy- what could be better?

I came up with these bars last week when I was in the mood to bake something yummy to celebrate getting an internship.

I was in the mood to layer…so layer I did.

I started with a pretty basic oat crust for a solid bottom layer. Then I added a layer of Reese’s. Plus some melted caramel. And then some graham crackers…topped with melted butter and sugar. Then I topped it all off with a layer of melted chocolate chips. Oh, and as a bonus? Toffee bits sprinkled on top. Sound like your kind of treat? I thought so.

1

So, here’s the recipe:

Five Layer Reese’s Bars

by Lindsay L

Prep Time: 20 min

Cook Time: 15 min

Keywords: stovetop bake dessert caramel peanut butter chocolate oats bars

6021922


Ingredients (9×9 pan)

Layer 1
1/2 c butter
1 c flour
1 c oats
1/2 c sugar
1 tsp baking soda

Layer 2
16 Reese’s peanut butter cups

Layer 3
8 oz individually wrapped caramels
1/3 c skim milk

Layer 4
8 graham cracker sheets
4 Tbsp butter
1/4 c sugar

Layer 5
1-1/2 c dark chocolate chips

Topping
1 c toffee bits

Instructions

Layer 1

Melt the butter in a small bowl.
Add the flour, sugar, oats and baking soda and mix well.
Line a 9×9 pan with foiled and spray with cooking spray. (You could also use a 9×13 pan and leave a few inches empty)
Press the mixture into the pan to form a crust.

Layer 2

Unwrap the Reese’s and gently press into oat crust in four rows of four.

Layer 3

Unwrap the caramels and place in a bowl.
Add the milk and microwave at 50% power for 4 minutes or until caramel is melted.
Mix well, then pour mixture over the Reeses.

Layer 4

Top with graham crackers, breaking as necessary to fit the pan.
Press them down gently into the caramel.

Layer 5

Melt the butter, stir in the sugar and pour mixture over the graham crackers. Spread evenly and place the pan in the oven.
Bake at 350 for 10-12 minutes until slightly darkened and bubbly.
Remove from oven and immediately sprinkle with chocolate chips.
Let sit for 5 minutes, then spread the melted chips into a layer of chocolate.
Top with toffee bits and let cool completely before removing from pan.

Store in an airtight container in the fridge.

Powered by Recipage

It looks like a lot of work, but I promise it goes quickly.

Five Layer Reese's Bars: Cookies bars stuffed with candy- what could be better?

Five Layer Reese's Bars: Cookies bars stuffed with candy- what could be better?

I’m gonna go ahead and suggest that you make these immediately!

Five Layer Reese's Bars: Cookies bars stuffed with candy- what could be better?

Five Layer Reese's Bars: Cookies bars stuffed with candy- what could be better?

Five Layer Reese's Bars: Cookies bars stuffed with candy- what could be better?

Dig in!
–Lindsay–


Filed Under: Baking, Dessert

Fitness Friday 16

April 6, 2012 by Lindsay 17 Comments

Hi Friends!

This is gonna be short and sweet. As you may recall, i’ve been sick…as such, working out has kinda fallen by the wayside. Last week we did a bit of a different spin on Fitness Friday and I shared some All-time Favorite Workouts. That was convenient because I only did one workout last week. On Monday…the morning I woke up with a sore throat but wasn’t fully sick.

I revisited the Bench Workout I posted back in January. You can see the original workout AND a short video I made about it explaining the moves by clicking here.

But, just because, I jazzed it up a little for you and made it a bit prettier for you!

bench


I did this using 15 pound dumbbells and was sore for several days.

Then I took a week off. This past Sunday was match day. I was an anxious mess, and it was also the first day I felt a little bit better…so I knew nothing was going to stop me from working out. I revisited another one of my workouts from January that I posted here– A 3 mile run plus tabatas. I modified it a little bit and added abs. You know what that makes it? A Triple Threat workout. Here’s what it looks like:


triple

This workout is tough, but I like it because everything is broken up, so you don’t have to spend very long doing one thing. It was the perfect distraction.

On Monday I felt ok, so I decided to do my favorite 100 Legs workout. I modified it by slowing down and just doing it to finish, instead of for time like I usually do. However, I was still a miserable mess when I finished. I quickly realized I was pushing myself too hard before I was fully recovered. So I spent the rest of the week resting…and hobbling…because that workout never fails to leave me sore for at least 2 days.

And that’s all I’ve got for you today, friends. Tell me about the best workout YOU did this week?

–Lindsay–


Filed Under: Workouts

Lentil Veggie Mac & Cheese

April 5, 2012 by Lindsay 44 Comments

Let’s talk about mac and cheese for a minute. Growing up, I pretty much lived on the stuff. And by stuff, I mean this:

mac

I ate it all.the.time. In fact, I ate it all the time up until about 3 years ago. And then I stopped eating it for a while. AND THEN, a funny thing happened. I bought a box, made it just like I always did, and hated it! It didn’t taste good anymore….it was bland and boring and all around gross. Weird, right?

Anyways, ever since then I’ve been on a quest to make some mac and cheese of my own. I’ve had several failed attempts where I tried to make it “too healthy” and it just wasn’t even worth eating. Until this week. This week I got it right.

Is this the healthiest dinner I could ever eat? No.
Is it terribly unhealthy? No.
Is it approximately one million times better than the boxed version. You betcha!


This vegetarian Lentil Vegetable Macaroni and Cheese is healthier than the boxed version and easy enough for even the newest cook!
It’s packed with veggies and lentils! Some of you might think lentils are gross. I’m kinda with ya on that one. I’d never eat just a spoonful of plain lentils. But here’s the thing about lentils. I’ve noticed lately that if I put them IN things that already have lots of other things in them, I don’t even notice they’re in there. Like my lentil veggie soup last week….and the lentil veggie mac and cheese this week. They’re just kinda there, leading a bland existence and taking on the flavors of the stuff you eat them with…but at the same time they’re a great source of protein and fiber. SOOOO, that’s a win in my book! If you don’t like lentils, you could substitute another source of protein like chicken if you eat meat, or canellini beans. You can use whatever kind of vegetables you want. I used red pepper, sweet potato, carrots and onion. I also made mine extra spicy with lots of cayenne pepper 🙂

Lentil Veggie Mac & Cheese

by Lindsay L

Prep Time: 20 min

Cook Time: 15 min

Keywords: saute bake side entree vegetarian healthy

6021620


Ingredients (Serves 4)

  • 3 cups mixed vegetables, diced
  • 2 cloves garlic, minced
  • 1 c pasta, uncooked
  • 1 c white cheddar cheese, grated
  • 2 oz goat cheese
  • 1 c Skim milk
  • 2 Tbsp butter
  • 2 Tbsp flour
  • 1 tsp paprika
  • 1/2 – 1 tsp cayenne pepper
  • 2 1/2 c lentils, cooked
  • 2 c fresh spinach

Instructions

1. Cook pasta according to package directions and set aside.
2. In a medium pan, saute vegetables and garlic until tender. Remove from pan and set aside.
3. In the same pan, melt butter, then stir in flour.
4. Slowly add the milk, stirring constantly to remove the lumps.
5. Add the cheese and spices and stir until melted.
6. Stir in the veggies, lentils and spinach and stir for 2 minutes while spinach wilts.
7. Add the pasta, stir to combine and heat through. Serve warm

Powered by Recipage


This vegetarian Lentil Vegetable Macaroni and Cheese is healthier than the boxed version and easy enough for even the newest cook!

This vegetarian Lentil Vegetable Macaroni and Cheese is healthier than the boxed version and easy enough for even the newest cook!

This vegetarian Lentil Vegetable Macaroni and Cheese is healthier than the boxed version and easy enough for even the newest cook!
There you go, friends! Enjoy 🙂

–Lindsay–


Filed Under: Dinner

PB & J Bites and {Attune Foods}

April 3, 2012 by Lindsay 51 Comments

Hi Friends!

**First of all, I just want to say thank you SO MUCH for all your kind words on yesterday’s post. I got so many comments from old readers, new readers and everyone in between. The amount of support I received was incredible and I spent all day yesterday just thinking about how amazing the blogging community really is. So THANK YOU!! It means the world to me.

Also, big thanks to my hubby for these BEAUTIFUL flowers he got me 🙂 I love him.

photo 193
So, on to today’s post.  I kinda dropped the ball on this one since Janetha informed everyone on Twitter that YESTERDAY was actually national pb & j day. But, as you know, I had some other exciting things going on, so we’re just gonna go ahead and extend our little pb & j celebration to today.

Recently I was sent some samples from a pretty amazing company called Attune Foods. If you’ve never heard of them, you should definitely head over and take a look at their website. They make some pretty awesome cereals, bars and crackers and they also have several gluten-free products. I was able to pick out three of their products to try. Here’s what I picked:

First up:

attune1

What I love best about all of Attune’s products are how simple the ingredient lists are. I can pronounce all of the ingredients and the lists are short and sweet. I tried eating these plain as I would a regular bowl of cereal…but as you know, I eat the same two cereals every single morning and it’s pretty hard to change my ways. So, since these flakes were actually a lot smaller than I expected…more like granola or oats, I have big plans to use this cereal to make some healthy no-bake granola bars!!! The flavor was delicious.

Second pick:

attune2

I swoon over these. I’m a HUGE graham cracker fan and these are absolutely fantastic. I’ve eaten them plain, made s’mores with them and dipped them in yogurt. They were delicious on each occasion. But I must say my favorite way to enjoy these was by making a big batch of my Almond Graham Banana Bites. These are one of my favorite treats and the grahams were perfect for it. This time I left out the almonds so it was all graham, baby 🙂

photo 192

Yeah, I’m gonna go ahead and recommend you make these immediately. YUMMM. Wanna kick it up a notch? Mix some pb in with that chocolate and then cover more of banana with it- don’t be lazy like me and just do the tops.

Third choice:

attune3

I got SO excited when I saw this one. I’m a HUGE advocate of watching your salt intake and I spend a lot of time looking at the salt content of packaged food. So when I saw these, I immediately knew I had to try them! I mean check out the ingredients. Doesn’t get any simpler than that folks!

I wanted to come up with a fun way to use these so I did some experimenting and I’m super happy with the result! When I think of crispy rice I automatically think of rice krispy treats. I used to eat them ALL the time when I was little and they were one of my favorite things to make. This time I decided to try to recreate them and make them a bit healthier. So I didn’t use marshmallows! GASP! I know!! I wasn’t sure how they would work out, but I was willing to take a chance.

pb4


I added some pb and vanilla for flavor and some brown rice syrup to help them stick together and sweeten them up a little bit. 4 ingredients. That’s it!

bites1

And what goes better with pb than j?! But in this case, I made my own healthy chia seed jam! It’s so easy. Only takes 2 ingredients. Frozen berries…and chia seeds. Plus sweetener if you want, but I think it’s sweet enough from the fruit. I’ve made chia jam with blackberries (my fav), raspberries and strawberries. This time strawberries were all I had on hand. I’ve found it works better with smaller berries, but I made it work with whole frozen berries. All you have to do is combine the berries and chia seeds in a bowl, microwave for 2 minutes or so, smash the berries with a fork and refrigerate to let set.

chiajam

I put the jam in a small container to set and let the crispy bites set in their muffin tins. A couple hours later I came back for a taste test. The verdict? Amazing. A fun new snack for me to enjoy 🙂

pb5


Want the recipe?!

PB & J Bites

by Lindsay L

Prep Time: 5 min

Keywords: stovetop appetizer breakfast snack healthy low-sodium vegetarian chia seeds peanut butter strawberry

6021414


Ingredients (approx 40 bites)

For the bites

  • 2/3 c peanut butter
  • 1/2 c brown rice syrup
  • 1 tsp vanilla
  • 4 c Erewhon Crispy Brown Rice cereal


For the jam

  • 1 c frozen berries
  • 2 Tbsp chia seeds

Instructions

For the Bites

In a medium saucepan, melt the peanut butter and brown rice syrup.
Add the vanilla and stir until well-combined.
Add the crispy rice and mix well
Press by spoonful into greased mini muffin tins and let set until cooled.
Remove from muffin tins and store in an airtight container.
Just before serving, top with chia jam!

**Note: You could also press the mixture into a large pan and cut into squares later.

For the Jam

Combine the frozen berries and chia seeds in a bowl.
Microwave on high for 2 and a half minutes.
Use a fork to smash the berries and mix well.
Transfer to an airtight container and place in the refrigerator to set for at least 30 min.

**Note: You can store this in the fridge for up to one week.

Powered by Recipage


There you go 🙂

pb3


Enjoy!
–Lindsay–
**I received these samples for free from Attune Foods. All thoughts and opinions are my own.

Filed Under: Snack

My Path & Big News!

April 2, 2012 by Lindsay 151 Comments

Hi Friends!

It’s Monday. Probably the best Monday of my life. Wanna know why?

match1

Oh, you can’t read that? Let me make it a little bigger for you!!

**********************

match3

match4

*************************

That’s right. Last night was match night for Dietetic Internships. First they make you wait 6 weeks from the time you submit your applications until the day you find out, AND THEN they make you wait until 7pm on match day to find out. It was torture! But it was all worth it because I matched 🙂 And I’m one step closer to becoming a Registered Dietitian. For the first time I actually feel totally confident that it will happen. Getting matched to an internship was the one thing that’s been hovering over my head for the past 3 years that was at least partially out of my control. Now that I have a spot in an internship, I have no doubt that I can successfully complete the internship and then go on to successfully pass the RD exam!

There are lots of different ways to become an RD. I thought this would be a good time to tell you guys a little bit more about me and the path I took. WARNING- long, rambling post ahead!

****************************

When I went to college for the first time, I attended a small, private university in Ohio. I majored in Psychology, graduated in 3 and a half years, had an awesome time and even met my hubby! After we graduated in December 2006, I went to work for a brand new preschool. I spent 6 months teaching 4 and 5 year olds all sorts of fun things.  I realized pretty quickly that it was not what I wanted to do with my life. I love kids and enjoy being around them. I just didn’t want a career as a teacher.

One thing that really stuck out to me as I got to know my kids was their complete and total lack of nutrition education. So many of them had never had vegetables that I eat every day, like red peppers and sweet potatoes. Another thing that stuck out was their lack of physical activity. When I was a kid, I was constantly running around outside, playing tag and riding my bike. But when it came time for recess, these kids were choosing to just sit in the grass or sit in front of the computer.

It made me sad. I started making little changes to my lesson plans so they could include things like fruit and veggie tastings and growing plants from seeds. At recess I introduced the kids to games like freeze tag and simon says to get them moving. When I left the preschool, I was more focused than ever on healthy eating and nutrition. About a month after I quit my job, the hubby and I got engaged (August 2007). I contemplated going back to school but knew that it would be too much to try to look for a job, go to school and plan a wedding. I promised myself that if I was still thinking about it after the wedding was over that I would do it!

I started working for an insurance company after a few months (September 2007) and had a steady job there that I didn’t hate, but I definitely didn’t love. After we got married (September 2008), I realized that going back to school was what I needed to do in order to be truly happy. I researched programs in the area and decided to start at a community college since it was significantly cheaper but still had a reputable program. I applied, was accepted and enrolled to start classes in January of 2009.

The first few quarters, I took 3 classes per quarter and worked 40 hours a week. I had three quarters before I could officially start the Diet Tech program so I used them to take prerequisite classes. And let me tell you, I had a lot of them. When I went to school the first time, I didn’t take any math or physical sciences. I hated them and wanted to avoid them at all costs. I didn’t really need them to be a pscyh major (which is why it was the best major to pick- in my opinion).

That approach wasn’t going to fly this time around. The dietetics curriculum is VERY science based. I had to take a lot of basic biology, chemistry and math classes before I could even start taking the courses required for the program.

A Dietetic Technician, Registered (DTR) does a lot of the same work an RD, but they must always work under an RD’s license. In the fall of 2009, when I officially started the Diet Tech program, we had someone from Ohio State come and talk to us about their RD program. I immediately realized that I wanted more independence than I could have as a Diet Tech, so I met with the necessary people to figure out what I needed to do to become an RD. Ohio State had an agreement worked out with the community college which allowed me to finish the Diet Tech program and then transfer all of those credits over to OSU to get credit for courses in their program. Plus, I would be required to take many additional courses above and beyond the Diet Tech program for the RD program.

Over the next six quarters, I whittled away at the list of courses I needed to complete. I had to take a different practicum each quarter to help complete the 450 hours of supervised practical experience that’s required to become a Diet Tech. We rotated through a long-term care facility, a WIC clinic, a school kitchen and a hospital. In December of 2010, I quit my job so that I could take more classes. We were spending 8-16 hours a week in practicums, plus going to several classes and it was getting too hard to make up the extra hours at work that I had to miss to go to class.

In January 2011, I started taking classes at Ohio State as well. There were a few prereqs for the RD program that I couldn’t take at the community college. So, for two quarters I was taking classes at two schools and working part-time. In March 2011 I got a part-time job as a Diet Aide because I had no job related experience in the field and that’s pretty much a requirement for getting an internship.

In June 2011, I graduated from the community college. I actually was the Valedictorian of my class (nerd alert!) and I had to give a speech in front of a couple thousand people. It was terrible! While completing the Diet Tech program and taking courses for OSU, I took 36 classes including TONS of math and science.

Some of the classes I took:

  • Anatomy
  • Physiology
  • Algebra I
  • Algebra II
  • General Chemistry
  • Organic Chemistry
  • Biology
  • Microbiology

 Plus all of the nutrition classes. And guess what- I earned A’s in every single one of them! Courses that I avoided for years because I didn’t think I could pass them, I not only passed- but excelled in. It wasn’t easy. I spent HOURS and HOURS studying, especially for anatomy and o-chem…but I did it. And I proved to myself that I can do pretty much anything I put my mind to.

I continued taking classes at OSU, more science- including 2 quarters of Biochemistry) and in September 2011, I took my registration exam and become a Dietetic Technician, Registered. Once I become and RD, I will no longer be able to use the DTR credentials, but I wanted to have them now in case something were to happen and I couldn’t become an RD (ie if I hadn’t gotten matched to an internship).

I am doing a didactic Dietetics program at Ohio State. This means that you complete all your coursework and then during your senior year you apply for an internship. If you get matched, you graduated from the school and then continue to do your internship the next year, possibly at the same school (like i’m doing) or at a different school. Internships are extremely competitive. Less than 50% of dietetic students that apply are matched. For the internship I matched to, they had 100 people apply last year and they accepted 12. SO, it’s pretty stressful. I applied to 4 schools. OSU is the only program here in Columbus and the other three I applied to were distance internships that would have allowed me to stay here and do my internship by securing my own preceptors (RDs willing to take responsibility for me during my supervised practice hours- all 1200 of them that are required).

A lot of schools, including OSU, also have coordinated programs which allow you to complete your supervised practice hours WHILE you are taking classes, instead of waiting until after. These programs are generally smaller and more competitive than didactic programs and going this route just wasn’t in the cards for me.

So, here we are in April of 2011. I just started my last quarter at OSU. I’m taking my last high-level nutrition class called Medical Nutrition Therapy. I’ll graduate in June and in August I’ll start my internship which will last for about 9 months. You basically have to pay tuition to the school and then work 40 hours a week for free. And it’s not cheap.  Lots of people think it’s ridiculous how hard they make it to become an RD when our country obviously needs more of them.

I agree…but I guess it also makes it that much more of an accomplishment.

After I complete my internship, I’ll be eligible to take the registration exam and become an RD!

***********************************

After I complete my internship, I”ll begin searching for jobs. One of the best parts of the Diet Tech program was the practicums. I’ve had the chance to experience a lot of different dietetic career paths already and I’ve found that I’m drawn to the community side. I love all the different options there are with regards to organizations you can work for. I also love community education and would love to potentially become a Certified Diabetes Educator. Just thinking about the road ahead gets me so excited!!! So many options. I’ve considered becoming a certified personal trainer so that I can combine the diet and exercise components and I would love to do some individual consulting that involve education, meal plans, etc. I feel like the possibilites are endless!!!

So there you have it friends! My story, my path, my life. Going back to school with no guarantee I’d get an internship was the biggest risk I’ve ever taken. I’m not the traditional college senior. I didn’t take the traditional path. But I’m proof that if you put your mind to something and you really want it bad enough, YOU CAN DO IT! And i’ve got a 4.0 and an internship to prove it 🙂

Follow your dreams! They make life worth it!

–Lindsay–
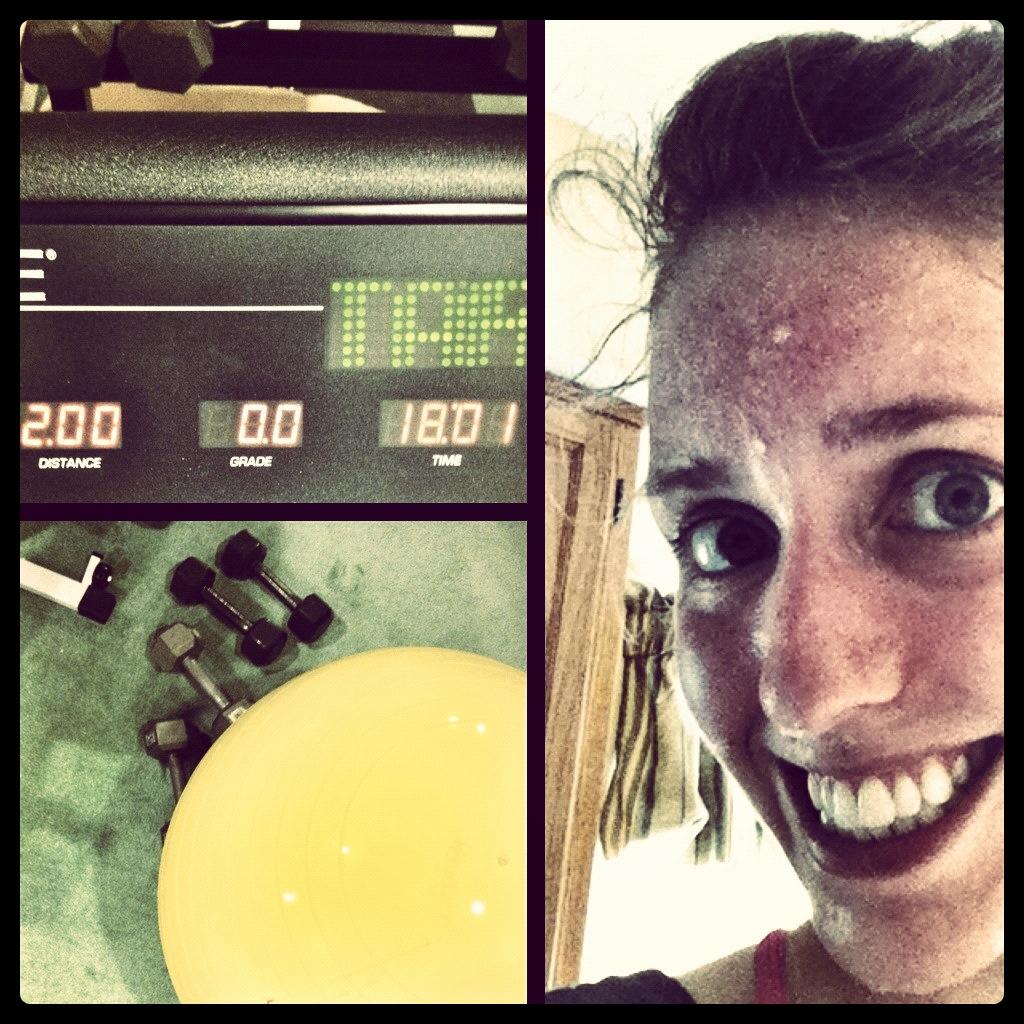
PS…Just want to say thanks to my hubby, my parents, my in-laws and my friends that have supported me for the past 3 1/2 years. They’ve encouraged me, celebrated with me, listened to me complain and pushed me to keep going when I wanted to give up. I wouldn’t be celebrating today without each and every one of them.

And also, a big thanks to all of you for all the tweets and messages last night on Twitter and Facebook. I was overwhelmed by all the congratulations and well wishes. Knowing that I have all of you supporting me and believing in me, and in this blog, makes this most recent accomplishment even sweeter than it already is.

Filed Under: Uncategorized

  • « Go to Previous Page
  • Page 1
  • Interim pages omitted …
  • Page 55
  • Page 56
  • Page 57
  • Page 58
  • Page 59
  • Interim pages omitted …
  • Page 65
  • Go to Next Page »

Primary Sidebar

Lindsay Livingston The Lean Green Bean Healthy Living Tips and Tricks

I'm a Registered Dietitian and mom of three from Columbus, Ohio. I use this blog to share simple, healthy recipes, nutrition tips, and an honest glimpse of motherhood!

Learn More →

Questions? Comments? Email me: [email protected]

The Lean Green Bean Facebook The Lean Green Bean Instagram The Lean Green Bean Pinterest The Lean Green Bean Twitter The Lean Green Bean Feed
footer-logo
The Lean Green Bean Facebook The Lean Green Bean Instagram The Lean Green Bean Pinterest The Lean Green Bean Twitter The Lean Green Bean Feed
Recipes

Breakfast
Dinner
Snack
Slow Cooker

Kids

Cooking With Kids
Favorite Gifts
Toddler Meals
Indoor Activities

Resources

Easy Packed Lunches for Kids
Dinner Spark
Snack Spark
Ultimate Guide to Food Prep

About

Meet Lindsay
Become an RD
Work with Me

The Lean Green Bean is a participant in the Amazon Services LLC Associates Program, an affiliate advertising program designed to provide a means for sites to earn advertising fees by advertising and linking to amazon.com.
Read the full privacy and disclosure policy here.

Copyright © 2022 · The Lean Green Bean

table talk series

Learn how food affects your body.

Get my free Table Talk email series where I share bite-sized nutrition information about carbs, protein, and fat, plus bonus information about snacks and sugar!

[email protected]