• Skip to main content
  • Skip to primary sidebar

Learn how food affects your body. Get Free Nutrition Info Today

the-lean-green-bean-logo
  • Home
  • Recipes
  • Kids
  • Resources
    • Ebooks
    • Food Prep
    • Videos
    • Snack Round-Ups
    • Gift Guides
  • About
    • Become An RD
    • Work With Me
  • Search
the-lean-green-bean-logo
  • Home
  • Recipes
  • Kids
  • Resources
    • Ebooks
    • Food Prep
    • Videos
    • Snack Round-Ups
    • Gift Guides
  • About
    • Become An RD
    • Work With Me
  • Search

blog

A Heart Healthy Dinner Party

February 20, 2012 by Lindsay 57 Comments

Hi Friends!

Happy Monday 🙂 Over the weekend we had some friends over for a dinner party. But not just any dinner party! Thanks to the lovely folks over at Eggland’s Best, we were able to host an EB Mine Brinner party to help promote February as National Heart Health month! (*I received a free package of Eggland’s Best goodies as well a gift card to help me with the groceries for the Brinner party but I hosted this party because I believe strongly in the importance in raising awareness in the importance of heart health.)

  • According to the Center for Disease Control and Prevention (CDC), heart disease is the leading cause of death among men and women in the United States. However, there are simple steps you can take to help reduce your risk, including proper nutrition and daily exercise. These lifestyle changes, along with not smoking can help cut your odds of having a heart attack by 92% (Source: Woman’s Day, February 2012).
  • Eggs can be incorporated into a heart-healthy diet, and are one of the most nutrient-dense foods you can eat. Eggland’s Best eggs contain less cholesterol than ordinary eggs, as well as more than 2X the heart healthy Omega-3 fatty acids, 2X more Vitamin D, and 10X more Vitamin E, a vitamin associated with reducing the risk of heart disease.

So here’s the deal. We all know I LOVE breakfast. And I LOVE eggs. Egg sandwiches are pretty much a staple in my lunch-time rotation, scrambled eggs make an appearance pretty much every weekend and the hubby and I actually eat brinner fairly often. 

EB13

Pin It

Due to the fact that last week was one of the craziest off my life, I didn’t actually start planning this party until Friday afternoon. The thing about me and planning parties is that I tend to get a little over zealous. And I make A LOT of lists. Since I was in a bit of a time crunch, I turned to my fellow bloggers for some inspiration when I was making my list of healthy egg dishes.

First, let’s start with what I didn’t have a chance to make. These are dishes that sounded fantastic, but I either didn’t have enough people coming, enough ovens, or enough arms to make them all. In case you’ve never tried, it’s difficult to plan a party that involves several egg dished that all need to be cooked and done at the same time!

So, here’s some great egg recipes for you to check out that are still on my to try:

Poached Eggs in Spicy Tomato Sauce from Cat @ Breakfast to Bed
Fried Eggs in Bell Pepper Rings
Baked Eggs in Bread Bowls from Sarah @ Baking Serendipity
Peach Dutch Baby Pancake from Brandi @ Bran Appetit
Spinach & Feta Wonton Quiche Cups from Jenn @ Peas and Crayons

Those look pretty good right? I bet you’re wondering what exactly I did make? Well, let’s take a look at the menu:

The Lean Green Bean Brinner Party

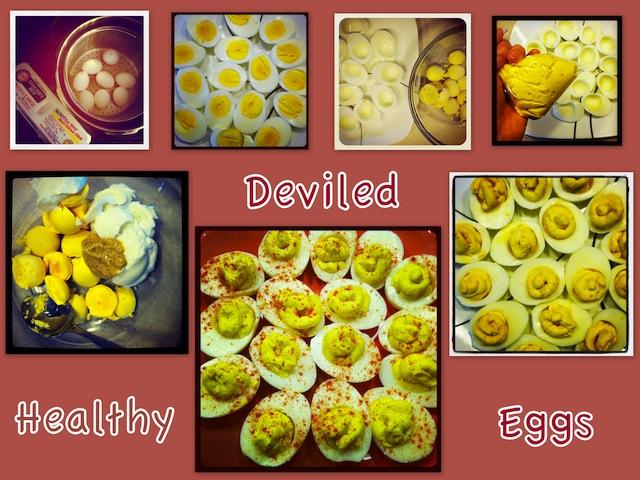
Deviled Eggs
Avocado & Egg Salad Sliders
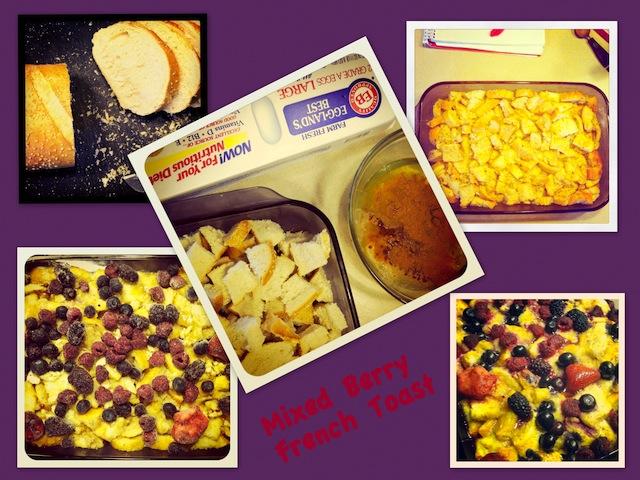
Mixed Berry Baked French Toast
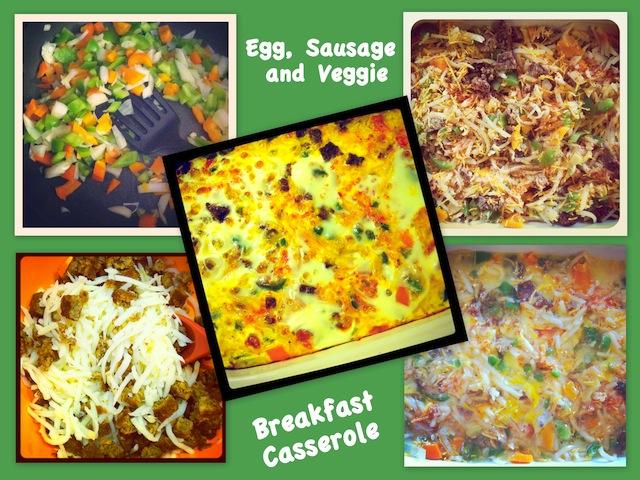
Sausage, Egg & Vegetable Breakfast Casserole
Veggie Egg Muffins
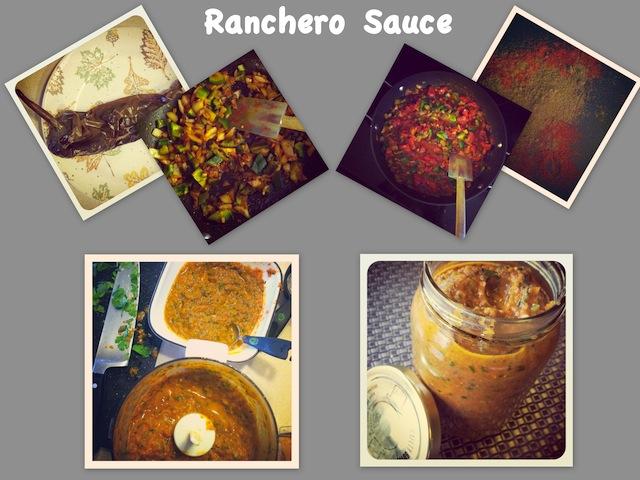
Bean & Veggie Breakfast Burritos w/ Ranchero Sauce
Fruit Salad
Orange Juice & Cocktails

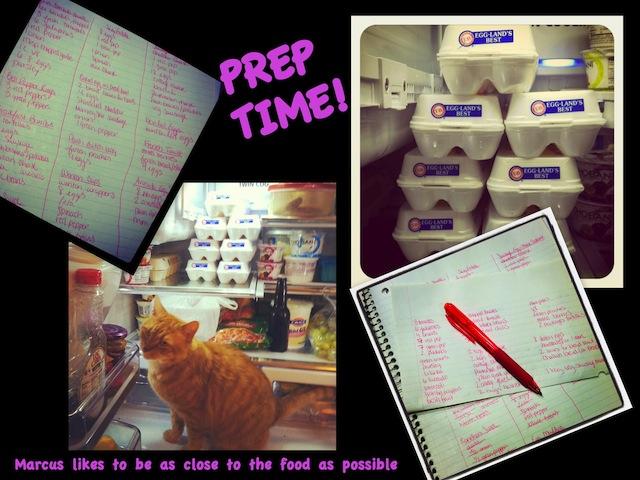
Let’s take a closer look shall we? Like I said, it started with a lot of lists…and LOTS of eggs.

EB1

I got up Saturday morning and got to work. I started with the French Toast because it typically sits overnight. I used this recipe from Taste of Home. I prepped the bread and let it sit all day. I decided to cook this first because I knew it would reheat a little better, if necessary, than the dishes that were more egg heavy like the casserole. Our guests came at 7:00pm, so I popped this in the oven at 5:30 and cooked it for 1/2 an hour. Then I took it out, added the berry topping and baked it for another 15 minutes. I stored it in an insulated bag and it was still nice and warm by the time we ate, about an hour later.

EB2

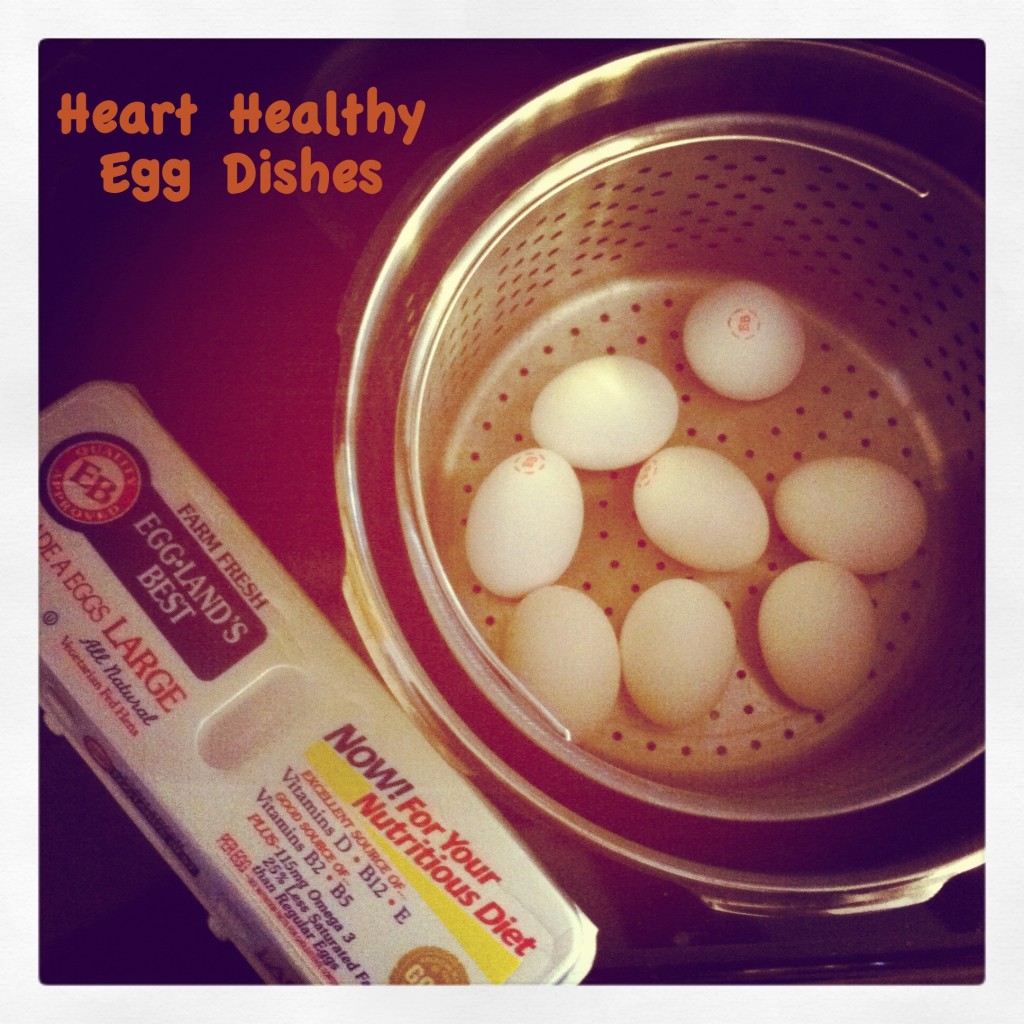
Next I tackled the cold dishes. I wanted to chose a few dishes that didn’t need to be baked/require the oven. I had coupons for pre-cooked and peeled eggs but couldn’t find them at my grocery store, so I pulled out my pressure cooker and got to work.

I made my first ever deviled eggs using this recipe from Anne @ Fannetastic Food. This recipe swaps greek yogurt for the mayo, an easy swap to make these more heart healthy. I was a little nervous about making these because I don’t eat them and really had no idea what they were supposed to taste like. Plus I only had spicy brown mustard instead of dijon. But they were all gone at the end of the night so I guess they were good 🙂 I made them in the morning and then just sprinkled on the paprika right before everyone came!

EB3

I used the rest of the hard-boiled eggs to make egg salad, another thing I don’t eat. I knew I wanted to add some avocado to make these even more heart-healthy so I was excited when I found this recipe from The Pioneer Woman. I halved the recipe, left out the chives and swapped greek yogurt for the mayo…then I served it on slider buns. I made the eg salad ahead of time. I was nervous about the avocado browning but since there was vinegar in the recipe I figured it would be ok. And it was! Then I just spooned them onto buns right before serving.

EB4

While I was cooking, the boys had a little playtime with this fun little egg toy…It’s their new fav.

EB5
Next up, I prepped the breakfast casserole. I used this recipe from Taste of Home and used Morningstar Breakfast Sausage. It was my first time buying the pre-shredded hash browns and they worked out really well. I bought the plain kind because they were very low sodium. I assembled the whole casserole and stuck it in the fridge. In the evening, after the french toast was cooked, I popped this casserole in and it finished cooking right around 7:15 when people started arriving.

EB6

Next up, I made the egg muffins. I followed this recipe from Amy @ The Scene From Me. I’ve made these before and they were a hit with the hubby. This time, I left the sausage out and just used veggies and cheese (1/2 feta, 1/2 cheddar). They’re a great, healthy breakfast that can be made ahead of time and re-heated throughout the week, or even frozen and eaten later. I put these in the oven last, right when people started eating and they were ready just in time for the people who came back for seconds.

EB7

The last thing I made was breakfast burritos. They were inspired by this recipe from Katie @ Yes I Want Cake. I left out the potatoes and bacon and just used black beans, veggies and eggs, plus some avocado, tomatoes and cheese. I started cooking these around 6:30 and assembled them all and wrapped them in foil to keep them warm.

EB9

I also whipped up some of this Ranchero Sauce from Janetha @ Meals and Moves for people to top the burritos with. I used 1 poblano pepper, a can of hot, diced jalapenos and only 1 Tbsp butter.

EB8

EB also sent me coupons to give away to my guests. They were a huge hit! We all like our eggs 🙂

EB10

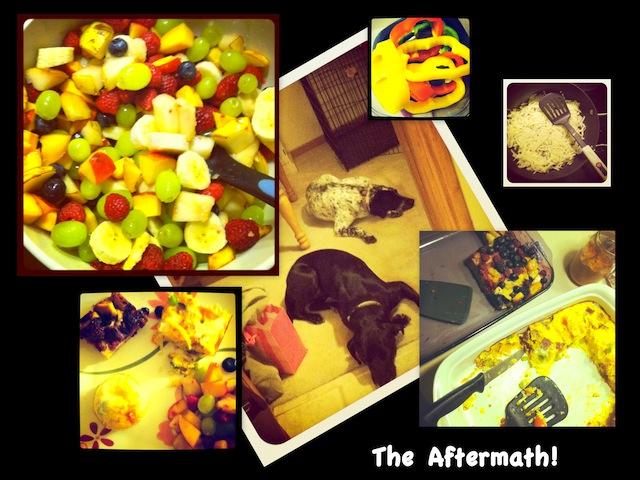
I also made a HUGE fruit salad for everyone to enjoy on the side.

EB11

And our friends brought the cocktails!

EB12

So there you go! A full party recap. In case you didn’t pick up on it, everything at the party was totally vegetarian! And I’m happy to say that all the dishes were a hit, even with my meat-loving friends!!!! Hopefully this inspired you to try a few new healthy egg recipes!

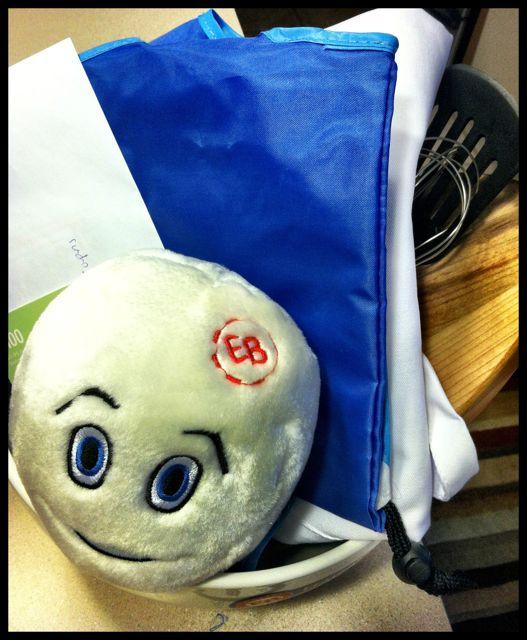
And guess what…EB has offered to send one reader the same package of goodies I got.

IMG 19551

It includes:

  • 2 Free EB Dozen coupons (Any variety- classic, cage-free, or organic)
  • 1 Free EB Hard Cooked and Peeled variety coupon
  • 1 EB Apron
  • 1 EB Spatula
  • 1 EB Whisk
  • 1 EB Cutting Board
  • 1 EB Mixing Bowl
  • 1 EB Bowl Scraper
  • 1 EB Coffee Mug
  • 1 Plush Egg
  •  1 EB Tote Bag

Wanna win? Just leave a comment telling me your favorite heart-healthy egg dish! I’ll choose a winner randomly tomorrow night. Giveaway ends Tuesday Feb 21st at 10pm EST.

DSC 1405

Enjoy!
–Lindsay–

Filed Under: Sponsored

Fitness Friday 10

February 17, 2012 by Lindsay 26 Comments

Hi Friends!

Time for another Fitness Friday!

fitnessfriday2

Not much time for chitchat today since I’m writing this post in a hurry/I should be studying. I hope you all had an awesome week of workouts!! Let’s take a look at what I did:

Feb 10th– rest day

———————————-

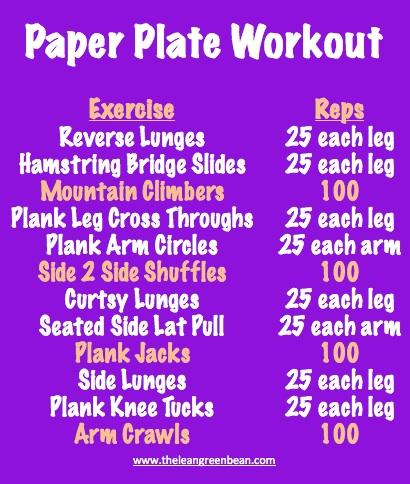
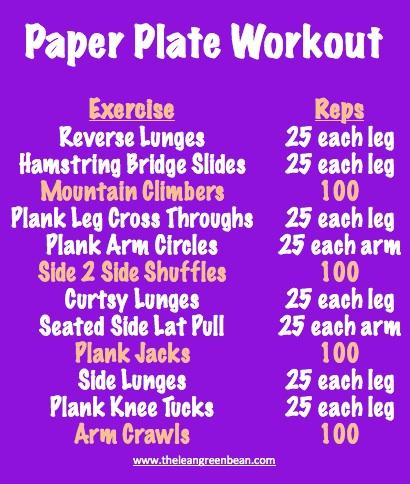
Feb 11th– A couple of weeks ago at the grocery store I bought a pack of paper plates so I could try out a paper plate workout. I did some research on some of the moves you could do and put together my own workout! The plan was to make a video of the moves to show you, but this week was a bit CRAZY…so it didn’t happen.

Here’s what it looked like:

feb11th1

You can google these exercises but they’re pretty self explanatory.

  • Reverse lunges: Put one foot on a paper plate and slide back into a lunge.
  • Hamstring bridge slides: Lay on your back, raise your butt in the air and put one foot on a paper plate. Slide the plate in towards your butt and out away from use, using your hamstrings to do most of the work.
  • Mountain Climbers: Just like regular ones except instead of lifting your feet off the ground, keep each foot on a paper plate and slide your feet in and out.
  • Plank Leg Cross-Thru: Get in plank position (arms straight). Put one foot on a paper plate and bend your leg slightly to move it just a bit in front of your other let. Slide the foot on the plate in front of your other foot (and under your body) then switch directions and move it out to the side away from you.
  • Plank Arm Circles: In straight arm plank position, place one hand on a paper plate. Use your shoulder muscles to move the plate in a circle.
  • Side to Side Shuffles: Put each foot on a paper plate. Slide your feet along the floor on the plates as you shuffle three times in one direction, then reverse and shuffle back.
  • Curtsy Lunges: Put one foot on a paper plate and slide it diagonally behind you, bend at the knee into a lunge position as if doing a curtsy
  • Seated Side Lat Pull: Sit with your feet tucked to the side of your legs. Place the hand on the side you’re leaning towards on a paper plate. Slide it out and then back in, using the other hand for balance and using your lat muscles to pull you back to your starting position.
  • Plank Jacks: Just like normal except instead of jumping your feet in and out, slide them in and out on paper plates.
  • Side Lunges: Just like normal except instead of stepping out to one side, put your foot on a plate and slide out before bending down inton a lunge position.
  • Plank Knee Tucks: Get in plank position (straight arms). Put each foot on a paper plate. Slide one foot in, bringing the knee toward the opposite elbow.
  • Arm Crawls: Place each foot on a paper plate. Get in straight arm plank position. Pull yourself across the floor with your arms, letting your feet slide behind you on the plates.

I loved this workout. I worked up quite a sweat and could really feel my thighs working!

————————————–

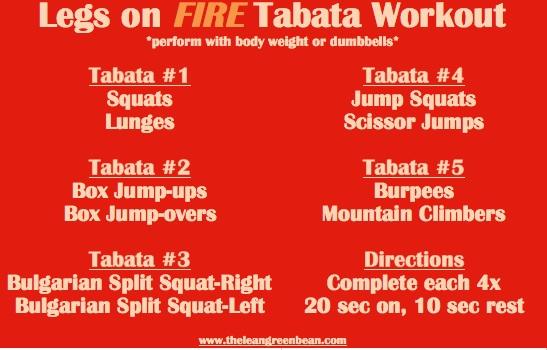
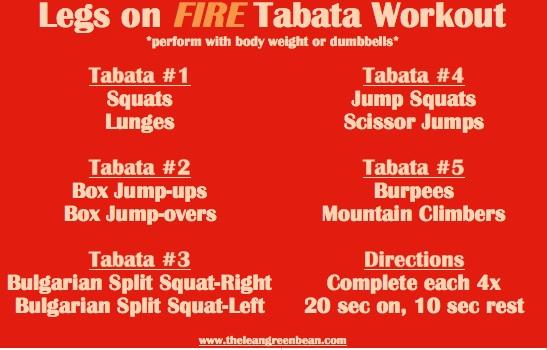
Feb 12th– It’d been a while since I did a good tabata so I put one together that was all legs and by the end I was FEELIN THE BURN! One of my favs so far!

feb12th

Pin It

———————————-

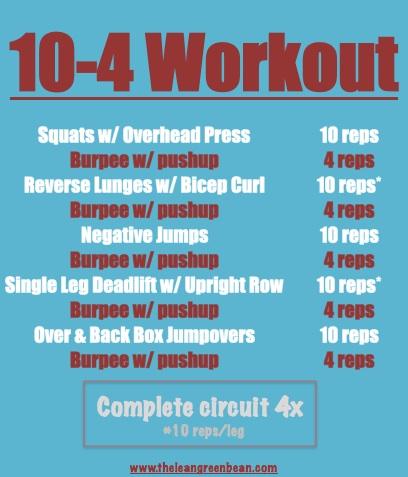
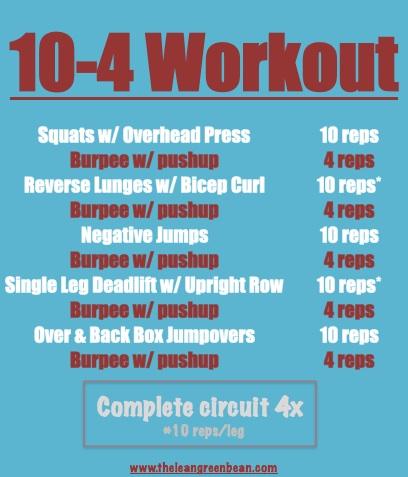
Feb 13th– Put together another fun workout that revolved around burpees. This was a real challenge for me because I hate burpees 🙂 Plus I was pretty sore from the previous two workouts this week!

feb13th

I was DEFINITELY ready to be done by the end of the 4th circuit!

—————————————-

Feb 14th– Rest day!

—————————————-

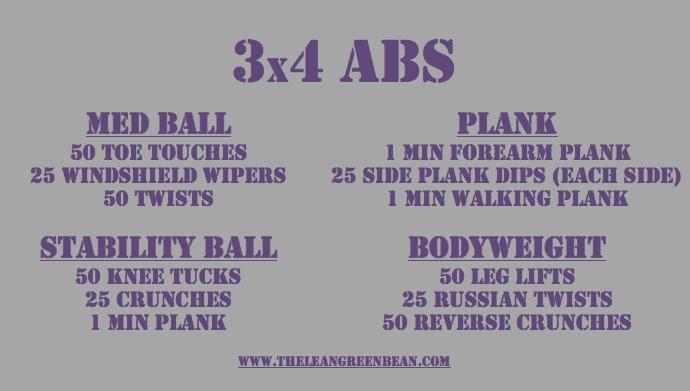
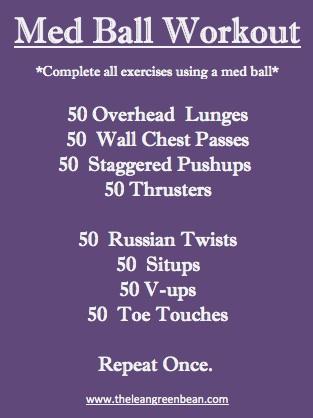
Feb 15th– Hubby got me a med ball for Valentine’s day so I put together a workout to test it out.

feb15th

My abs and shoulders were definitely feeling the burn on this one. If this is too hard for you, you could easily just do it one time through, or drop the reps down to 25 instead of 50!

———————————–

Feb 16th- Rest day. Lately I’ve been taking my rest days on Tuesdays and Fridays and it’s been working out well….but this week I did a little rearranging and took my second rest day on Thursday so I could study.

So there you have it. Feel free to pin these to save them for later, and let me know if you give any of them a try!!

Enjoy!
–Lindsay–

Filed Under: Workouts

Lightened Up Caramel Apples

February 14, 2012 by Lindsay 40 Comments

Happy Valentine’s Day friends 🙂

I hope you get to enjoy some time with your loved ones tonight!

DSC 1430

I made you a little dessert. A fun spin on the traditional calorie-laden caramel apple. You know, like the ones from Rocky Mountain Chocolate Factory?

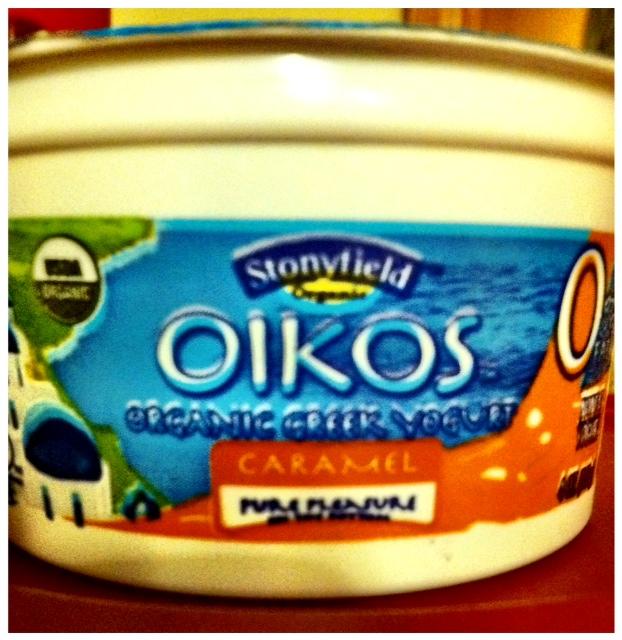
Last week, my friends at Stonyfield sent me a fun little valentine’s day package! *Free sample. All opinions are my own.

app2

That’s right…caramel and chocolate flavored Greek Yogurt!

Whenever I think of caramel, I think of caramel apples, even though I don’t really ever eat them. To be honest, I’m not the biggest caramel fan….so I wasn’t actually sure that I was going to like this little dessert I whipped up for myself! But I kept an open mind, and it turns out I loved it!

Here’s how it went down:

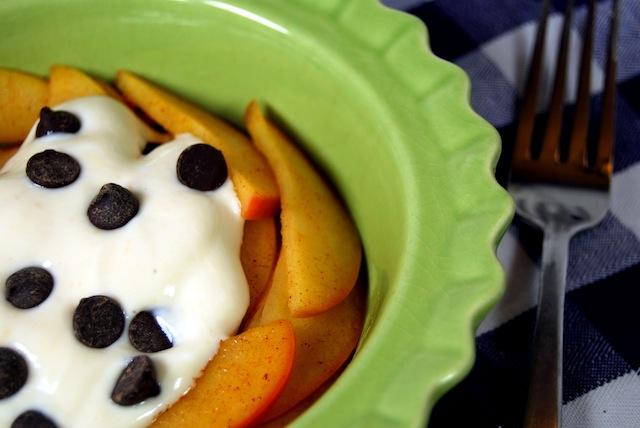
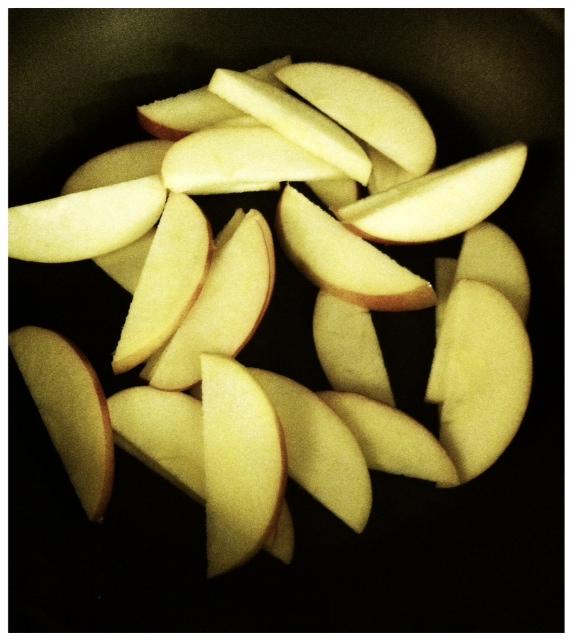
One of my favorite go-to “desserts”, (especially right after I graduated from college-I made these all.the.time) is sauteed cinnamon apples. All I do is slice an apple up into really thin slices, put them in a saucepan with a little bit of water and some cinnamon and saute them until they’re nice and soft.

photo 146

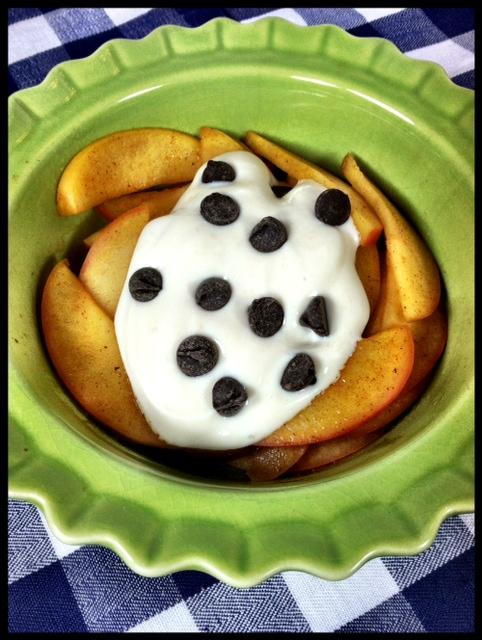
I usually top the slices with a little bit of vanilla ice cream or yogurt, but last night I got the brilliant idea to add the caramel yogurt!!

photo 147

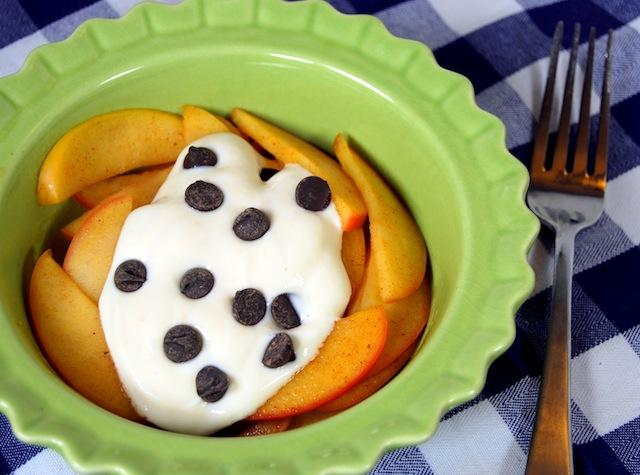
Let me just say….YUM! I liked this yogurt way better than I thought I would. The caramel flavor wasn’t too strong, but was still definitely present and it paired perfectly with the apples! Add a few chocolate chips and you’ve got yourself a pretty tasty little treat – that won’t undo all your hard work at the gym!

photo 148

DSC 1428

Pin It
Speaking of the gym, don’t forget to hop on over to Lindsay’s blog and check out today’s Tuesday Trainer! Today’s theme is partner moves!

lindsayslist.co-tuesday_trainer

Today’s workout: Put together a workout that involved a lot of burpees! A challenge for me because I hate burpees: feb13th1 Pin It

I was definitely ready to be done by the 4th round!

Enjoy!

–Lindsay–


Filed Under: Uncategorized Tagged With: Apple

Healthy Breakfast Bars

February 13, 2012 by Lindsay 30 Comments

Hi Guys!

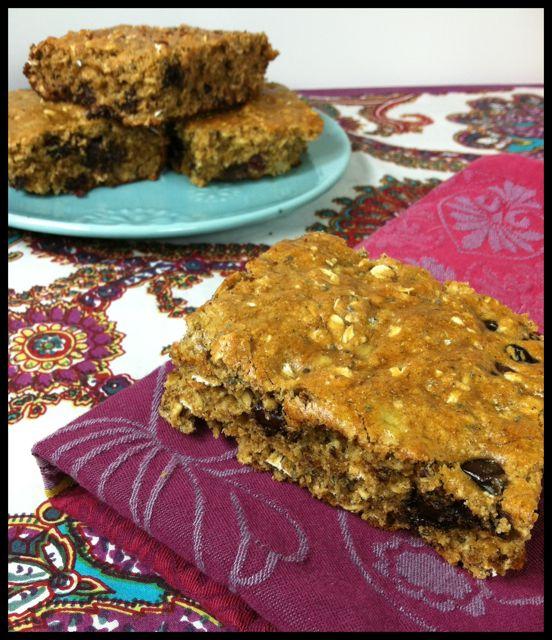
It’s Monday, and boy do I have a treat for you! Have you ever baked something and had it turn out so well that it just makes you kinda ridiculously happy? That’s how I feel about these. I feel like I’ve been in a little bit of a cooking rut lately, makings some things that are edible, some things that are good, but nothing GREAT. Well let me tell you, I’ve definitely busted out of that rut with these….and it brought a big smile to my face 🙂

Let’s back up…Over the weekend I whipped up some breakfast/snack bars using my new favorite ingredient- chickpea flour! I made a small batch because I wasn’t sure how they would turn out…but I loved them! You can’t tell there’s chickpea flour in them at all. I’m so excited to share them with you guys. I used my Pumpkin Oatmeal Bars as a starting point…but I wanted to make them healthier, and I didn’t have any pumpkin so I had to work around that.

IMG 1977

These are gluten free as long as you use oats that are, and can easily be made vegan if you use a flax egg!

Healthy Breakfast Bars


by Lindsay L

Prep Time: 5 min

Cook Time: 20 min

Keywords: bake breakfast snack healthy vegetarian low-sodium banana chickpeas cranberry peanut butter

6017001


Ingredients (12 bars)

  • 1 c garbanzo bean flour
  • 1 c oats
  • 1/2 c oat flour
  • 1 tsp cinnamon
  • 1 tsp baking soda
  • 2 Tbsp chia seeds
  • 1/2 c natural peanut nutter
  • 1/2 c brown rice syrup
  • 2 egg whites
  • 1 tsp vanilla
  • 1 c mashed banana
  • 1/2 c chocolate chips
  • 1/2 c dried cranberries

Instructions

Mix wet ingredients in a medium-sized bowl.

Add dry ingredients and stir until combined.

Stir in the cranberries and chocolate chips.

Pour mixture into a greased 9 x 13 pan and bake at 375 degrees for 15 – 20 minutes.

Powered by Recipage

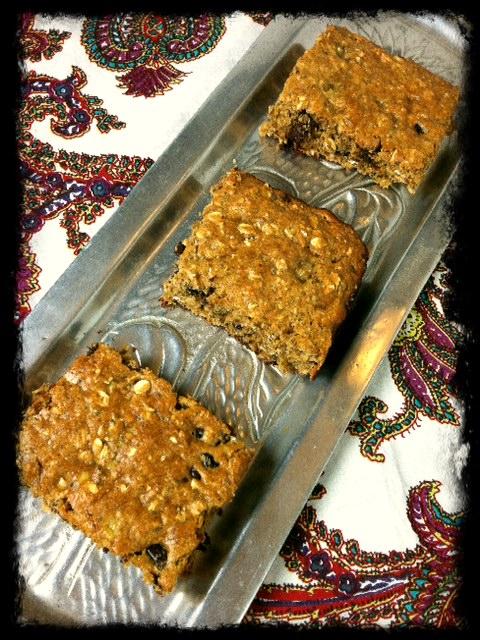
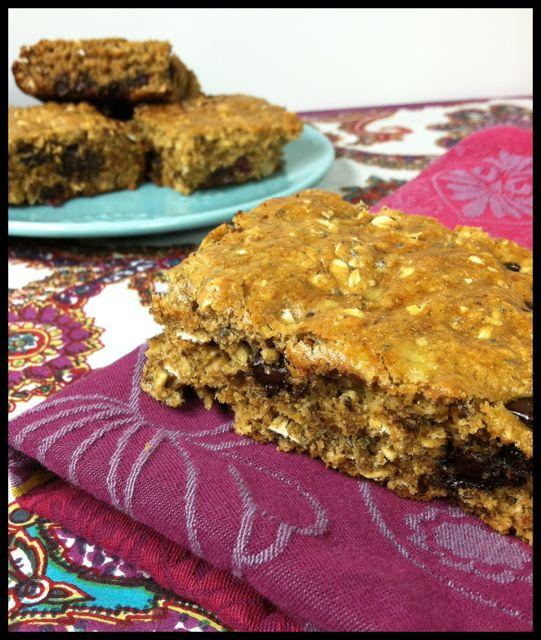
These bars are moist and delicious and packed with protein and fiber! You can customize them by adding different kinds of dried fruit, leaving out the chocolate chips or you could try subbing pumpkin or applesauce for the mashed banana! Also, when I first tested these I made a quarter batch, so this recipe can easily be halved or quartered. They could also be baked in a variety of different sized pans to get your desired thickness.

photo 145


IMG 1976

Pin It
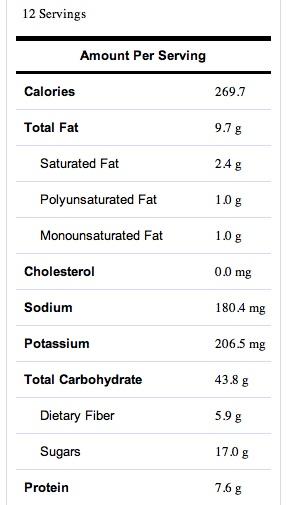
I plugged this recipe into sparkpeople because I was curious about the nutrition facts and look what popped out:


bars


 I was so pumped to see so much fiber and protein in them. The sugar is a little high, but some of it is natural from the banana, and if you left out the chocolate chips and used an unsweetened dried fruit instead of craisins it would be lower.


So there you have it. My new favorite morning snack 🙂


Today’s workout:


t’d been a while since I did a good tabata so I put one together that was all legs and by the end I was FEELIN THE BURN! One of my favs so far!


feb12th1

Pin It

Enjoy!
–Lindsay–

Filed Under: Breakfast Tagged With: Cranberry

Fitness Friday 9

February 10, 2012 by Lindsay 16 Comments

Hi Friends!

Happy Friday 🙂 Time for another week of workouts!

fitnessfriday1

Gosh I love Fridays 🙂 I’ve got some good workouts to share with you today! My favorite this week was the Fast 4 & Core so be sure to check that one out!

Let’s get started shall we?

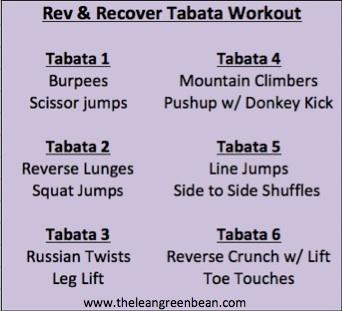
Feb 3rd – Rev & Recover Tabata Workout
I kept the tabatas simple with only 2 exercises for each one. Tabatas 1 & 2 and 4 & 5  will rev up your heart rate and get you breathing hard. Tabatas 3 & 6 let you actively recover with tabatas geared towards ab exercise.

feb3rd

I liked this tabata because it was quick, but still got me sweating. I did 20 sec of work/10 sec rest eight times total per tabata so each exercise was done 4 times. It took 24 minutes with no rest between tabatas.

———————————–

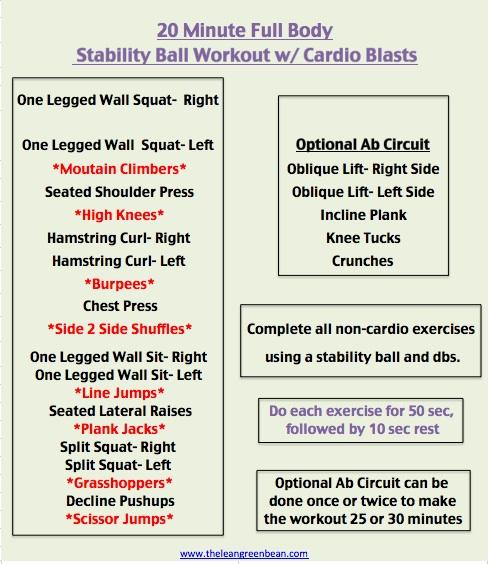
Feb 4th  – I put together a stability ball workout with cardio blasts. Each exercise was done for 50 sec. followed by 10 sec rest. This took 20 minutes, followed by an optional 5 minute ab workout that could be done once or twice.

feb4th

If you’re not sure how to do any of these exercises using a stability ball, just google them! There are tons of videos out there to show you, but here’s a quick run down:

One legged squats– place the ball between your back and a wall. Stand on one leg and squat down. The ball will roll down the wall with you.
Seated shoulder press- Sit on the stability ball and do shoulder presses like normal
Hamstring curl– Lay on the floor and place one foot on top of the ball. Roll the ball towards you using your hamstring and then roll it back out.
Chest press– Place your feet on the floor and your upper back on the ball. Perform chest press like normal.
One Legged Wall Sit- Place the stability ball between your back and the wall. Stand on one leg and roll down the wall until your leg is in a seated position. Hold.
Seated lateral raises– Sit on the stability ball and perform lateral raises as usual
Split squat– Put one foot, laces down on the top of the stability ball. Stretch your front leg out to a lunge position. Squat up and down.
Decline pushups– Put your feet on the stability ball and your hands on the ground and do pushups.

Abs:
Oblique lifts– google this one
Incline plank– Do a plank but put your forearms on the stability ball and keep your feet on the floor
Knee tucks– put your hands on the floor and your legs on the stability ball. Pull your knees towards your stomach, rolling the ball in with them and back out
Crunches– lay with your back on the stability ball and your feet on the floor and perform crunches like normal

————————————–

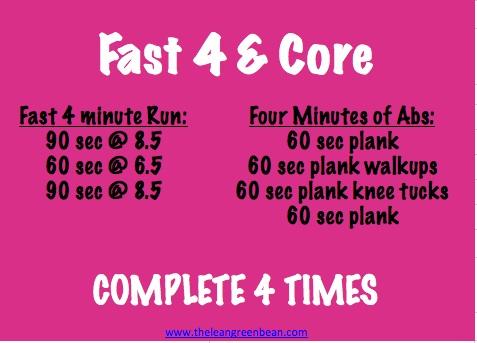
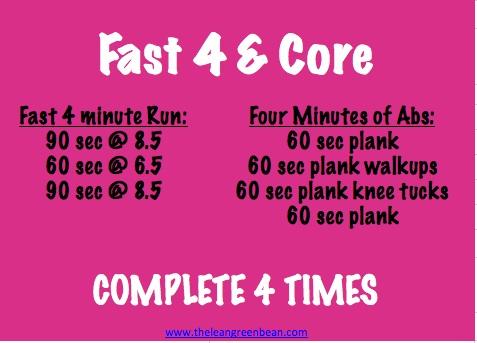
Feb 5th– Wanted to push myself with running and do some core work so this is what I put together:

feb5th

Pin It

This speed was crazy fast for me. It’s basically a 7:45 min mile, and you end up running just over ½ a mile…then ab work…and repeat. I covered 2.08 miles.

——————————————-

Feb 6th– I did this workout– still one of my all-time favs. Kills me every time. I used 15# dbs and it took me 23 minutes.

—————————————-

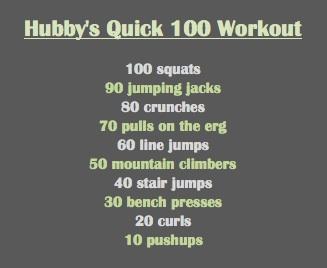
Feb 7th-rest day for me, but hubby made himself a little 100 workout so I thought I’d share it with you!

feb7th

—————————————-

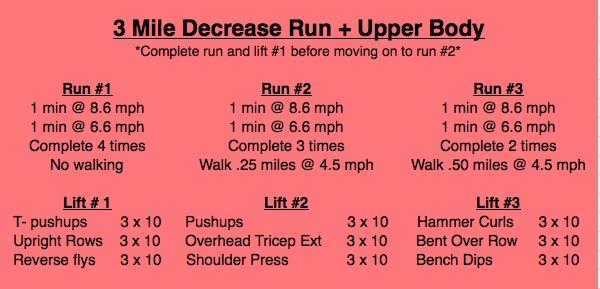
Feb 8th– My legs were a little tired still, even after my rest day but I wanted to do a bit of running. I also knew I needed to do some upper body lifting. I’m notorious for avoiding pretty much all upper body weights except shoulder presses…but I’m working on it! I put together a 3 mile decrease run, where the miles are broken up by upper body exercises and each mile, you decrease the amount you run and increase the amount you walk.

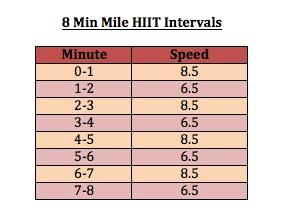
I used my goal speeds from my 8 min miles workout and finally got it dead on! If you run alternating 8.6 and 6.6 mph you will finish a mile in exactly 8 min.

feb9th

With those treadmill speeds you’ll finish the first mile in 8 minutes, the second in 9:20 and the third in 10:40. You can make it more challenging my increasing the incline during the walking portions. For the lifting I used 10# dbs for everything except the tricep ext where I used one 15#.

———————————-

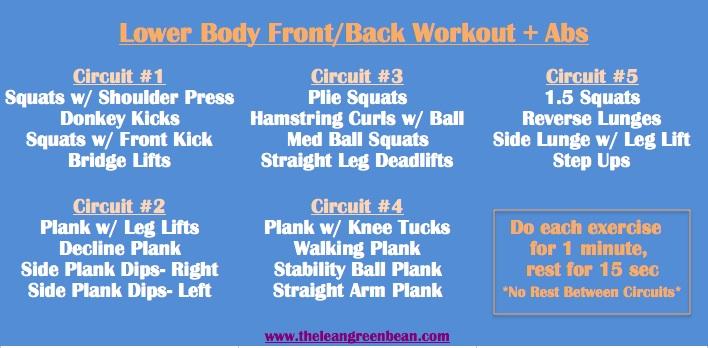
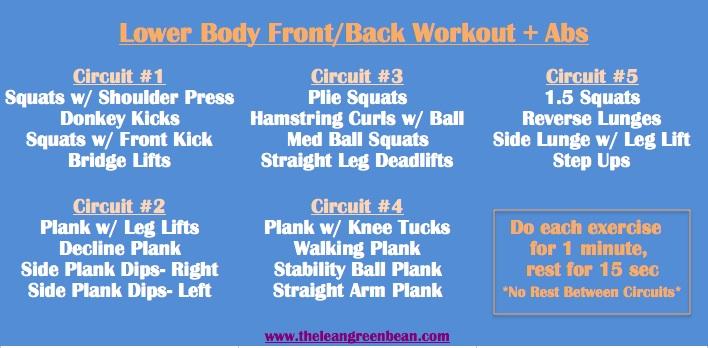
Feb 9th- I wanted to tackle some leg work, so I chose some exercises that worked the quads and some that worked the hamstrings and glutes (hence the front/back workout name). Then I threw some abs for good measure! Here’s what it looked like:

feb9th1

I used 15# dbs for most of the leg exercises. The hardest part for me? Two full minutes of side plank dips! Yikes!

———————————

So there you go friends 🙂 Any of these look like fun to you?? Now it’s your turn. Tell me about the best workout you did this week?

Enjoy!
–Lindsay–


Filed Under: Workouts

Sweet Potato Falafel

February 9, 2012 by Lindsay 62 Comments

Hi Friends!

So here’s the deal. I’ve only actually had falafel like twice…ever. So i’m no expert.

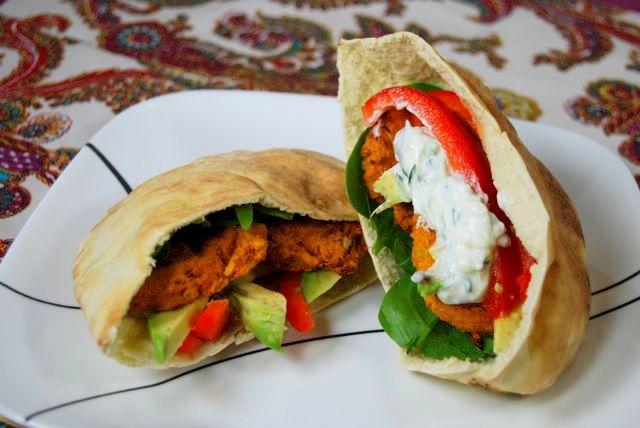
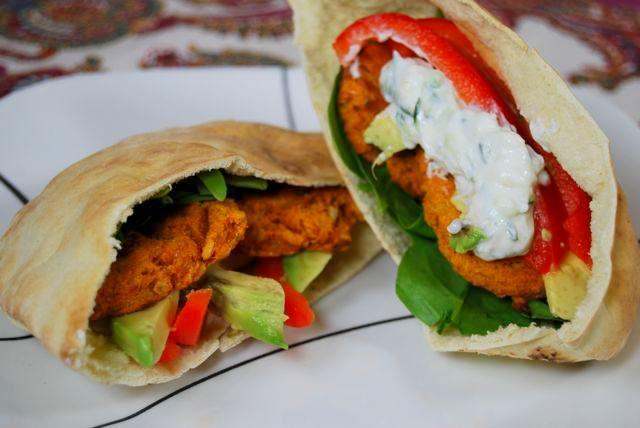
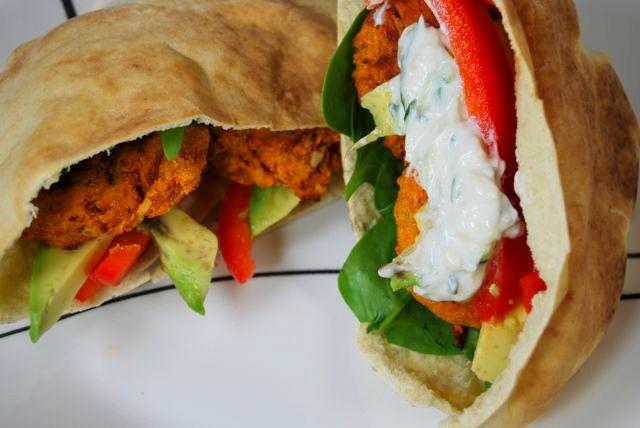
This Sweet Potato Falafel makes a great vegetarian lunch! Enjoy it in a pita or on a salad!

But we all know that I am immediately sucked in to any recipe with sweet potato in the title. When I first discovered Allie’s blog a few months ago, the first recipe of hers that I noticed was her Sweet Potato Falafel. I immediately wanted to make them…however I was forced to wait a while because I had no idea that most falafel recipes call for chickpea flour, not just canned chickpeas.

This Sweet Potato Falafel makes a great vegetarian lunch! Enjoy it in a pita or on a salad!

I tried to make my own chickpea flour with some dry chickpeas I had. I put them in the food processor and OMG was it loud. Worst noise ever. It hurt my eardrums terribly, and barely made a dent in breaking up the chickpeas in to flour.

Then I tried two different grocery stores and neither of them had the flour. I complained to the hubby and he told me he was going to put me on WhiteWhine.com. Have you heard of this website. HILARIOUS. Go check it out. It’s basically just a collection of ridiculous complaints from overpriveledged white people.

ANYWAYS, third times a charm I guess…because I located my flour and immediately got to work on these falafels.

falafel

I made some changes to the recipe so below is the one I used. I cut down on the sweet potato cooking time by microwaving almost all the way and then baking for just 10 minutes for flavor. I also didn’t wait for the dough to cool before scooping and baking like a lot of recipes said to do.

Sweet Potato Falafel


by Lindsay L

Prep Time: 20 min

Cook Time: 15 min

Keywords: bake appetizer entree sandwich healthy low-sodium vegetarian sweet potato chickpeas Greek Mediterranean

6016633


Ingredients (12 falafels)

For the Falafel

  • 2 medium sweet potatoes
  • 1 c chickpea flour
  • 3 cloves garlic, minced
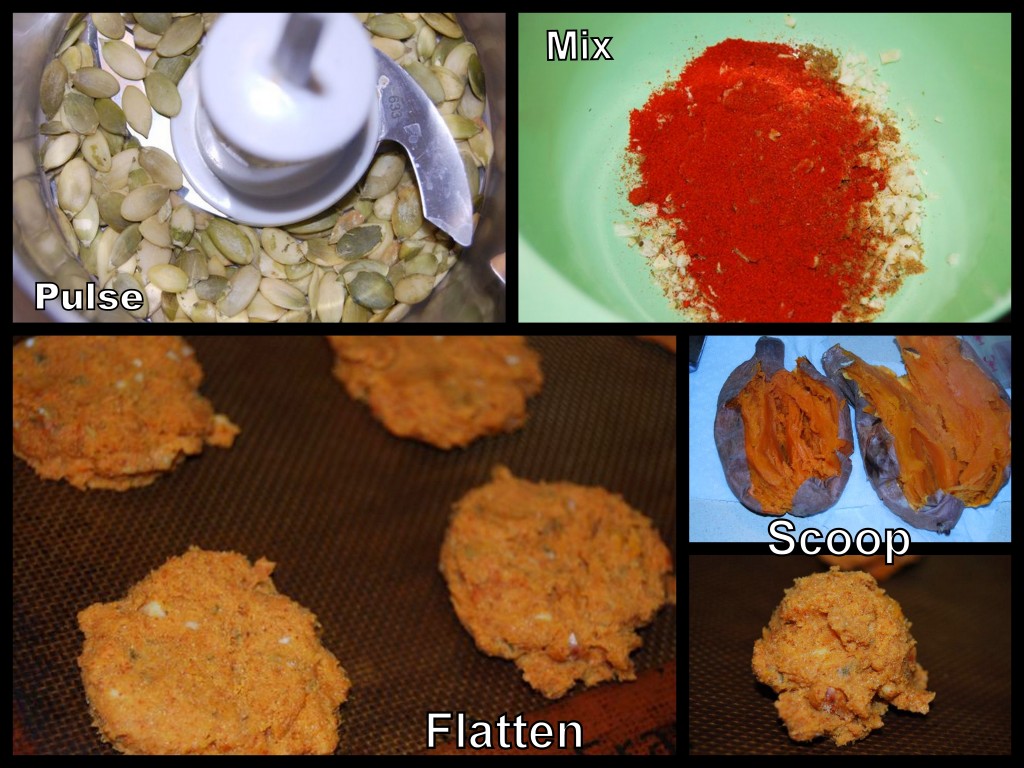
  • 1/4 c pepitas, pulsed several times in a food processor
  • 1 1/2 tsp cumin
  • 1 tsp cayenne pepper
  • 1 tsp paprika
  • juice from 1/2 a lemon
  • 1 Tbsp EVOO

For the Tzatziki sauce

  • 1/2 c plain, non-fat greek yogurt
  • 1/4 of a cucumber, shredded and squeezed of excess moisture
  • 2 cloves garlic, minced
  • 1 tsp EVOO
  • 1 tsp red wine vinegar
  • 1 tsp lemon juice

For assembly

  • avocado slices
  • red pepper slices
  • spinach
  • cucumber slices
  • pitas

Instructions

For the Falafel

Preheat oven to 425 degrees F.

Stab the sweet potatoes all over with a knife and microwave on high for six minutes, turning once.

Remove from microwave and bake in the oven for an additional 10 minutes (This helps them get the oven baked taste without all the time).

In a small bowl, combine the garlic, pepitas, spices and chickpea flour.

When the sweet potatoes are done, slice in half lengthwise and scoop the flesh into the bowl.

Mix well and add the lemon juice and olive oil.

Stir until combined- mixture will be thick, like cookie dough.

Scoop dough onto cookie sheet. Use a fork to flatten each ball.

Lower oven temperature to 400 degrees F and bake for 14 minutes, flipping once 1/2 way through.

For the sauce

Combine all ingredients in a small bowl and let sit for at least 15 minutes

To assemble

Stuff half a pita with spinach, 2 falafels, red pepper slices and avocado. Top with tzatziki sauce.

Powered by Recipage

The verdict? These were really good! sweetpotatofalafel5 They are a bit on the dry side (not totally sure if most falafels are like that or not) but I found that with the red peppers, avocado and sauce, there was plenty of moisture so they didn’t taste dry at all….and the flavor was great. (Side note, we ate the leftovers the next night and they were just as good) I’m just saying if you were to just pick up a falafel by itself and munch on it, it might be a little dry 🙂 If you’re worried about it, you could maybe add a little greek yogurt to the falafel dough to moisten it…or an egg. This Sweet Potato Falafel makes a great vegetarian lunch! Enjoy it in a pita or on a salad! Pin It

This Sweet Potato Falafel makes a great vegetarian lunch! Enjoy it in a pita or on a salad!

So there you have it friends! The recipe for the sauce made just enough for us and it’s about 1/3 the amounts of some of the recipes I looked at. I also left out the dill that appears to be traditional because I hate dill 🙂 How do you feel about falafel? Today’s workout:  I wanted to tackle some leg work so I chose some exercises that worked the quads and some that worked the hamstrings and glutes (hence the front/back title). Then I threw some abs in there for good measure 🙂 Here’s what it looked like: feb9th2 Pin It
Enjoy!
–Lindsay–


Filed Under: Lunch Tagged With: Sweet Potato

Black Bean, Shrimp & Avocado Rollups

February 7, 2012 by Lindsay 40 Comments

Hi friends!

A couple of months ago, the hubby and I were back in our college town and we ordered an appetizer at one of the bars while we waited for a table to open up at the restaurant down the street. We ordered some black bean and avocado egg roll type things. They were really good, but they were fried- not my favorite…so when hubby suggested I recreate them at home, I immediately made a note in my phone.

rollups4

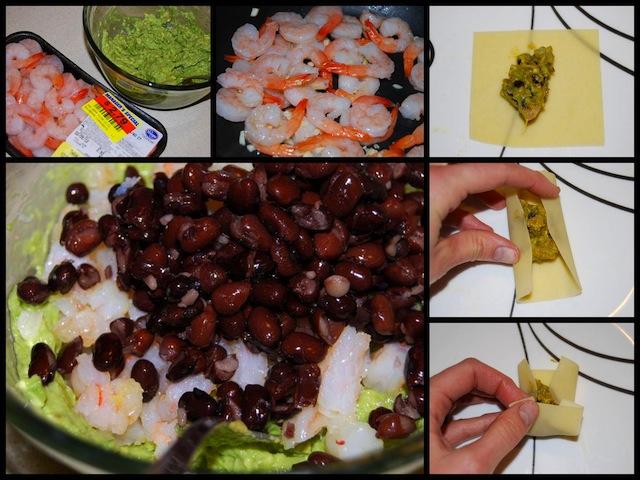
Then I promptly forgot about them for several weeks. The other day I came upon the note in my phone and decided to give them a whirl at home.I changed them up a little bit by adding shrimp. I used wonton wrappers and baked them instead of frying.

rollups

These were super easy to make, have very few ingredients and were a big hit with the hubby! They’d make a great party appetizer and are a fun alternative to chips and dip.

rollups2

So here’s what you do:

Black Bean, Shrimp & Avocado Rollups

by Lindsay L

Prep Time: 15 min

Cook Time: 12 min

Keywords: bake appetizer healthy vegetarian black beans avocado shrimp

Ingredients (15-20 rollups)

  • 1 large avocado
  • 1 Tbsp lemon juice
  • 1/2 c black beans
  • 1/4 lb shrimp, raw
  • 1/2 tsp cayenne pepper
  • 2 Tbsp onion, diced
  • 2 cloves garlic, minced
  • 20 wonton wrappers
  • salsa

Instructions

In a small saucepan, heat some EVOO over medium-high heat.

Saute the onion, garlic and shrimp until the shrimp is cooked through.

Dice the shrimp mixture (you should have about 1/2 a cup) and let cool.

Mash the avocado in a small bowl. Add the lemon juice, black beans, cayenne pepper and shrimp and stir until well combined.

Place one tablespoon of filling into a wonton wrapper. Fold in two of the sides, then roll up from one of the unfolded ends and place on a baking sheet, with them seam down.

Mist with cooking spray, sprinkle with paprika if desired and bake at 425 for 12-15 minutes until wontons are golden brown.

Serve with salsa.

Powered by Recipage

The hubby suggested that these could also be made in tortillas and then sliced. We’re going to try that next time.

rollups3

rollups5

What’s your favorite non-traditional party appetizer?

Workout:

Wanted to push myself with running and do some core work so this is what I put together:

feb5th1

Pin It

This speed was crazy fast for me. It’s basically a 7:45 min mile, and you end up running just over ½ a mile…then ab work…and repeat. I covered 2.08 miles.

Enjoy!
–Lindsay–


Filed Under: Uncategorized Tagged With: Avocado

Cilantro & Roasted Red Pepper Pesto

February 6, 2012 by Lindsay 39 Comments

Hi Friends!

It’s been a while, but it’s time for another Secret Recipe Club post!


This month I was assigned to Katherine’s blog: Katherine Martinelli. She has a beautiful blog and takes amazing photos. I drooled over pretty much everything, and after much deliberation I finally decided I was so intrigued by her Cilantro Pesto that I had to give it a try!

A few weeks ago, I was tweeting with Lauren and she was telling me how much she loved this roasted red pepper pesto! I was immediately in love and bookmarked the recipe. When I decided to make this cilantro pesto, I thought it’d be the perfect time to add in a roasted red pepper to it to tone down the cilantro a little.

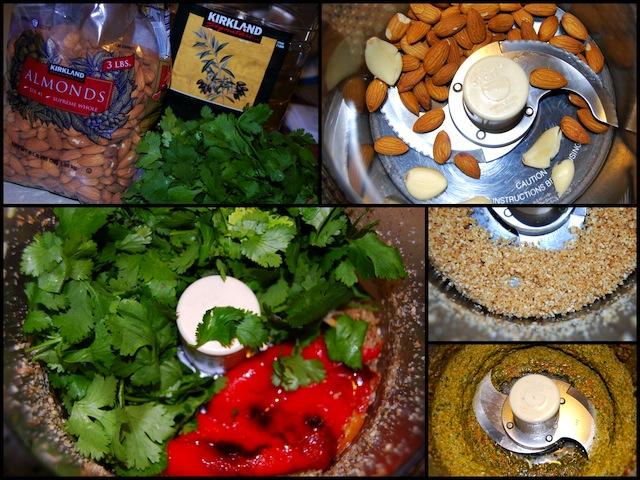
So I made a few changes to Katherine’s recipe. I used almonds instead of pine nuts because I had them on hand, added a red pepper, decreased the oil and didn’t use any cheese!

src1

Cilantro & Roasted Red Pepper Pesto

by Lindsay L

Prep Time: 5 min

Keywords: food processor healthy vegetarian red pepper cilantro

Ingredients (1/2 cup)

  • 1 roasted red pepper, skin & seeds removed
  • 1/3 raw almonds
  • 2 cups cilantro leaves
  • 4 cloves garlic
  • 2-3 Tbsp olive oil
  • parmesan cheese if desired

Instructions

Place the almonds and garlic in a food processor and pulse several times.

Add the cilantro and red pepper and process until smooth.

Slowly pour in the olive oil and process until well blended.

Store in an airtight container in the fridge or freeze.

Powered by Recipage


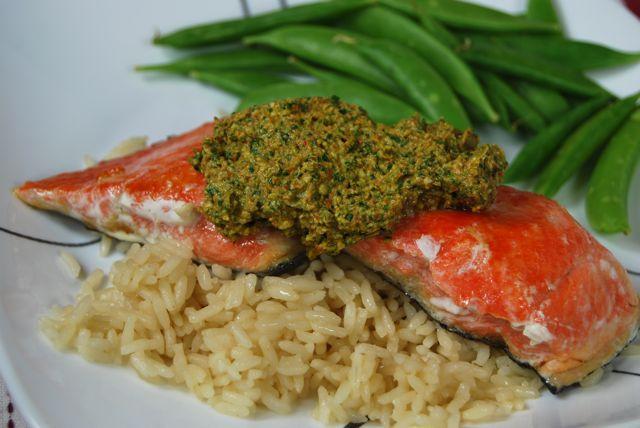
It turned out really well! I served in on some salmon but i’m putting the rest in the freezer for the next time I feel like making some bruschetta….and i’ll use the rest to make some pesto pasta. YUM!


DSC 1321

Thanks to Katherine for the inspiration!

Weekend Workout- Saturday:

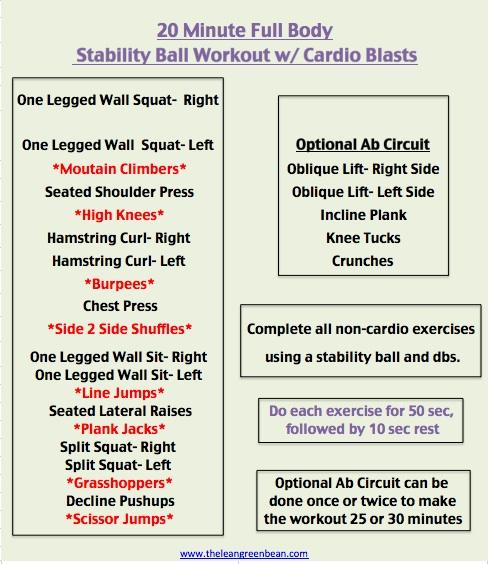
I put together a stability ball workout with cardio blasts. Each exercise was done for 50 sec. followed by 10 sec rest. This took 20 minutes, followed by an optional 5 minute ab workout that could be done once or twice.

feb4th1

Pin It
If you’re not sure how to do any of these exercises using a stability ball, just google them! There are tons of videos out there to show you, but here’s a quick run down: One legged squats- place the ball between your back and a wall. Stand on one leg and squat down. The ball will roll down the wall with you. Seated shoulder press- Sit on the stability ball and do shoulder presses like normal Hamstring curl- Lay on the floor and place one foot on top of the ball. Roll the ball towards you using your hamstring and then roll it back out. Chest press: Place your feet on the floor and your upper back on the ball. Perform chest press like normal. One Legged Wall Sit- Place the stability ball between your back and the wall. Stand on one leg and roll down the wall until your leg is in a seated position. Hold. Seated lateral raises- Sit on the stability ball and perform lateral raises as usual Split squat- Put one foot, laces down on the top of the stability ball. Stretch your front leg out to a lunge position. Squat up and down. Decline pushups- Put your feet on the stability ball and your hands on the ground and do pushups. Abs: Oblique lifts- google this one Incline plank- Do a plank but put your forearms on the stability ball and keep your feet on the floor Knee tucks- put your hands on the floor and your legs on the stability ball. Pull your knees towards your stomach, rolling the ball in with them and back out Crunches- lay with your back on the stability ball and your feet on the floor and perform crunches like normal Enjoy! –Lindsay–

Filed Under: Uncategorized

What’s in a Jean Size

February 1, 2012 by Lindsay 83 Comments

Hi Friends!

I’ve been thinking about something for the past week or so and it just doesn’t seem to want to get out of my head, so I’m writing about it.

me1

{This is funny because clearly I was not having
any deep thoughts in this picture}

ANYWAYS…last week, one of my fellow Fitfluential Ambassadors asked people to submit a picture of themselves wearing a pair of jeans that make them feel great about themselves. I didn’t…mainly because I was feeling lazy…but I think that’s what started this whole thought process.

I started thinking about the pairs of jeans I own. I think I have 4 pairs. 2 pairs of what used to be my favorite pair with the flare legs. Yep, exactly same pair, bought about 2 years apart…so one’s old and one’s new. And two pairs of my new favorite pair of skinny jeans. Yep, again, same exact pair, just one old and one new.

I held out on buying skinny jeans for a long time. I have big legs, always have, probably always will, namely big thighs…and I was convinced skinny jeans just weren’t for me. So, a few months ago when I finally got up the courage to even try some on…it was a big day. This particular pair wasn’t great…BUT they weren’t horrible…I was surprised and I decided to keep looking. A few weeks later, I tried on another pair and they were AWESOME. They weren’t the infamous jeggings…they were actual jeans…just with a skinny ankle opening…HUGE change from the flare legged jeans I’d been wearing for oh, approximately the last 15 years. So I bought them.

And I’ve pretty much been wearing them non-stop. I think I like them because they remind me of the leggings I’d rather be wearing…but they’re jeans….so they’re more appropriate in most situations 🙂 I’m especially loving that they fit so nicely in my winter boots and that I no longer have to deal with stuffing my bunchy flare legged jeans into them, which i’ve been doing for oh, approximately the last 15 years.

jean3

Anyways, so here’s what happened. The other day it was pretty nice out (read: dry, with no snow) so I decided I would wear my tennis shoes to class, instead of my boots. Along with that decision, I decided that since I’d been wearing my skinny jeans for the past however many days in a row, that today might be a good day to pull out the old flare legged pair. Here’s me wearing the flare back in April.

jeans2

And you know what? They didn’t fit. Well, they fit. I could still button them, they weren’t too tight in the waist, but I spent the next several hours being super uncomfortable. Since I started working out, my legs have changed a little bit…I’ve gained some muscle. And when I put on my old pair of jeans, ie the pair I hadn’t really worn since I started working out, they didn’t fit right. They were tighter in my hips and thighs but still fit in the waist. I was constantly tugging on the sides and squatting to try to stretch them out, yet pulling them up at the waist.

And it was miserable. I knew they still looked ok. I could see myself in the mirror and I know that anyone else who saw me wasn’t going “omg look at how terribly her jeans fit”…but I wasn’t comfortable. I started thinking I must’ve gained weight since the jeans were tighter in some places…even though I KNEW it was muscle I’d gained. It’s still hard to avoid those negative thoughts.

Later that day, as I came home from class, I remembered that the hubby and I had a college alumni event to go to that evening. I wasn’t really in the mood. I was feeling a little down in the dumps…but hubby was excited about going. So here’s what I did: I got my hair wet and restyled it from the messy high ponytail it had been in all day. I put on a new shirt that I know fits my body that way it is now, and I put on my skinny jeans and my favorite pair of boots. And you know what?

I felt like a million bucks. I was comfortable and I didn’t tug at my jeans a single time during the night.

photo 129

When I got home, I looked at the size on both pairs of jeans…just for kicks. And you know what? The skinny jeans were a size smaller. I realized that the two pairs of jeans represented two different stages of my life. One pair fits how I used to be, and one pair fits how I am now. And you know what? That’s ok. It would have been ok if they were the same size, or even if the skinny jeans were a bigger size. Who cares?! They look better, they feel better…why should it matter what size they are.

It got me thinking about why clothing size really matters. Do you think people’s body confidence would increase if jean were sized via random letters in non-alphabetical order instead of increasing numerical numbers? Would people care less about what size they wore  if they couldn’t compare their size C jeans to another girl’s size K jeans? Versus comparing their size 10 to another’s size 4?

312

Clearly size is irrelevant anyways if I can have two pairs of jeans and the the bigger ones feel too tight. Size is just a number, and it irritates me when people let it define them.

I guess the point I’m trying to make here is that if you’re working out hard, losing fat and gaining muscle, OR losing weight through diet and exercise, OR working hard to get healthy and gain weight….treat yourself to some clothes that fit your body now. Whether it be a size bigger, or a size smaller….find a size that FITS YOU…don’t just buy something and try to squeeze into it because it’s the size you think you want to be or think you should be. And don’t keep wearing the same pair if your body changes. 

210

Ignore the size, ignore the label, ignore what size the sizing charts tell you you should be wearing. Focus on the way they FIT, not what size they are. Find a pair of jeans that are comfortable. That fit your curves, or lack of curves, whatever the case may be. That make you SMILE when you look in the mirror because you’re proud of yourself for all your hard work and you want to show it off.

114

Then buy those and never look back!

Today’s workout:

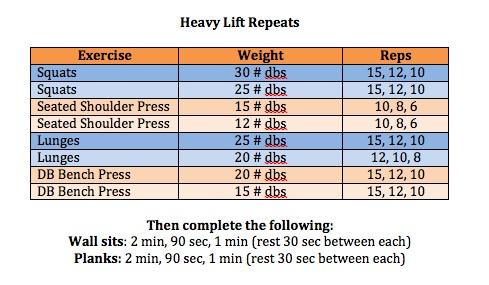
Needed a heavy lifting day so I picked 4 moves and really focused on heavy weights.

Here’s what I did:

feb1st1

Pin It

I chose a heavy weight and then a slightly lighter one for round two. I’m getting to the point where it’s almost as hard to hold the 30# dbs as it is to squat with them! I miss having a bar to do squats. But anyways, my legs were screaming by the end of the lunges…and then I went and did wall sits!
PS…you can turn your gymboss into a stopwatch- perfect for the wall sits and planks!

–Lindsay–


Filed Under: Uncategorized

January Foodie Penpals

January 31, 2012 by Lindsay 27 Comments

Heyyyyyyyyy Friends!

It’s time for another Foodie Penpals reveal day!

FPP

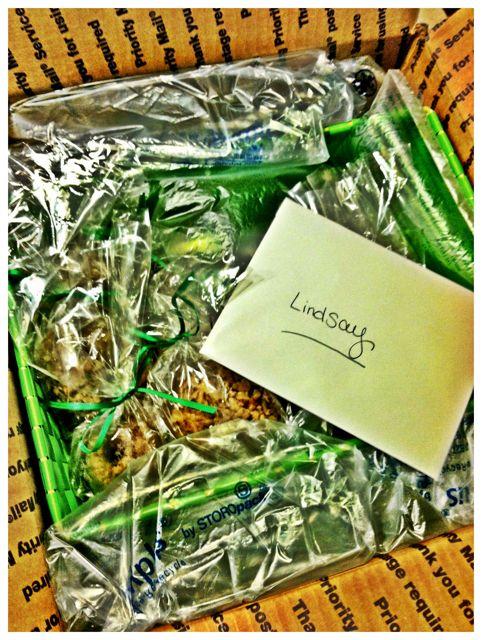
And let me tell you, I got some GOOD stuff this month! I got my box from the lovely Sarah at Sarah Snacks. She’s totally adorable and one of my fav bloggers, not only because she’s also in school to become an RD but because she whips up delicious recipes and is fun to chat with on Twitter 🙂

Check out what she sent me:

IMG 1754

Expertly packed so everything made it in one piece!

IMG 1755

Look at all those goodies! And such a fun green basket…which is now conveniently holding the million supplies we need to take care of our wounded puppy! (Who, by the way, did not end up needing more stitches, but still has his paw wrapped and has successfully eaten his entire bandage twice more…sigh…good news is the paw does appear to be healing, slowly but surely)…ANYWAYS…

IMG 1756

She sent me homemade treats, which I love! Banana chocolate chip and banana walnut muffins!

IMG 1757

Local Texas pecans. A little back story…I complained on twitter a few months ago about how all the Christmas cookies i wanted to make used pecans but they were SO expensive here in Ohio. She told me they have pecan trees in Texas and she’d send me some when they were back in season. AND THEN SHE REMEMBERED! She’s the freakin’ best 🙂

IMG 1758

Dark chocolate covered cherries, which are delicious to munch on and are also probably going to be very good in the cookies I put them in 🙂
Vegan queso (Fun Fact: She’s the second foodie penpal to send it to me. Foodies love the stuff!)
And that salsa. BEST.SALSA.EVER. The hubby and I devoured it in about 2 days. So good!!!

So like I said, I lucked out 🙂

In case you’re now super jealous and would like to join in the fun, here are a few details about the program:

-On the 5th of the month, you will receive your penpal pairing via email. It will be your responsibility to contact your penpal and get their mailing address and any other information you might need like allergies or dietary restrictions.
-You will have until the 15th of the month to put your box of goodies in the mail. On the last day of the month, you will post about the goodies you received from your penpal!
-The boxes are to be filled with fun foodie things, local food items or even homemade treats! The spending limit is $15. The box must also include something written. This can be anything from a note explaining what’s in the box, to a fun recipe…use your imagination!
-You are responsible for figuring out the best way to ship your items depending on their size and how fragile they are. (Don’t forget about flat rate boxes!)
-Foodie Penpals is open to blog readers as well as bloggers. If you’re a reader and you get paired with a blogger, you can choose to write a short guest post for your penpal to post on their blog about what you received. If two readers are paired together, neither needs to worry about writing a post for that month.

**The BIG news this month is that we’re going to do a trial run in Canada.  I’m still not exactly sure how it will work with shipping costs and stuff since I’m not sure you guys up North have flat rate shipping boxes, but if you’re willing to give it a try for a month and provide me with some feedback, that would be awesome!

Please note, Canadian Residents will be paired with other Canadians only. We’ve determined things might get too slow and backed up if we’re trying to send foods through customs across the border from US to Canada and vice versa. So, I’m going to keep two separate lists and match US w/ US and Canada w/ Canada!

Sound like fun? If you’re interested in participating for February, please send  an email to Lindsay at [email protected] and include the following information:
-Your full name
-Your email address
-Your blog name/address
-Your twitter handle (if applicable)
–WHETHER YOU ARE A US RESIDENT OR CANADIAN RESIDENT. – this is SUPER important so I can get you on the right list!

That’s all for today friends!

Yesterday’s workout:

I didn’t sleep well the night before and literally had to drag myself off the  couch but it ended up being my best workout of the week. I hit the treadmill for some more intervals but decided I was going to jog during my recovery instead of walk.

Here’s what I did:

jan30th1

Pin It

So here’s the deal. This workout was a bit of trial and error. For the first mile, I ran the very first minute at 8.0 and decided it wasn’t fast enough so I bumped it up to 8.5. That mile too 8:12. For the next mile I did all 8.5/6.5 and it was 8:06 which I realize isn’t exactly an 8 min mile per the title but it’s pretty darn close! For mile 3, I was tired. So for the first 4 minutes I did 8.6/6.6. Then for the next 4 I did 8.6/4.5. Once I hit 8 minutes I was at 2.92 miles so I bumped it back up to 8.6 and finished mile 3 in 8:35. It was amazing!!! At first I felt bad that I had to walk for the second half of that last mile…but then I realized that all three of my miles were still faster than the fastest one I did on Saturday! Next time I’m going to try to do all of them at 8.6/6.6.

–Lindsay–

Filed Under: Uncategorized

How To Make Your Own Hummus

January 30, 2012 by Lindsay 42 Comments

Hi Friends-

I have my first test of the quarter today so I’m just popping in with a quick video I shot last week for you guys.

As you know, I’m a huge fan of making my own hummus. It’s SO easy and I love how totally customizable it is. I finally got my act together and made a video of me making my favorite kind of hummus.

The video is only three and a half minutes long so that just shows you how quickly it can be done (less than 5 min!).

red pepper hummus

So here’s the deal:
This is my all-time favorite hummus. It includes a roasted red pepper, roasted garlic and half a roasted sweet potato. I realize that those things cannot be roasted in under 5 minutes…but it’s so easy to just throw them in the oven one night when you’re already using the oven to cook dinner. Then you can either make the hummus when they’re done or pop them in the fridge and make it in the next day or two!

So…watching the video is not really a necessity since I’m giving you the recipe….but watch away if you wish 🙂

So here’s the recipe:

Roasted Red Pepper & Garlic Hummus With Sweet Potato

by Lindsay L

Prep Time: 1 hour

Cook Time: 5 min

Keywords: roast food processor appetizer snack side healthy low-sodium vegetarian chickpeas sweet potato red pepper

Ingredients (2 cups)

  • 2 cans chickpeas, drained & rinsed w/ 1/2 c liquid reserved
  • juice of one lemon
  • 1 red pepper, roasted w/ skin & seeds removed
  • 1/2 a sweet potato, roasted w/ skin removed
  • 1 head garlic, roasted w/ skin removed
  • 3 Tbsp tahini
  • 1/2 tsp cayenne pepper
  • 1/2 tsp paprika

Instructions

Place the chickpeas, red pepper, sweet potato & garlic in the food processor. Pulse a few times.

Add the lemon juice, reserved chickpea liquid, tahini and spices and process until desired consistency is reached.

Add water a little bit at time if it’s too thick.

Store in an airtight container in the fridge.

Powered by Recipage


And here’s the video:

So tell me, do you make your own hummus?

Also, a lot of you guys seemed to enjoy the About Me post I did this weekend.  That, coupled with a post I saw Kelly do a few days ago- where she basically reintroduced herself because she’s noticed she has a lot of new readers lately, got me thinking.

I’d love to do a Q & A post for you guys! So here’s your chance to ask me anything you’ve been wondering, funny or serious…about me, about the blog, about what I’m doing with my life, about fitness and exercise…whatever you want! Leave your questions in the comments, send me an email ([email protected]) or tweet me! I’ll put them all together into a fun  Q & A post 🙂

Yesterday’s workout:

I had a test to study for but wanted to squeeze in a quick workout after I got off work. I put together a list of 10 bodyweight exercises and headed to the basement with my gymboss.

jan29th

Pin It

Finished off the workout with a 2 min plank and two 1 min planks.

Ready, go!
–Lindsay–

Filed Under: Appetizer, Snack

If you looked…

January 28, 2012 by Lindsay 28 Comments

Over the past couple weeks I’ve been tagged by a few bloggers (Caitlin, Meg & Lindsay) to do an About Me post. I was having trouble coming up with lots of random facts to share about myself, but when I saw this post from Ashley, I immediately started writing one of my own in my head….So here’s just a little bit more about me:

If you looked…

If you looked into my home, you’d see…
tumbleweeds of dog fur rolling down the hallway
an ever-expanding home gym in the basement
a pile of mail, some dirty dishes and a vase full of flowers on the couter
a pile of scrapbooks filled with memories
a collection of mismatched plates, jars & other food blogger props
a husband dancing around like an idiot, just to see me smile…

house

If you looked into my car, you’d see…
a dirty apron and a name badge so I don’t forget them on my way to work
an extra pair of shorts, a t shirt and tennis shoes, because you never know when you might have time for a workout
a rust spot from when I tried to parallel park in college & backed into a truck
a clean towel in case I get caught in the rain
2 pairs of sunglasses, a coffee mug and a pile of papers because I’m terrible at remembering to bring things inside
A single earring because the other one fell below my seat about 6 months ago and I’m too lazy to fish it out
the dog’s favorite tennis ball so we’re always ready for a trip to the dog park
the colorful wooden spoon my mom gave me the day I moved out of the house for good, to always remind me of home

photo 128

If you looked into my gmail, you’d see…
countless blog-related emails
followup messages as I try to organize my potential internships
tons of junk emails that I’m too lazy to unsubscribe from
a million daily deals that I still don’t have the money to buy
an email from a good friend so i never forget how lucky i am to have her

computer

If you looked into my phone, you’d see…
hundreds of pictures of my animals
snapshots of random things I eat
photos of my hubby and voicemail messages that never fail make me smile
pictures from trips of taken and days I’ve loved, so I never forget what makes me who I am

phone

If you looked into my head, you’d see..
shadows of worry and self doubt about the future
snippets of pride each time i do a killer workout and survive
a never-ending list of things I need to do, recipes I want to make, workouts I want to try and places I want to visit
memories of fun times with friends, both near and far
a newly developed confidence in myself

me

If you looked into my heart, you’d see..
a fierce desire to share my passion for health and nutrition with others
an indescribable amount of love for my husband, family & friends
an aching sadness because I know that I can’t fix everything that’s wrong with the world
an overwhelming amount of love for my abandoned shelter pets
the crazy amount of happiness I get from helping others
the courage to follow my dreams…

us2

Your turn! What would I see if I looked into your ___________?!

Yesterday’s workout:

Put together a tabata workout to try out my new gymboss timer! Inspired by this flamingo workout:

jan27th1

This workout was a fun way to change it up. I enjoyed the challenge of doing things like shoulder presses on one leg. I used 15# dbs for most of the exercises, 25# db for the deadlifts.

Today’s Workout:
Hit the treadmill for some intervals. I chose 8.5 as my fast running speed and 4.5 as my recovery speed. I wanted to cover 3 miles. Here’s what I did:

jan28th

Pin It

This workout was great! It pushed me but was still doable.
I was definitely tired by mile 3 which is why I slowed down my fast run speed…
but I still finished the 3 miles in 27:00 minutes.

–Lindsay–


Filed Under: Uncategorized

Fitness Friday 7

January 27, 2012 by Lindsay 29 Comments

Hey Hey Friends!

We made it to Friday once again! You know what that means…time for another round of workouts!

fitnessfriday1

This week was pretty cardio heavy, including two 3 mile runs and a serious 1000 rep workout…but it also included 2 rest days and a day of heavy lifting! I like to think that’s a good balance 🙂

Ready? Here we go:

Jan 20th– rest day

Jan 21st– The hubby and I had to stagger our workouts so one of us can watch the dog this week…so, he went first and ran 4 miles in 40 min! So proud of him!!

When it was my turn, I put together an interval workout for myself with my fastest treadmill speeds ever! It’s a 10 min cycle so you can choose how many times to repeat it to get to your desired workout time.

I did it twice and covered 2.3 miles in 20 minutes, then finished out to get to 3 miles by doing the next five min at 6.0, 6.1, 6.2, 6.1, 6.0 (one min each) and then a min at 6.5 and a min at 7.0 to finish 3 miles in 26:50!

Before today I’d never gone above 8.0 on the treadmill so this was pushing it for me. If you need a little extra time to recover, especially after the first cycle you can walk 30 sec at 4.0, run 30 sec at 6.0 and then leave the speed intervals the same. That’s what I did for the second cycle.

Here’s what it looked like:

jan21

Jan 22nd– I seem to be in a running mood this week, but sometimes I like to break it up with a little break or two. I set out with the goal of running 3 miles total, one mile at a time. In between, I did three 4-min tabatas to give myself some active recovery!

Jan22

I ran the three miles in 27:52 (9:17 pace) and each Tabata took 4 minutes. I rested for 1 min after each Tabata. I set the treadmill at 6.5mph for each mile. It was tough, but not impossible. By the time I got halfway through the last mile, I wanted to take the speed down to 6.0 SO BADLY but I fought a mental battle with myself and told myself I could do it at the speed I was at, and I did!

Jan 23rd–  Suddenly it was 11pm and I hadn’t done my workout yet! After 2 days of cardio I decided to do some heavy weights w/ some of my fav arms & legs exercises.

jan23

For me, theses were heavier weights than I usually use to do my high rep circuit workouts so this was a challenge for me. I tried to pick a weight that I would really struggle with in the last set. This took me 20 minutes and I felt great

Jan 24th– Was in the mood to push myself so I put together a new 1000 rep workout. I broke it down into 10 moves, 25 reps of each, repeated 4 times.

jan24

Pin It

This.was.killer. If you’re not feeling the burn after this one, I want your legs. Seriously, I almost collapsed on the last set of lunges. If 1000 is too much for you, just do the cycle twice. This took me about 45 minutes, but there was a little editing going on while I was doing it as I worked out the best moves and what order to do them in.

Jan 25th– Rest day!

Jan 26th– Another late night workout. I was in the mood for the treadmill but not just running. I came upon this workout from Jillian at Sprinkle Massacre just before I went downstairs and decided to use it as my starting point.Basically I did the first half and then decided I didn’t like the slower speed/higher incline combo so I reversed the workout and went back down the pyramid and then added a few min at the end.

Mine looked like this:

jan26th

I finished 3 miles in 32:50.

To be honest, this was easy for me. It works out to about an 11 min/mile pace, which explains why…but my legs were feeling good. I felt like I could have run forever at this pace. If I wanted to challenge myself I would need to up the speeds, but this was a great workout for tonight. Exactly what I needed- just to get moving, sweat some but not totally kill myself. WIN!

Now it’s your turn! What’s the best workout you did this week?!

Enjoy!
–Lindsay–


Filed Under: Workouts

Things Blogging Has Taught Me

January 23, 2012 by Lindsay 145 Comments

Hi Friends-

No new recipes today…Today’s post is straight from the heart (and a little long, sorry about that). Recently I’ve been doing a lot of work on my blog and it’s got me thinking about some of the things I’ve learned over the last year and a half.

I thought I would share them with you guys in the rambly sort of way I do best, so here we go…in no particular order:

An honest, candid look at some of the lesson I've learned from being a blogger.

Pin It

 -Blogging is hard. It’s hard to find several hours a day to devote to blog writing, reading, cooking and taking pictures. It’s hard to constantly be creative and try to think of new things that you haven’t blogged about, let alone anyone else. It’s hard to be organized enough to line up guest posts or prep extra posts when you have a busy week coming up. But I make time and I put in the effort, because I love it.

-You could easily drown in the sea of social media if you let yourself. When I first started blogging, the only thing I worried about was publishing the post. Occasionally I’d share the link on my personal facebook page. That was it. Then I made a facebook page for my blog. Then I got a twitter account. Then I joined pinterest. And now, it feels like between stumble upon, posterous, tumblr, foodbuzz, youtube and others, that there are million other social media sites that I’m not even using…and quite frankly, I don’t have time for all of them. So I choose to stay active on the social media sites I enjoy most, instead of stretching myself a million different directions and not enjoying any of them.

-You will get jealous of other bloggers Do I get jealous when a blogger gets their 98th picture accepted by Foodgawker while I can’t get them to accept even one of mine? Yes! Or when someone makes it into the Foodbuzz Top 9 for the 10th day in a row? Absolutely. Or when someone gets the same number of pageviews in a day that I do in an entire month? Sure. But I’ve come a long way since I started blogging because I realized that it just doesn’t matter. I can be happy for them and their successes, while still being proud of myself and the things I’ve accomplished. I can work really hard on a recipe or a post and just because it doesn’t get a certain number of page views or pins or whatever, DOESN’T MEAN IT ISN’T AN AWESOME POST! If you find yourself being jealous of other bloggers,  remember that somewhere, someone out there might be jealous of you and the amazing things you’re doing!

-You don’t have to do everything other bloggers are doing. On the food side- You don’t have to spend 1 hour after you cook a meal taking pictures of it every single night. If you’re not in the mood, snap a quick picture and dig in. Your blog can still be successful if you don’t take amazing pictures. One the fitness side- You don’t have to go out and run 20 miles every day to call yourself fitfluential, a runner or an athlete. If running 3 miles is hard for you, then every.single.time you run 3 miles, you should be proud of yourself because that is an accomplishment for YOU. Quit comparing yourself to others and start celebrating all the awesome things you can do.

-No one can make you feel inferior unless you let them. There is absolutely no reason why your 20 minute workout can’t be considered just as good as someone else’s 2 hours of running.  I’ll probably never run a marathon…let’s be honest, I can’t run more than 4 miles without a) feeling like i’m going to die and b) being just plain bored. I don’t enjoy running long distances, so i’m not going to do it. I do enjoy putting together an amazing 20 minute circuit workout and calling it a day…so that’s what I’m gonna do- And that’s fine!

-You don’t have to blog multiple times a day, or even every day to be successful. There are bloggers out there who religiously blog 3 times a day. And there’s nothing wrong with that. It works for them…I admire their dedication and their ability to come up with that much stuff to talk about. And I read those blogs and love them…but I’ll never be like them. AND THAT’S OK. It took me a long time, but i finally realized that I don’t need to blog every day in order to keep my readers. In fact, sometimes I go three days without blogging, and guess what! NOTHING happens. People still read when I do post, they still comment, they’re still there if I decide to put living life ahead of blogging. And just because I don’t blog every day doesn’t mean i’m not dedicated to my readers. Blogging is supposed to be fun! If I turn it into a chore/competition/requirement, then what’s the point?

-Just because you’re a food blogger doesn’t mean you have to like all the same foods as everyone else. I don’t like kale chips, or coconut water, or dates filled with peanut butter … And I don’t have to pretend to like them just to fit in.

-Numbers don’t have to matter I realize that some people blog to make money or as their full-time job…and to them, it probably does matter how many page views they get because for them, page views = pay check. And that’s fine. But that’s not me. Blogging is not really a source of income for me. Sure I make a little money here and there….like enough to treat myself to an extra frozen yogurt, or occasionally pay someone to do some behind the scenes techy stuff to my blog…but it’s nothing life changing. AND THAT’S OK! When I first started blogging, I looked at my stats page every day. I let whether I had a lot of page views or not as many as normal control my mood. It stressed me out constantly and I was always feeling pressured to do something bigger and better. So I stopped looking. Quit cold turkey. Now I never look at my numbers unless I have to submit them to a company for an opportunity. And it was so freeing! I know not everyone takes this approach, and that many people will continue to check their numbers all the time…but for me, it works. It helps me keep myself in check and helps keep blogging what it’s supposed to be- FUN. I blog because I want to, and it doesn’t matter if there’s one person reading my post every day, or one thousand.
*This doesn’t mean I’m not interested in growing my blog, gaining readers or making improvements to my site…it just means that I’ve learned to not let the numbers dictate my feelings or rule my life!

SO, some of those things may have been viewed as blogging negatives, although I don’t really think they are…but I wanted to also focus on some of the positives…

-The blogging community is the most inspirational & motivating group of people I’ve ever been a part of. I’ve never been surrounded by so many amazing people that share the same interests as me, get excited about the same things as I do or are as supportive as they are. If I’m lacking motivation to go work out, I turn to Twitter and am usually up off the couch within 5 minutes. If I don’t know what to make for dinner, I just open my google reader and I usually have about 27 ideas by the time I’m done reading all the new blog posts. If I have an amazing workout and I tweet about it, I immediately have at least 5 people telling me what a good job I did or how awesome I am. It doesn’t get any better than that.

-You can make good friends through blogging. Even though I’ve met very few bloggers in real life, there are several that I consider to be some of my best friends. I email them about life and they can relate. I text them when I’m stressed about school because they’re going through the same thing. I send them packages on their birthday because I know it will make them smile. It’s been an amazing way for me to find some new friends, which is something I never expected would happen when I started this blog. Embrace every opportunity. You never know when one will positively change your life for the better!

-After all your hard work, you will have something you can be proud to call your own. When I started my blog, I had no idea how long it would last, or how much a part of my life it would become.  When I look back at some of my first posts, it’s fun to see how much I’ve grown as a person, developed my identity as a blogger and gained confidence both in blogging and in life. And you know what? I’m freakin’ proud of myself. I’m proud of how awesome my blog looks. I’m proud of how many hours of work I’ve put into blogging. I’m proud of myself for the times I’ve stepped outside my comfort zone. I’m proud of all the new foods I’ve tried. I’m proud that I’ve inspired other people to make healthier choices….

I’m proud of ME.

And if you can relate to this post at all, I hope you’re proud of yourself too for all the amazing things you’ve done with your life! I hope you’ll stop comparing yourself to others,  stop trying to be someone else…and start to enjoy just being you!

Cheers!

–Lindsay–

Sunday’s Workout: I seem to be in a running mood this week, but sometimes I like to break it up with a little break or two. I set out with the goal of running 3 miles total, one mile at a time. In between, I did three 4-min tabatas to give myself some active recovery!

Jan221

Pin It

I ran the three miles in 27:52 (9:17 pace) and each Tabata took 4 minutes. I rested for 1 min after each Tabata. I set the treadmill at 6.5mph for each mile. It was tough, but not impossible. By the time I got halfway through the last mile, I wanted to take the speed down to 6.0 SO BADLY but I fought a mental battle with myself and told myself I could do it at the speed I was at, and I did!

Today’s Workout:

Suddenly it was 11pm and I hadn’t done my workout yet! After 2 days of cardio I decided to do some heavy weights w/ some of my fav arms & legs exercises.

jan231

For me, theses were heavier weights than I usually use to do my high rep circuit workouts so this was a challenge for me. I tried to pick a weight that I would really struggle with in the last set. This took me 20 minutes and I felt great


Filed Under: Uncategorized

An Update on A Puppy with Stitches

January 21, 2012 by Lindsay 28 Comments

Hi friends!

I was gonna write a fun post for you guys today all about me. Instead, I’m spending the morning at the vet.

Let’s recap:

One week ago, Tucker got a giant cut in the pad of his foot. We kept it clean and wrapped all weekend but it was too deep and we knew he would need stitches.

20120121-092249.jpg

Monday: off to the vet we went. He got internal and external stitches, they gave us a cone collar and said to keep him from jumping for 2 weeks (HA!)

20120121-092514.jpg

Tuesday: I had I go to work and leave him alone til hubby got home. I put the cone on and put him in his cage. Hubby came home 2 hours later and the cone was off and the bandage was ripped.

20120121-092623.jpg

Wednesday/Thursday: we were worried he would hurt his foot more if he kept trying to get the cone off so we left him occasionally with the paw wrapped and sprayed with bad tasting stuff. Every time hubby came home the bandage was nibbled on but relatively intact. He pulled it off a couple times while we were home and we put it back on.

20120121-092746.jpg

Friday: the foot seemed to be bothering him more. I skipped class to stay with him, then we decided to go out to dinner. When we got home 3 hours later, he’d eaten the entire bandage and pulled the stitches out! We gave him hydrogen peroxide and he barfed up most of the bandage…

Saturday: we’re off to the vet to probably get more stitches…and spend more money…sigh….

20120121-093011.jpg

He’s lucky we love him!

Today’s workout: Hubby and I have to stagger our workouts this week so one of us can watch the dog…so, he went first and ran 4 miles in 40 min!

I put together an interval workout for myself with my fastest treadmill speeds ever! It’s a 10 min cycle so you can choose how many times to repeat it to get to your desired workout time.

I did it twice and covered 2.3 miles in 20 minutes, then finished out to get to 3 miles by doing the next five min at 6.0, 6.1, 6.2, 6.1, 6.0 (one min each) and then a min at 6.5 and a min at 7.0 to finish 3 miles in 26:50!

Before today I’d never gone above 8.0 on the treadmill so this was pushing it for me. If you need a little extra time to recover, especially after the first cycle you can walk 30 sec at 4.0, run 30 sec at 6.0 and then leave the speed intervals the same. That’s what I did for the second cycle.

Here’s what it looked like:

jan211

Pin It


Filed Under: Uncategorized

Fitness Friday 6

January 20, 2012 by Lindsay 29 Comments

Hi Friends!

We’re back again for another Fitness Friday!

fitnessfriday

I’ve got a week’s worth of workouts to share with you, plus another vlog!

So let’s get right to it! Here are my workouts for the week:

Jan 13th– Put together a 25 min Tabata workout for hubby & I, inspired by this one from Lindsay.

jan131

Doing only 4 exercises per tabata and repeating them really made this workout go by quickly.

————————————————–

Jan 14th– Hubby took a rest day and I hopped on the treadmill for a quick run to loosen my legs. Started at 6.5mph and increased by .1 every minute up to 6.9 and back down.

jan141

I covered 2.21 miles in 20 min. I hit the two mile mark at 17:54 and then finished out the last 2 minutes. I felt good about this workout because I ran the whole thing, even though I wanted to stop several times. It got me sweating but still let me feel like I was stretching my legs.

—————————————————–

Jan 15th– Rest day

—————————————————-

Jan 16th– Put together a workout full of partner exercises to do with the hubby!

jan161

We took it kinda easy this workout because we were working through all the exercises and figuring out exactly how to do them. Feel free to increase the number of sets/reps you do with your partner.

A few moves that might need an explanation:
Throwdown situps– One partner sits on the floor with their knees bent. The other partner kneels on their partners feet, put their hands on their partner’s shoulders and pushes them down. The partner on the ground should engage their abs to resist as they go down to the floor slowly and then sit back up
Hamstring Drops– Have your partner kneel in front of you with their feet behind them, soles in the air. Stand on the soles of their shoes and push them forward. The partner will fall to the ground and land in pushup position, then pull themselves back up, engaging their hamstrings.
DB/Med Ball Situp Handoffs– lay down opposite each other on your backs with your feet touching, one person holding a med ball or dumbbell. Sit up and pass the weight to your partner, do another sit up and exchange the weight again. You can also lock your legs together to help your feel from coming up off the ground.
Plank Walkup Hand Slaps– Start facing each other in plank position with your palms on the floor. Both partners lower onto one forearm, then the other, then push back up onto one palm, then the other. Then lift your right hand, slap your partner’s right hand and repeat but slap their left hand.
Situp Punches– One partner lays on their back with their knees bent. The other partner kneels on their feet and holds their hands up over the partner’s knees. The partner on the floor does a situp and lightly punches their right hand across into their partner’s right hand and their left hand across into their partner’s left hand. Do another situp and repeat.
Twist and Pass– Stand back to back. Both partners twist to one side, pass a db or med ball and twist to the other side and pass it again. Two passes is one rep.
Leg Throwdowns– One partner lay on the floor. The other stands behind their head so the partner on the floor can grab their ankles. The partner on the floor lifts their legs off the floor and the standing partner throws them down to the floor. Repeat.
Wheelbarrow Pushups– One partner grabs the other partners ankles and lifts them into the air. The partner with their feet in the air does pushups. Switch partners.
Resistance Band Tricep Extensions– Each partner holds one end of the same resistance band and alternates doing tricep extensions.

——————————————————-

Jan 17th– Put together a terrible 2’s workout. Wanted something that would pass quickly and be done quickly. The basic idea is you alternate a 2 min fast run with 2 minutes off the treadmill doing as many of an exercise as you can in 2 minutes without compromising good form.

Here’s what mine looked like:

jan172

This works out to be 20 minutes long, with 2 minutes of rest total . Get it- 22 mins, 2 mins each exercise, Terrible Twos Workout? Clever right?! Write down how many reps you do of each exercise and try to beat that number next time! If you can’t do a two minute plank, hold it as long as you can and then immediately do another that’s long enough to get you to two minutes.

I covered 1.26 miles on the treadmill. Loved this workout! Flew by and really got me sweating. I did 56 squats, 60 lunges, 38 burpeees and 45 squat jump-ups. I probably could have done more squats but I wanted to go at a speed where I could keep going steadily for the whole two minutes.

A few things:
-Make sure you choose a running speed that is challenging for you. 8.0 mph is the fastest I usually run on the treadmill so it was VERY challenging for me to run at this speed for 2 whole minutes.
-If you’re not tired enough to need the 30 second breaks after running, you’re running fast enough!
-For the squat jump ups, you can use a box/exercise step/or your imagination. Stand with your feet on either side of your box/step, squat down and then jump up on to it with both feet. Step down on either side and repeat.

————————————————

Jan 18th– Legs were tired so I walked an inclined mile on the treadmill at 4.0 mph/ 7.0 incline and then did a resistance band arm workout.

jan181

This workout was just average. I don’t have a good set of resistance bands. Mine don’t have handles and I found it very hard to do some of the exercises. I’m planning to look for a set with handles and try some more resistance band workouts because I really like them!

————————————————-

Jan 19th– Put together a bench workout that only require the use of a bench and your body weight. It can be done anywhere there’s a bench. In your basement, at the gym, at a park…

jan191

Here are the reps I did for rounds 1 & 2: Jump-ups (20,22), Pushups (27,31), Lunges-right & left (26, 29), Dips (31, 30), One Leg Step-ups- right & left (23, 25), Leg lifts (25,26), One leg squats-right & left (20, 22), In & Outs (29, 32), Calf Raises (45, 45).

Here’s me doing my best to explain all the moves in writing:

Bench Jump-ups: Start straddling the bench. Squat down and jump up with both feet landing on the bench. Step down and repeat.
Incline pushups– Place your hands on the side of the bench and do a pushup
Decline pushups– Place your hands on the floor and your toes on the bench and do a pushup
Lunges: Place one toe on the bench and step out with the other leg. Move up and down, forming a 90 degree angle with your front knee, then switch legs.
Dips: Place your hands on the side of the bench and use your triceps to move your body up and down
Step-ups: Start with both feet on the ground, stepup with one foot, follow with the other, and then back down
Leg Lifts– Lay on the bench with your legs hanging off one end. Bring your legs up so they’re perpendicular with the floor and then back down to parallel.
One legged squats: Balance on one leg, squat down and touch your but to the bench and stand back up.
In and Outs: Balance your butt on the bench and lean back. Pull your arms and legs into your chest. Lean back and extend your arms and legs out, then pull back in as you sit up.
Calf Raises: Stand on the edge of the bench or on the ground next to the bench and raise up and down on your toes.

And here’s a little vlog I put together of the moves so you guys can better understand what i’m talking about!

So there ya have it! My week of workouts. They’ve all been added to the fitness page as well. Now it’s your turn. Tell me about your workouts this week! Do anything fun?

Enjoy!
–Lindsay–

PS. The winner of the Everyday Happy Herbivore Cookbook…

141

….is Kelly from Laughter, Strength & Food!

a

Congrats Kelly. Email me your mailing address so we can get your cookbook out to you!

Filed Under: Workouts

Why I Love My Pressure Cooker

January 19, 2012 by Lindsay 36 Comments

Hi Friends!

Happy Thursday. Today I just wanted to share a quick post for you about my newest kitchen appliance- my pressure cooker!

My parents got me this Fagor Duo 8-Quart Pressure Cooker for Christmas and I love it. I’ve always kinda felt that the pressure cooker is a somewhat unnecessary kitchen appliance. And in a way, it is. Anything you can do in a pressure cooker, you can do another way…it just takes longer.

pressurecooker

I remember while I was growing up, my mom would use hers occasionally…and I always thought it was cool to watch, but never thought about it much more than that. A few years ago, when my parents moved…the pressure cooker was one of the larger things my mom took with her. I remember thinking that was weird, because their new kitchen was much smaller and it seemed like it was taking up unnecessary space.

Well, my friends, now I understand why…because IT’S AWESOME!

The first thing I used it for was brown rice. This baby can cook brown rice in 15 minutes instead of 40! Not quite as fast as my Uncle Ben’s 90 Sec Brown rice, but still…15 minutes is a huge improvement!

Next, I knew I wanted to try it on with some dried beans. As you guys know, I like to make a whole bag of dried beans at once, and then I portion them into ziploc bags and freeze them so I can just pull them out when I need them! However, I’d just made a batch of black beans right before Christmas, so I didn’t need to make any more of those…

But I still wanted to try it out! So, I picked up some dried chickpeas. I make a lot of hummus and roasted chickpeas but I’ve never been a fan of dried chickpeas. The first time I bought them, I wasn’t a fan of how they turned out….but I decided it was worth another shot with the pressure cooker!

So get this- using a pressure cooker, you can go from dried chickpeas (not even pre-soaked) to totally cooked in 40 minutes!!! AMAZING!!!! And even more amazing? Hummus from dried chickpeas can be ready in 45 minutes! LOVE 🙂

pressure

So, the fast rice is awesome, the quick hummus is amazing but probably my favorite use for my pressure cooker so far is hard boiled eggs! 7 minutes to perfectly cooked hard boiled eggs that peel SO EASILY!

Guys, I know you’ve all struggled with peeling a hard boiled egg. You know how frustrating it is when the shell only comes off in tiny little pieces, and then they get stuck to your fingers and to the egg itself and it’s just one big frustrating mess?! Well this definitely solves the problem.

I did some online research about the best way to pressure cook eggs and a lot of things I read said you needed to keep the eggs separated so they didn’t bang into each other or they would crack. So for my first test, I stood the eggs on end in beer bottle caps. Truthfully, I spent the whole 7 minutes praying that the whole thing didn’t explode in my kitchen.

DSC 1107

But despite my concerns, it worked perfectly and they were all still standing when they were done. Then I decided that it seemed like a bit of unnecessary work getting them all balance in there. So the next time I just put a bunch in there and hoped for the best. Another success. A couple of them did crack, but it wasn’t until the egg was already at least partially cooked, so there was no messy water, just a few cracked shells that made them even easier to peel!

I’m in love, I’m in love and I don’t care who knows it 🙂

Next on my list- pressure cooker risotto. My mom makes it all the time. Perfectly cooked, without the one hour of constant stirring.

I guess what I’m trying to say is….if you have the room for it, and you see one on sale- grab yourself a pressure cooker. So worth it!

I also found this awesome website Hip Pressure Cooking that’s basically devoted to how cool pressure cooking is.

So tell me, do you have a pressure cooker? Do you want one? Do you have a favorite pressure cooker recipe?

Enjoy!
–Lindsay–


Today’s Workout:

Put together a bench workout that only require the use of a bench and your body weight. It can be done anywhere there’s a bench. In your basement, at the gym, at a park…

jan192

Here are the reps I did for rounds 1 & 2: Jump-ups (20,22), Pushups (27,31), Lunges-right & left (26, 29), Dips (31, 30), One Leg Step-ups- right & left (23, 25), Leg lifts (25,26), One leg squats-right & left (20, 22), In & Outs (29, 32), Calf Raises (45, 45).

Here’s me doing my best to explain all the moves in writing:

Bench Jump-ups: Start straddling the bench. Squat down and jump up with both feet landing on the bench. Step down and repeat.
Incline pushups– Place your hands on the side of the bench and do a pushup
Decline pushups– Place your hands on the floor and your toes on the bench and do a pushup
Lunges: Place one toe on the bench and step out with the other leg. Move up and down, forming a 90 degree angle with your front knee, then switch legs.
Dips: Place your hands on the side of the bench and use your triceps to move your body up and down
Step-ups: Start with both feet on the ground, stepup with one foot, follow with the other, and then back down
Leg Lifts– Lay on the bench with your legs hanging off one end. Bring your legs up so they’re perpendicular with the floor and then back down to parallel.
One legged squats: Balance on one leg, squat down and touch your but to the bench and stand back up.
In and Outs: Balance your butt on the bench and lean back. Pull your arms and legs into your chest. Lean back and extend your arms and legs out, then pull back in as you sit up.
Calf Raises: Stand on the edge of the bench or on the ground next to the bench and raise up and down on your toes.

Filed Under: Uncategorized

Roasted Broccoli w/ BBQ Sauce

January 16, 2012 by Lindsay 45 Comments

Hi Friends!

Happy Monday. Just popping in to share a few things with you guys.

First of all, I did TONS of work on the blog over the weekend…it was exhausting but hopefully it will be helpful you guys as readers and that will make it all worth it!

Here’s what I did:

1) I finally got all of my recipes into Recipage. Check it out by clicking the Recipes tab at the top of the page. You can now search for recipes in a variety of different ways including cooking method, key ingredients and alphabetically.  You can easily print or email recipes, as well as tweet them, pin them or share them on facebook! So excited about this!!

2) I made a tab for Foodie Penpals. All the details of the program can be found there so be sure to check it out if you’re not already participating. If you ARE already participating, feel free to share the link with your readers in posts and on twitter to help continue to spread the word!

3) I updated my About Me tab!

4) I made a Workouts tab. I’ll continue to post my weekly Fitness Friday posts, but I’ve gone back and inserted some of the individual workouts into old posts on the day I did them. That way, you can go to the workout tab, choose a specific workout you want to do and it will link you to the post that contains that workout. This will allow you to bookmark and share specific workouts instead of an entire week’s work that you get in the Fitness Friday posts.

5) I made an Inspiration tab. Some of my recipes were just too simple or not specific enough to work in Recipage. I also had several series posts I’ve done like Lindsay’s Lunchbox & WIAW that were on my Recipe page before and wouldn’t work with Recipage. So, the Inspiration tab is somewhere you can go for easy lunch and dinner recipe inspiration, series posts, blog link love and other odds and ends posts.

Whew….I think that’s it for now! I’ll keep you posted as other changes occur!

I’ll leave you with my new favorite side dish. It couldn’t be easier to make…just 3 ingredients!

IMG 1639

Roasted Broccoli w/ BBQ Sauce

by Lindsay L

Prep Time: 5 min

Cook Time: 10 min

Keywords: roast side healthy broccoli bbq sauce

Ingredients (Serves 2-3)

  • 2 cups broccoli florets
  • 1 Tbsp BBQ sauce
  • 1 Tbsp orange juice

Instructions

Toss the broccoli in olive oil.

Roast at 425 for 10 min or until slightly blackened.

Combine the bbq sauce and oj in a small bowl.

Toss roasted broccoli in bbq sauce mixture.

Transfer to a clean bowl and serve

Notes

Don’t leave the broccoli in the bowl you toss it in or it will get soggy with the extra sauce

Powered by Recipage

IMG 1640

IMG 1641

So tell me: What was the best part of your weekend?!

Enjoy!
–Lindsay–

Weekend Workout:

Hubby took a rest day on Saturday and I hopped on the treadmill for a quick run to loosen my legs. Started at 6.5mph and increased by .1 every minute up to 6.9 and back down.

jan142

I covered 2.21 miles in 20 min. I hit the two mile mark at 17:54 and then finished out the last 2 minutes. I felt good about this workout because I ran the whole thing, even though I wanted to stop several times. It got me sweating but still let me feel like I was stretching my legs.
Today’s Workout:

Put together a workout full of partner exercises to do with the hubby!

jan162

We took it kinda easy this workout because we were working through all the exercises and figuring out exactly how to do them. Feel free to increase the number of sets/reps you do with your partner.

A few moves that might need an explanation:
Throwdown situps– One partner sits on the floor with their knees bent. The other partner kneels on their partners feet, put their hands on their partner’s shoulders and pushes them down. The partner on the ground should engage their abs to resist as they go down to the floor slowly and then sit back up
Hamstring Drops– Have your partner kneel in front of you with their feet behind them, soles in the air. Stand on the soles of their shoes and push them forward. The partner will fall to the ground and land in pushup position, then pull themselves back up, engaging their hamstrings.
DB/Med Ball Situp Handoffs– lay down opposite each other on your backs with your feet touching, one person holding a med ball or dumbbell. Sit up and pass the weight to your partner, do another sit up and exchange the weight again. You can also lock your legs together to help your feel from coming up off the ground.
Plank Walkup Hand Slaps– Start facing each other in plank position with your palms on the floor. Both partners lower onto one forearm, then the other, then push back up onto one palm, then the other. Then lift your right hand, slap your partner’s right hand and repeat but slap their left hand.
Situp Punches– One partner lays on their back with their knees bent. The other partner kneels on their feet and holds their hands up over the partner’s knees. The partner on the floor does a situp and lightly punches their right hand across into their partner’s right hand and their left hand across into their partner’s left hand. Do another situp and repeat.
Twist and Pass– Stand back to back. Both partners twist to one side, pass a db or med ball and twist to the other side and pass it again. Two passes is one rep.
Leg Throwdowns– One partner lay on the floor. The other stands behind their head so the partner on the floor can grab their ankles. The partner on the floor lifts their legs off the floor and the standing partner throws them down to the floor. Repeat.
Wheelbarrow Pushups– One partner grabs the other partners ankles and lifts them into the air. The partner with their feet in the air does pushups. Switch partners.
Resistance Band Tricep Extensions– Each partner holds one end of the same resistance band and alternates doing tricep extensions.


Filed Under: Uncategorized

Fitness Friday 5 & A Vlog

January 13, 2012 by Lindsay 38 Comments

Hi Friends!

fitnessfriday 11

Time for another Fitness Friday and I’m super excited about it this week for several reasons:

1) I did some awesome workouts this week!

2) The hubby has jumped onboard the workout wagon and has been working out with me all week!

3) I did my first vlog about a plank workout!

So, let’s recap those workouts shall we?

Jan 6th-3 mile run.

I did the whole run without stopping, in 27:42. I ran outside because it was so freakin’ nice out! Shorts in January? When does that ever happen?! When I got home, I took down all the outdoor xmas lights (because I’m an awesome wife) and then I did some planks, including my first ever 3 minute plank!

3 min plank
2 min plank
1 min plank

Jan 7th– rest day….it was Saturday and I was busy enjoying the day 🙂

Jan 8th– Got up early and made up a tabata workout to do with the hubby!

It looked like this:

[print_this]workout1 Pin It

[/print_this]

This workout was challenging. Hubby remarked multiple times that he “hates Dr. Tab” 🙂 Loved it! Another option would be to do all the exercises once and then start over and do the whole cycle 8 times.

Jan 9th– Did a killer stair workout. I visited the reservoir where I used to row on the crew team in college. It’s called Hoover Reservoir and at one end is Hoover Dam (not THE hoover dam) but it’s still pretty impressive. There are stairs that run up both sides of the dam, 98 stairs. And after I saw Lindsay run them last week, I knew I had to get myself out there and do it too.

IMG 16861

I headed over after class and ran the set of 98 stairs 15 times. I didn’t stop in between so it took me about 20 minutes and my legs were SHAKY by the end. When hubby got home from work, he couldn’t believe I went without him, so we put the dogs in the car and headed back over and ran them 10 more times!

hoover

So, 98 stairs 25 times = 2450 stairs plus there was another set to get to the 98 so we’re just gonna go ahead and call that 2500 stairs! My calves were BURNING the next day.

After the first round of stairs I came home and did some planks: 2 ½ min plank, 1 ½ min plank, 1 min plank.

Jan 10th– Rest day. I wasn’t feeling 100% and my calves were super sore from the stairs.

Jan 11th– Hubby and I made up a circuit workout in the basement using the treadmill and rowing machine that we have, along with some dumbbell exercises.

It looked like this:

[print_this]

workout2

[/print_this]

Here’s a shot of what our setup looked like. Excuse the mess, and note Hubby passed out on the weight bench after we were done!

112

Afterwards, I did an intense plank workout. I started thinking about all the different kinds of planks and plank exercises you can do and I just strung a bunch of them together:

[print_this]workout3[/print_this]

And look! I made my first vlog about this plank workout! I had quite the time getting the video camera up high enough so that you could see me. Check out my setup:

29

After I was done, hubby came home and informed me that we have a tripod, so I’ll probably just use that next time 🙂 But this was fun!

Anyways check out the video if you feel so inclined. Hubby says the intro is too long, sorry about that…still workout on this whole video thing. You can skip through the beginning to get to the exercises if you want!


Eeeep! So there ya go! Let me know if you try it out! I know my form’s not 100% perfect- but I was too worried about talking to the camera! I’ll get better 🙂

Jan 12th- Hubby & I did another slightly modified version of one of my fav 100 workouts. It’d been a couple weeks since i’d done it and i missed it! And it was fun introducing it to hubby, although he complained about how many leg exercises there were 🙂 I did modify it a bit to make it leg focused since my arms were tired.

This is what it looked like:


[print_this]

workout5

[/print_this]

And that’s a wrap. A week’s worth of workouts in the Bean household.

A couple more things to point out:
1. I fixed the button on the right sidebar so you may subscribe to The Lean Green Bean via email if you’d like…just click the button that looks like an envelope.
2. I’ve added a button so you can easily follow me on Pinterest. Just click the button on the right sidebar
3. Speaking of Pinterest, I added one Pin It button in today’s post (under the tabata workout) but I’m not quite advanced enough to figure out how to put it under every workout. But if you ever see a workout or a recipe you really like here on The Bean, and you use Pinterest, I’d love it if you pinned your favorites to your boards! You can install the Pin It button on your toolbar (directions here) to make it super easy for you to pin stuff from any website you might be on throughout the day!

Whew, I’m exhausted. That’s enough for today!

Happy Friday friends 🙂

Enjoy!
–Lindsay–
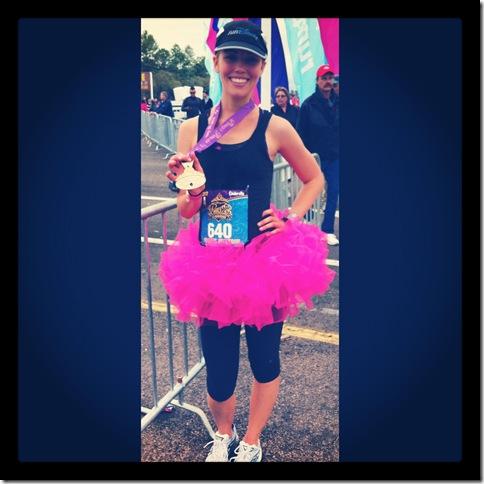
Today’s Workout:

Put together a 25 min Tabata workout for hubby & I, inspired by this one from Lindsay.

jan132

Doing only 4 exercises per tabata and repeating them really made this workout go by quickly.

Filed Under: Workouts

Smoked Gouda & IPA Soup

January 12, 2012 by Lindsay 23 Comments

Hi Friends!

As promised, the hubby is back with another guest post for you guys!! This time he’s showing you what happened to the beer after we left off last time, and then sharing a recipe for some delicious beer cheese soup we made using our homebrew! (Side note- Hubby spent all night working on this post, only to have WordPress eat the whole thing! But being the AMAZING hubby that he is, he stuck it out and powered through draft number two so we could share this post with you today. Isn’t he awesome?!

———————————————-

Hello all, it’s the Hubby here. I just wanted to check back in and tell you about that Beer the Bean and I made awhile back, and then, share this awesome Beer Soup recipe we found (and altered- read: took out some butter, added veggies, etc.).

First off, when we last left our beer it was sitting in a primary fermenter. Life went on, fermentation completed, and I “racked” (siphoned) the beer into a secondary fermenter. This allows the remaining yeast to settle out of the beer and gives it more clarity. I also “dry hopped” our beer, which is when you add hops to the secondary fermentor to add more hop aroma. All in a days work.

Ain’t she a beaut’!?

28

Next step, kegging time. I recently invested in some 5 gallon “corny” kegs (named after the Cornelius company that first produced them). They were originally made for pre-mixed soft drinks, but have been largely phased out in favor of “bag in a box” syrup that is mixed with cabonated water as it’s dispensed. This means there is an abundance of these kegs for homebrewers, and they are the perfect size! Also, I can tell you unequivocally that this is magnitudes easier than filling 50+ bottles. This is a big win for the Bean household.

111

 After siphoning the beer into the keg, I sealed it up and put it in my new kegerator… OK, to be honest, I stole the wifey’s basement freezer to use as kegerator. No booing! We have homebrew on tap now, it’s a small price to pay!

After hooking the beer up to a CO2 tank, the carbonation is forced into the beer, and it’s ready to enjoy in about a week. It turned out well! A nice balanced bitterness with a roasted finish. Mmmmm.

311

So then, my awesome wifey gets me DRAFT magazine, and I see this recipe for Smoked Gouda IPA soup, and I’m all “I just made a black IPA, let’s do this thing!”… and then I forgot about it for two weeks…. Then I saw the magazine laying on the coffee table and was like “No for real, let’s actually do this thing!”

IMG 1283

First step, I procured smoked Gouda. I happened upon a wedge-o-gouda at COSTCO and jumped on it. As you’ll see in the recipe, this bad boy will need shredded. A word of warning- CHEESE GRATERS ARE EXTREMELY DANGEROUS- PROCEED WITH EXTREME CAUTION! I was blazing through the job, making tremendous progress, but then grated my thumb… Don’t do that. You won’t like it.

IMG 12851

Anyway, here’s how we did it up:

Smoked Gouda & IPA Soup

by Lindsay L

Prep Time: 20 min

Cook Time: 30 min

Keywords: stovetop appetizer soup/stew vegetarian vegetables beer cheese winter fall

Ingredients (Serves 4-6)

  • 1 red pepper, diced
  • 2 cups potatoes, diced
  • 3 cloves garlic, minced
  • 1 medium onion, diced
  • 1 Tbsp olive oil
  • 12 oz IPA or other beer (we used homemade IPA!)
  • 4-6 cups smoked gouda, shredded
  • 2 Tbsp butter
  • 4 cups vegetable broth
  • 3 cups skim milk
  • 2 Tbsp cornstarch
  • 1/2 tsp cayenne pepper

Instructions

1. Heat the olive oil in a large pot over medium heat.

2. Add the red pepper, potatoes, garlic and onion and saute for 10-15 minutes.

3. Add the vegetable broth, bring to a boil, then reduce heat and let simmer for 20 minutes.

4. Meanwhile, in a medium saucepan, melt the butter. Add the milk and bring to a gentle simmer. Put the cornstarch in a small ramekin, add a little bit of water and stir until smooth. Pour the cornstarch mixture into the milk and stir.

5. Slowly whisk in the shredded cheese. Stir until the cheese is melted.

6. Pour the cheese mixture into the soup and stir to combine.

7. Slowly add the beer, stir and let the soup simmer for a few minutes to thicken. Serve warm!

Powered by Recipage


The orginal recipe was liquid only, but I like a big and hearty chunky soup, so I got to choppin’. Red potatos, red peppers, and onion were the perfect addition. I handled the knife very carefully after my cheese grater accident, and then threw all those veggies in to a stockpot with some veggie broth.

gouda1

After getting the milk, butter, and cornstarch mixture together, I took it off the heat and started working in that GOUDA. It takes a lot of stirring, but you’ll end up with a nice, creamy mixture.

gouda 2

Last, but certainly not least, you need that IPA! Just a quick lesson for those non-beer-nerds. IPA stands for India Pale Ale. This is a very “hoppy” (bitter) style of beer that was first brewed in England for export to India. Hops are a natural preservative, so the extra hops helped the beer make the trip. Nowadays, Americans have fine tuned this style and you can find many delicious options at the store.

IMG 1300

For my soup, I opted for our homebrew- this batch has been dubbed “Black Lab IPA”. I could also recommend that “Ruination Ale” from Stone Brewing Company would probably be really good in this soup as well. I’ll probably try that next time.

In she goes…

IMG 1301

Enjoy it with a beer! This turned out to be a great hearty soup, perfect for a cold day. However, enjoy in moderation, because eating a block of Gouda probably isn’t the healthiest thing you can do.

IMG 1305

Also, beware of jealous cats…

Cheers!

410

Today’s Workout:

10 Min Plank Workout
jan12

Filed Under: Soup & Salad

  • « Go to Previous Page
  • Page 1
  • Interim pages omitted …
  • Page 57
  • Page 58
  • Page 59
  • Page 60
  • Page 61
  • Interim pages omitted …
  • Page 65
  • Go to Next Page »

Primary Sidebar

Lindsay Livingston The Lean Green Bean Healthy Living Tips and Tricks

I'm a Registered Dietitian and mom of three from Columbus, Ohio. I use this blog to share simple, healthy recipes, nutrition tips, and an honest glimpse of motherhood!

Learn More →

Questions? Comments? Email me: [email protected]

The Lean Green Bean Facebook The Lean Green Bean Instagram The Lean Green Bean Pinterest The Lean Green Bean Twitter The Lean Green Bean Feed
footer-logo
The Lean Green Bean Facebook The Lean Green Bean Instagram The Lean Green Bean Pinterest The Lean Green Bean Twitter The Lean Green Bean Feed
Recipes

Breakfast
Dinner
Snack
Slow Cooker

Kids

Cooking With Kids
Favorite Gifts
Toddler Meals
Indoor Activities

Resources

Easy Packed Lunches for Kids
Dinner Spark
Snack Spark
Ultimate Guide to Food Prep

About

Meet Lindsay
Become an RD
Work with Me

The Lean Green Bean is a participant in the Amazon Services LLC Associates Program, an affiliate advertising program designed to provide a means for sites to earn advertising fees by advertising and linking to amazon.com.
Read the full privacy and disclosure policy here.

Copyright © 2022 · The Lean Green Bean

table talk series

Learn how food affects your body.

Get my free Table Talk email series where I share bite-sized nutrition information about carbs, protein, and fat, plus bonus information about snacks and sugar!

[email protected]