• Skip to main content
  • Skip to primary sidebar

Learn how food affects your body. Get Free Nutrition Info Today

the-lean-green-bean-logo
  • Home
  • Recipes
  • Kids
  • Resources
    • Ebooks
    • Food Prep
    • Videos
    • Snack Round-Ups
    • Gift Guides
  • About
    • Become An RD
    • Work With Me
  • Search
the-lean-green-bean-logo
  • Home
  • Recipes
  • Kids
  • Resources
    • Ebooks
    • Food Prep
    • Videos
    • Snack Round-Ups
    • Gift Guides
  • About
    • Become An RD
    • Work With Me
  • Search

blog

Let’s Go Grocery Shopping!

January 10, 2012 by Lindsay 61 Comments

Hi Friends!

Over the weekend, the hubby and I did some pretty serious food shopping. It’d been a while since we’d been to the grocery store…plus we went to Costco…so I thought it’d be fun to show you guys what we bought!

Let’s start with Costco:

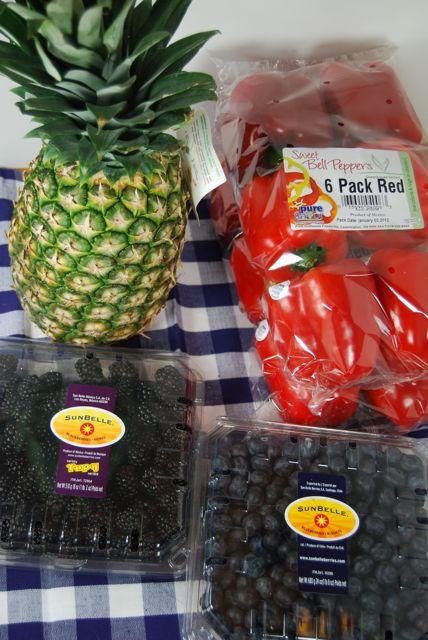
DSC 1111
{A pineapple- it was the best price we’d seen in a while}
{Blueberries & Blackberries}
{12 red peppers- they have these 6/$6 – best price around by far!}

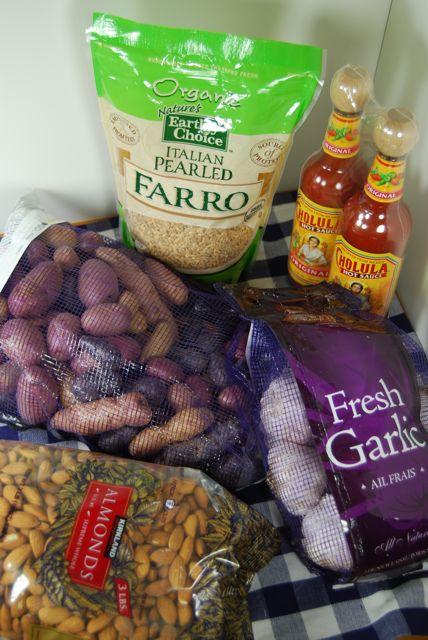
DSC 1114

{Farro-$7 for a huge bag here, or $5 for a tiny bag at the grocery store}
{Plain, unsalted almonds- for granola, trail mix & snacking by the handful}
{Fingerling potatoes- the best for roasted potatoes}
{Garlic- I don’t always buy it in bulk but I’ve been using a lot lately}
{Cholula- hubby uses it on pretty much everything}

DSC 1117{All new to us- Popchips, Vegetarian burritos & Sweet Potato Fries}
{I’ve heard good things about all of them- can’t wait to try}
{Cat not included}

DSC 1120

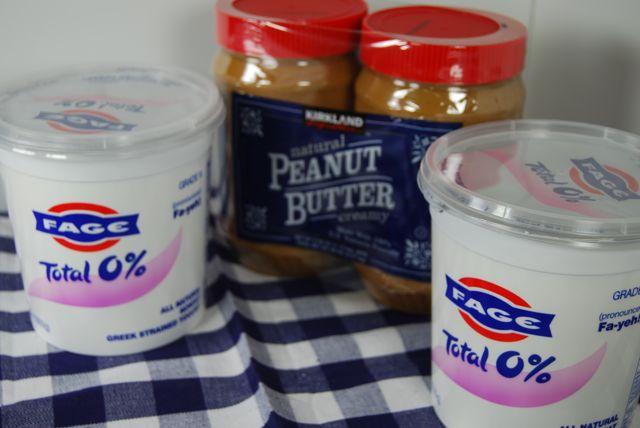
{Peanut butter- for the dogs}
{Plain Greek yogurt- for the Bean (Lindsay)}
{The yogurt is $5 per container- best price ever!}

DSC 1121{Duh}

Then we headed to the regular grocery store:

DSC 1122{Skim milk}
{Almond milk- recently started doing 1/2 almond-1/2 skim in my cereal}
{OJ- for the hubby & for my smoothies}

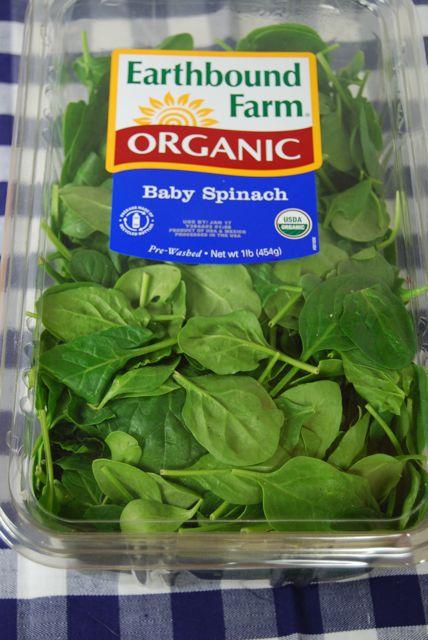
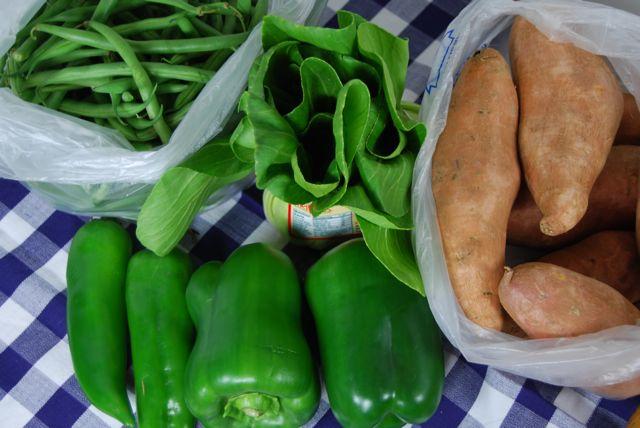
DSC 1123{Veggies: Peppers, sweet potatoes, baby bok choy, green beans}

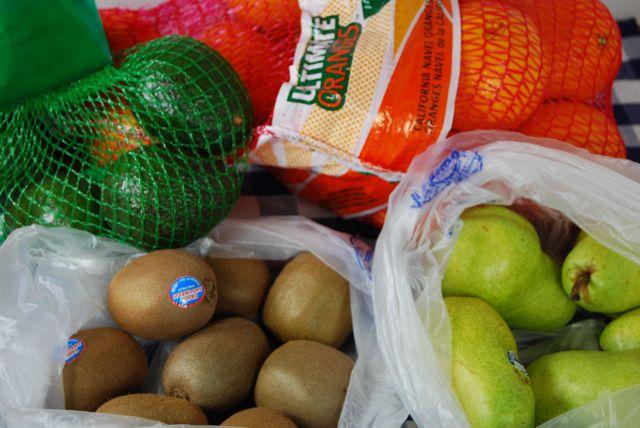
DSC 1124{Fruit- pears, kiwis, oranges & avocados}

DSC 1125

{Jazz apples- one of my fav, broccoli & carrots}
{Usually I buy baby carrots but this 3 lb bag was on sale for $1}

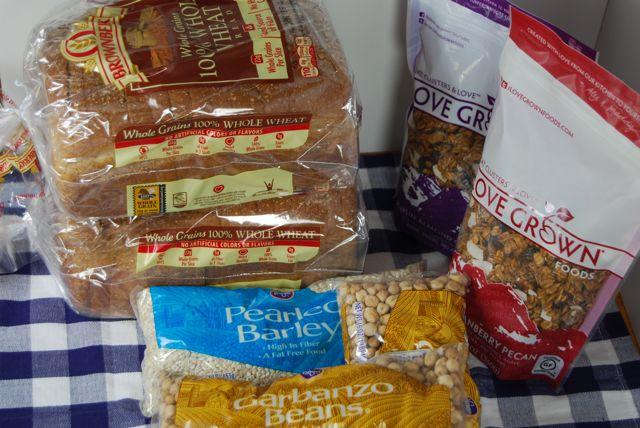
DSC 1128{Whole wheat bread, dried chickpeas & barley}
{Some LGF granola for my giveaway winner!}

DSC 1130{Frozen shrimp}
{Cheese- pepperjack for me, havarti for the hubby}
{wonton wrappers for potstickers- recipe soon!}
{Morningstar black bean burgers- a staple in our freezer}

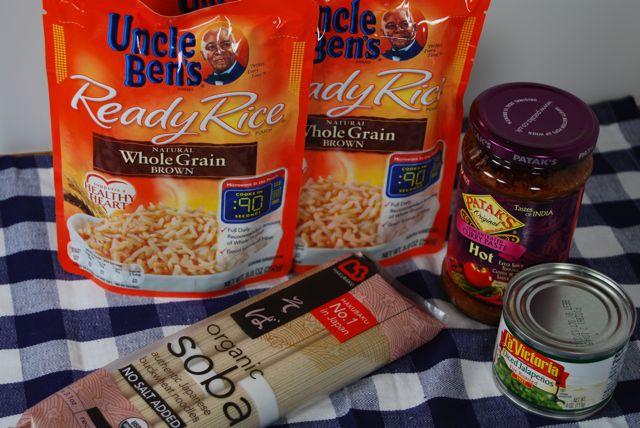
DSC 1132{Curry paste- our fav kind}
{Soba noodles}
{90 sec brown rice}
{diced jalapenos for an upcoming recipe!}

DSC 1133{Duh}

DSC 1134{Eggs}
{Chobani- I mix 2 scoops of flavored into my bowl of plain}

DSC 1136

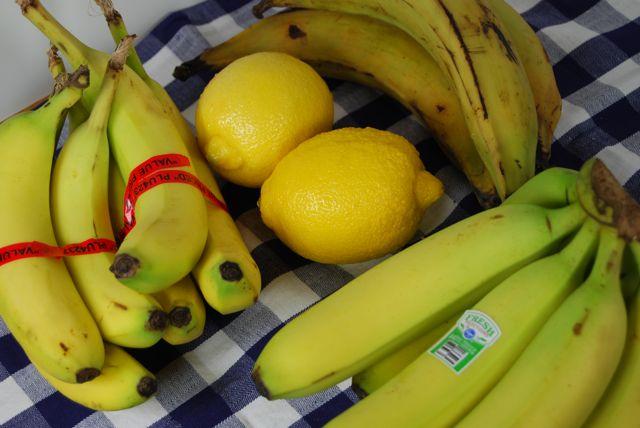
{Plantains for our buffalo plantains experiment}
{Bananas}
{Discount bananas that I freeze & use for “fro yo”}

DSC 1137{Human snacks}
{Dog snacks}
{Cat snacks}

DSC 1139{Best part of the day- hubby snuck these into the cart 🙂 Love him}

So there ya have it! And yes, I’m fairly certain most people think we’re shopping for a family of 6, when in fact it’s just the two of us 🙂

Now, who’s coming over for dinner?!

Enjoy!
–Lindsay–
Filed Under: Food Prep

Baked Plantains

January 9, 2012 by Lindsay 36 Comments

Hi Friends!

Happy Monday! I have a fun little post for you this today that involves a Cuban meal the hubby and I cooked up last week!

Confession: I’d never had a plantain until last fall when we spent a weekend in Miami (click here if you need a little mental break to enjoy some beach pics) and a friend cooked some up for us!

In case you’re not familiar, plantains look like bananas, and you can buy green plantains or sweet plantains. They’re cooked, instead of eaten raw like bananas…and most often they’re fried. That’s how we enjoyed them the first time. Last week we were shopping at a different grocery store than we normally do and we found some plaintains! Hubby snatched them up and we brought them home. Then we had to figure out what to do with them.

I didn’t necessarily want to eat them fried, so we decided that I would bake some and hubby would fry some so we could compare!

I’m not really sure the proper way to peel a plantain, but I found that if I sliced the top and bottom off, I could pretty much just peel them like a banana. Once peeled, I sliced them into 1/2 inch slices, tossed them in olive oil and placed them on a baking sheet with a silpat. I sprinkled them with some seasonings and stuck them in the oven. After about 10 minutes, I took them out, smashed them flat with the bottom of a glass, flipped them over and put them back in the oven.

cuban

Baked Plantains

by Lindsay L

Prep Time: 5 min

Cook Time: 20 min

Keywords: bake appetizer snack side healthy vegetarian plantain Cuban

Ingredients (Serves 2)

  • 2 green plantains
  • 1 Tbsp olive oil
  • 1 tsp paprika
  • 1/2 tsp garlic powder
  • 1/2 tsp cayenne pepper
  • pinch of salt

Instructions

1. Peel the plantains and slice into 1/2 inch pieces.

2. Toss in olive oil and place on a greased baking sheet.

3. Sprinkle with seasonings and bake at 400 degrees for 10 minutes.

4. Remove pan from oven, smash slices down with the bottom of a glass.

5. Flip the slices over and return to the oven to bake for 10-15 more minutes until golden brown.

Powered by Recipage


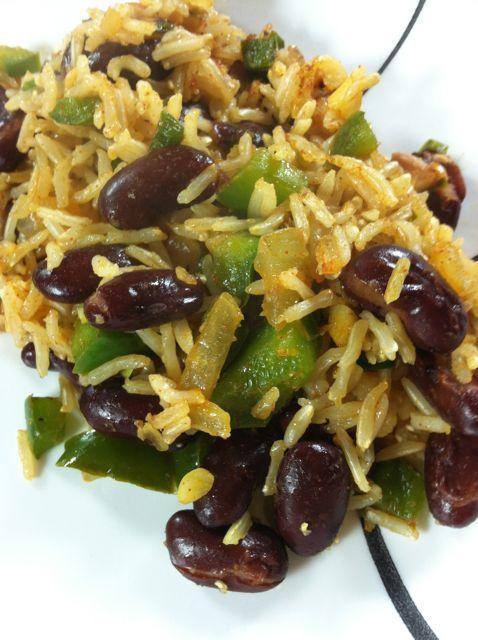
While mine were baking, hubby took a few of the slices and fried them in some canola oil.  Meanwhile, I set to work making a quick dinner of red beans and rice to accompany our plantains. I just sauteed some garlic, onion and green pepper in a skillet. I added a can of no-salt-added kidney beans, some brown rice and some cayenne pepper and mixed seasoning that’s similar to McCormicks.

cuban 4

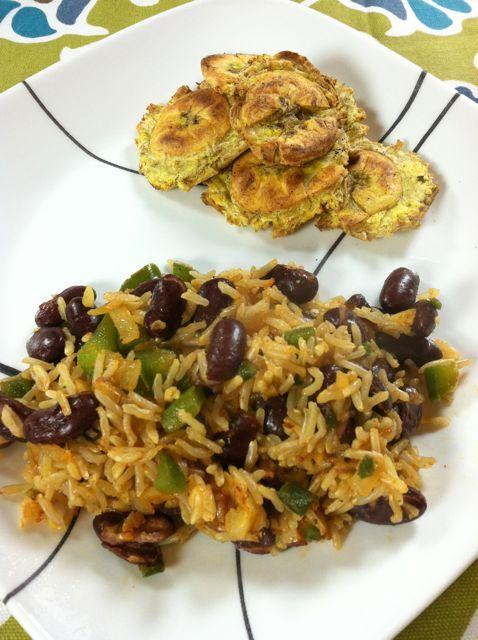
Here are the baked and fried plantains side-by-side:

cuban1

The verdict? I really liked the baked ones. They got really crunchy and kinda tasted like potato chips. We dipped them in ketchup and then when we ran out of ketchup, we tried dipping them in buffalo wing sauce. Hubby liked the fried ones because they were thicker slices, not smashed. He said they were meaty enough that they would make a good substitute for boneless wings!!

SO, we bought some more plantains and we’re going to bake them again after tossing them in buffalo sauce and then not smash them down! I’ll let you know how it turns out 🙂 Hubby always says that he doesn’t miss eating meat, except for wings…so this could be the substitute we’re looking for!

Here’s the whole meal. It was delicious and a fun departure for the Mexican route we usually go with rice and beans.

cuban 5

So tell me…have you ever had plantains? What’d ya think?!

Enjoy!
–Lindsay–
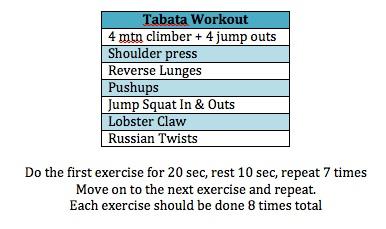
Today’s Workout:

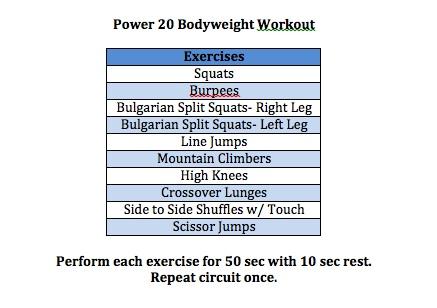
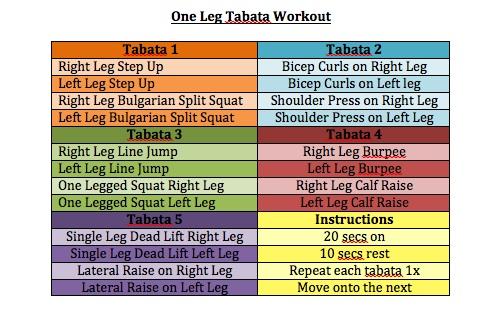
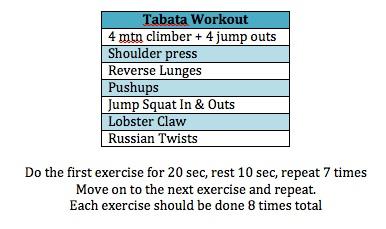
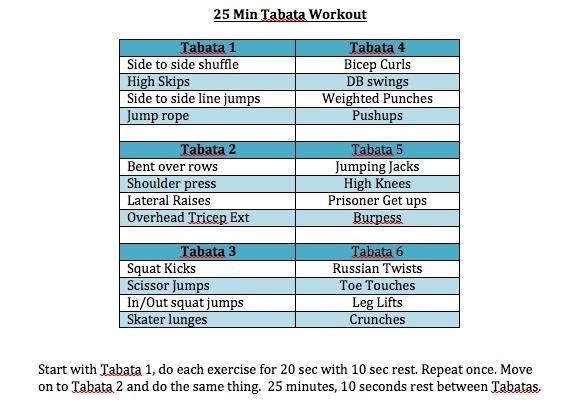
28 Min Tabata Workout

jan9

This workout was challenging. Hubby remarked multiple times that he “hates Dr. Tab” icon smile Fitness Friday 5 & A Vlog Loved it! Another option would be to do all the exercises once and then start over and do the whole cycle 8 times.

Filed Under: Uncategorized

Farro With Caramelized Onions & Balsamic Roasted Carrots

January 4, 2012 by Lindsay 15 Comments

Hi Friends!

Happy Wednesday! Here’s a fun new little side dish for you guys. The other night I found myself wanting to cook with farro. I discovered farro last year and fell in love. It’s super healthy, a good source of fiber and protein and nice and chewy.

This week I was trying to decide what to mix it with and I couldn’t get caramelized onions out of my head. After checking the fridge, I noticed we were pretty low on other vegetables…but we did have a bag of baby carrots.

In the winter, I seem to always turn to roasting vegetables…so I immediately thought to roast the carrots. Then I decided I didn’t want them plain…so after they came out of the oven, I sliced them up and drizzled them with some balsamic vinegar.

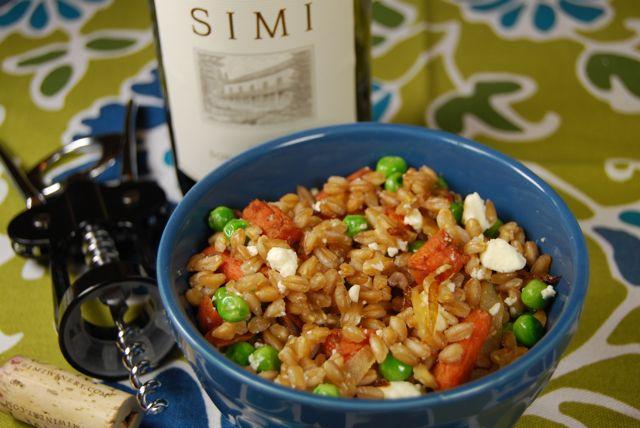
After a few more last minute additions, this is what I served alongside our black bean burgers.

Farro w/ Caramelized Onions & Roasted Balsamic Carrots

by Lindsay L

Keywords: saute roast side healthy vegetarian vegetables farro feta

Ingredients (Serves 4)

  • 1 1/2 c farro, cooked
  • 1 Tbsp olive oil
  • 1/2 an onion, sliced into thin rings and cut in half
  • 16 baby carrots
  • 1 Tbsp balsamic vinegar
  • 1/2 c green peas
  • 1/4 c crumbled feta

Instructions

1. Heat the olive oil in a pan over medium heat. Add the onions, lower the heat and saute slowly until caramelized.

2. Cook the farro according to package directions and set aside.

3. Place the carrots on a baking sheet and roast at 425 degrees F until soft and slightly blackened.

4. Remove the carrots from the oven, slice into bite-sized pieces, drizzle with balsamic vinegar and set aside.

5. Mix the farro, carrots and onions together in a bowl.

6. Saute the peas (if frozen) until warmed through and add to the farro mixture.

7. Add the feta and mix through.

8. Serve warm.

Notes

I served this without a dressing of any kind and we enjoyed it, but if you want a little more moisture, add an extra drizzle of of balsamic after everything is mixed.

You could also make a balsamic & red wine reduction to drizzle over the top.

Powered by Recipage


Desktop3

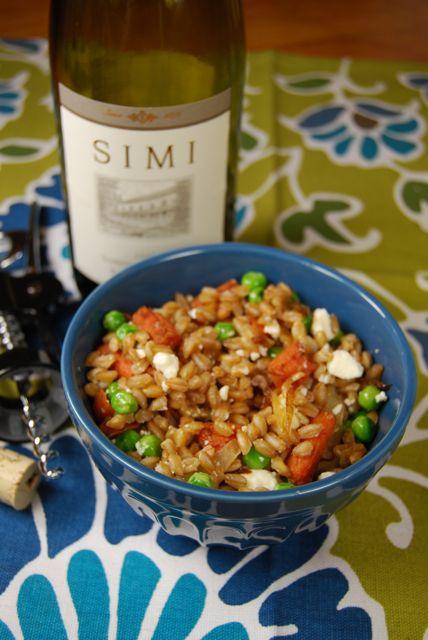
This was a fun, filling side dish that was a bit different from things I usually make!

DSC 1101

Enjoy with some wine like we did 🙂

DSC 1102

What’s your favorite winter-inspired side dish?

Enjoy!
–Lindsay–

 

Filed Under: Uncategorized

Chipotle & Rosemary Spiced Nuts

December 28, 2011 by Lindsay 2 Comments

Hi Friends!

Today’s guest post comes from a fellow food blogger that I truly admire. She whips up some of the most delicious recipes (including the one below). I’ve been reading her blog forever and was so excited when she offered to guest post for me!


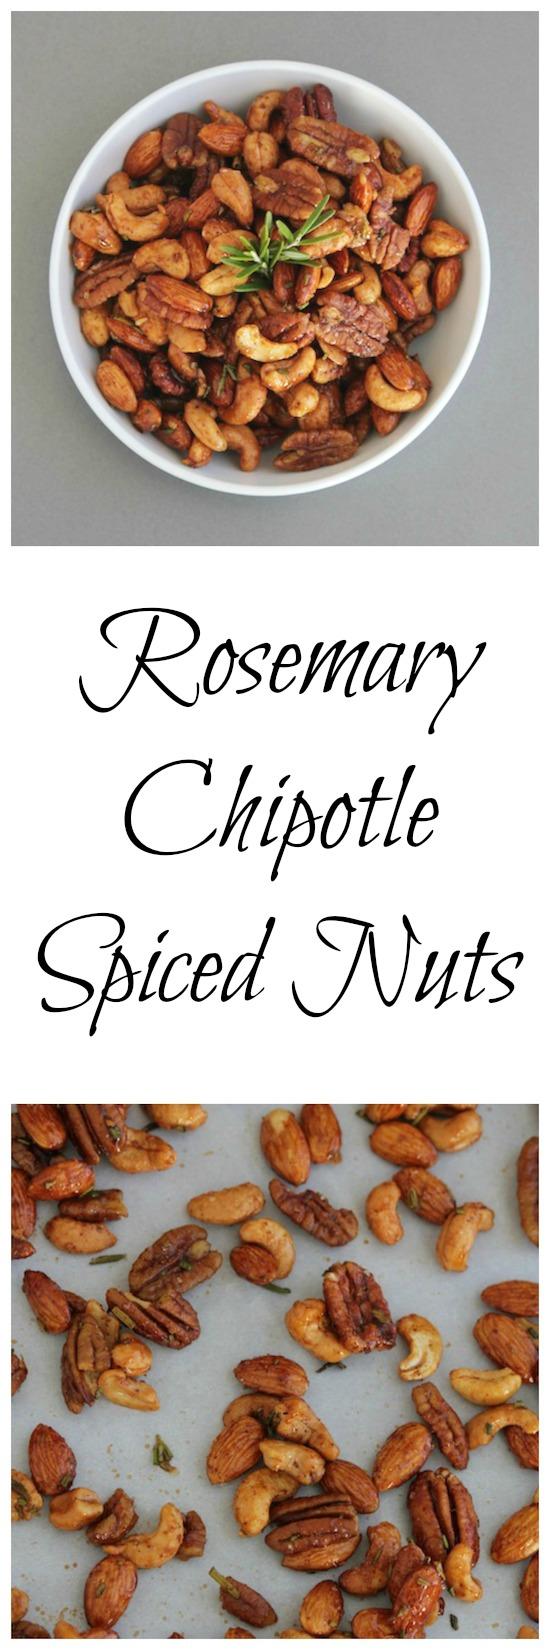
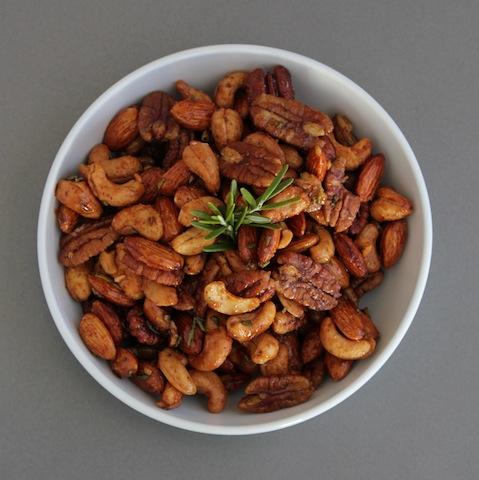
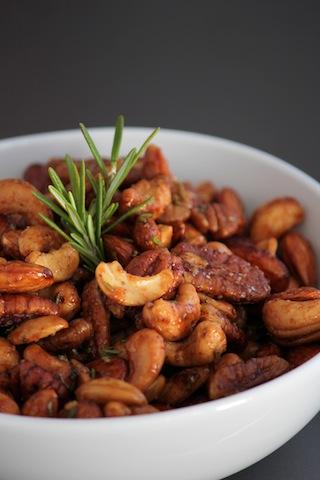
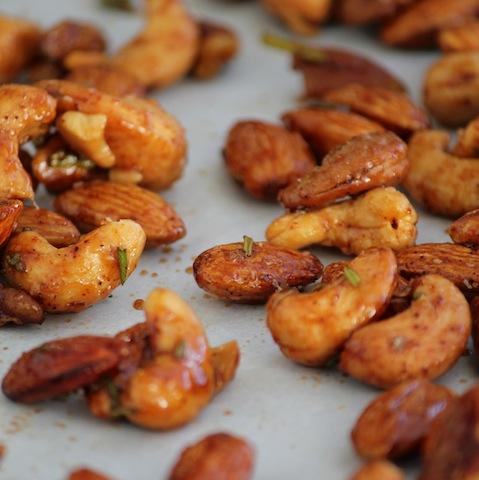
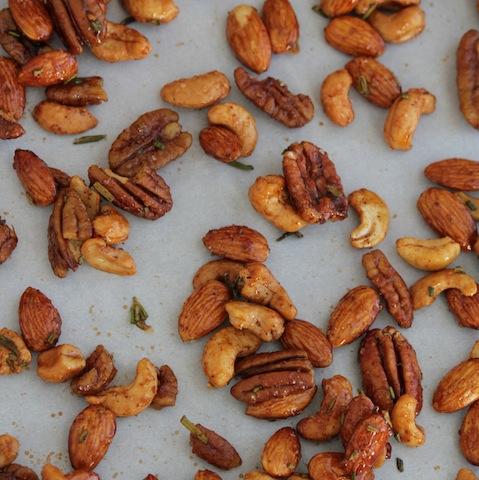
These Rosemary Chipotle Spiced Nuts are full of flavor and make a great party snack!

A little bit about Brooke:
Brooke Shea blogs at Baking with Basil where she enjoys sharing simple, sugary treats and the occassional savory dish.  Her love for baking started young when she would go over to her grandma’s house and dirty her counter up with flour and sugar.  She’s been addicted ever since.

Take it away Brooke!

————————————–

These Rosemary Chipotle Spiced Nuts are full of flavor and make a great party snack!

Hello LGB readers and Happy Holidays!!  I am honored to be guest posting on The Lean Green Bean today!  When I first told Lindsay I would guest post for her I knew I wanted a recipe that was a little bit sweet and savory.  So the days passed and I continued to be stumped on what to make.  I sat down Saturday morning in an attempt to clean off the massive amounts of Food Network shows that were recorded and of course the first one I went to was Barefoot Contessa.  Ina always has good options to choose from and these spiced nuts were just what I was looking for.

These Rosemary Chipotle Spiced Nuts are full of flavor and make a great party snack!

I’m a huge fan of spiced nuts!  Especially those ones at the mall or at festivals that have the crunchy cinnamon-y coating on the outside.  Oh my!  It’s more a dessert than anything but they are soo good.  This recipe initially drew me in from the combination of sweet and spicy.  As Ina went on to make the recipe, I got pretty excited at the simple list of ingredients (minus the ground chipotle powder which I found at my local supermarket).

These little guys are good!!  They are slightly smoky, sweet, salty, and would make a great addition to any cocktail party.  Or even a homemade gift for the spiced nut fanatic in your family.  Now how easy is that??  🙂  Be sure to save yourself a few extra because they are addicting and you can’t try just 1 or 2.  I hope you are all having a wonderful holiday season and have a very Happy New Year!

These Rosemary Chipotle Spiced Nuts are full of flavor and make a great party snack!


[print_this]

Chipotle and Rosemary Roasted Nuts
Recipe adapted from Barefoot Contessa

Ingredients

  • 2 tbsp canola oil, divided
  • 3 cups whole cashews, unsalted
  • 2 cups whole almonds, unsalted
  • 2 cups whole pecans, unsalted
  • 1/2 cup walnuts, unsalted
  • 1/3 cup pure maple syrup
  • 1/4 cup light brown sugar, lightly packed
  • 3 tbsp freshly squeezed orange juice
  • 1 1/2 tsp ground chipotle powder
  • 3 tbsp minced fresh rosemary, divided
  • 4 tsp kosher salt

Directions

1.  Preheat oven to 350 degrees.  Pour 1 tbsp canola oil onto a large baking pan, spread evenly.  Set aside.
2.  In a large bowl, combine the cashews, almonds, pecans, walnuts, 1 tbsp canola oil, maple syrup, brown sugar, orange juice, and chipotle powder.  Toss to coat the nuts evenly.  Add 2 tbsp rosemary and 2 tsp salt and toss again.
3.  Spread nut mixture evenly onto prepared pan.  Roast nuts for 25 minutes or until the nuts are glazed and golden brown.  Stir twice while nuts are roasting.  Meanwhile, line 2 pans with parchment paper.  Set aside.  Remove from oven and sprinkle with 2 tsp kosher salt and 1 tbsp rosemary.
4.  Immediately transfer nuts to remaining 2 pans in a single layer, dividing evenly.  Be careful not to scrape the extra glaze from the pan onto cooled sheets, this will aid in the nuts not sticking together as much. While nuts are cooling, stir frequently to keep them from clumping together.  Store in an airtight container at room temperature.

Notes:

  • Feel free to use any combination of nuts that you want.  If you do use salted nuts, cut back on the salt in the recipe.
  • Even with spreading them onto a separate pan to cool, the nuts still stuck together but it did help.  Since making them, I’ve read that an egg while wash helps in them not sticking but haven’t tried it yet.
  • For more/less smoky, spicy flavor, increase or decrease ground chipotle powder by 1/2 tsp.   
  • Ground Chipotle Powder is different from Chili Powder.  The Chiptole Powder is what lends to the smoky, sweet flavor.
  • These are great served warm or at room temperature.

[/print_this]

These Rosemary Chipotle Spiced Nuts are full of flavor and make a great party snack!

So there you have it! Do you guys have a favorite kind of spiced nuts?

Enjoy!
–Lindsay–

Filed Under: Appetizer, Snack

Mexican Chocolate Peanut Butter

December 27, 2011 by Lindsay 14 Comments

Hi Friends!

Today you’re in for a real treat. On of my best blog friends is here to entertain you. If you’ve read my blog for any length of time, you already know how much I love her. Following my best friend and the hubby, she’s one of the best at making me laugh 🙂 So i’m just gonna sit back and let you enjoy her!

———————————-


Howdy, y’all! Seasons Greetings from The Smart Kitchen!*
*I have already exceeded my exclamation point quota. Curses!^
^Whoops.

s1

My name is Miss Smart,* and as a food blogger I like to think I’m known for three things:
*OK, it’s actually Sarah. But I like the idea of an alter-ego, and Miss Frizzle was taken.

1. Having a love affair with my food processor
2. Licking my plate in public (and asking people to take pictures of it)
3. Being generally awesome^
^And (usually) having very high self-esteem?*
*Also, if there were a #4, it would be my excessive use of footnotes.

Today, we’re going to focus on #1. There may also be spatula-licking involved, but #3 you’ll have to determine on your own.

s2

Yes, I have a love affair with my food processor. This pretty much stems from the fact that I make ludicrous amounts of hummus and nut butters, in every possible flavor or fashion I concoct in my little ol’ brain.*
*which I actually hope is quite large

s3

I’ve reviewed how to make homemade nut butter a million times on my blog. [OK, maybe three. Whatever.] I’ve offered tips and tricks and suggestions. Still, I find people are scared of the concept.
Maybe it sounds like a really good idea but you always forget to follow through?
Maybe it’s the scary noise made during the initial crunching that frightens roommates and pets?
Maybe it’s the potential for your food processor to start smoking while you are churning away?

s4

Whatever it is, today I’m solving the problem of making your own, flavored peanut butter at home. How? I’m giving you permission to cheat.*
*I’m a teacher. I can do that.

s5

You don’t have to start from scratch all the time…especially not when there companies out there making perfectly affordable (and frankly, quite tasty) creamy peanut butters made from nothing more than peanuts.

s6

From there, the world is your oyster. Or, perhaps I should say, the world is your peanut?*
*Both are in shells? Maybe?

s7

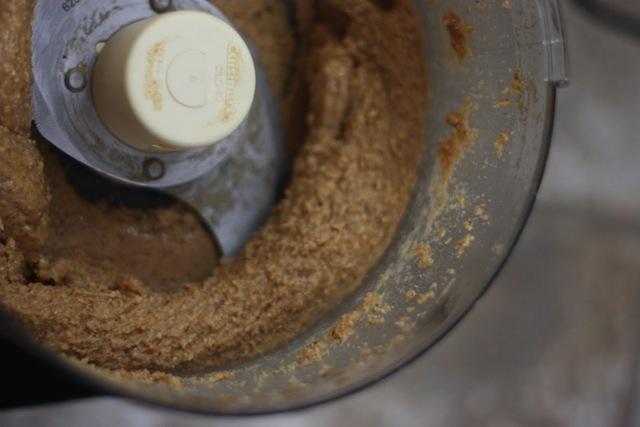
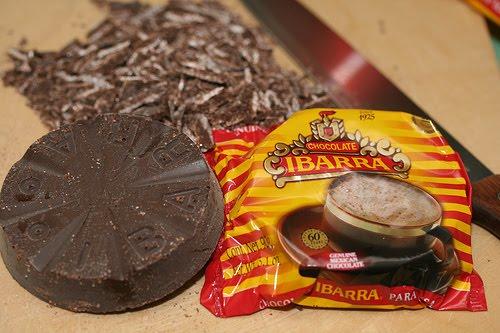
Really, you can go anywhere from here. I get flavor inspiration from cookies, from pie, from seasons, from tea, from other flavored peanut butters…once from a flavor of instant oatmeal! Today, I was inspired by chocolate. Mexican chocolate.

s8

[Source]

Perhaps it was my recent obsession with PB&Co.’s Dark Chocolate Dreams combined with my current habit of putting cinnamon into everything, but the idea of combining cinnamon and chocolate into a delicious peanut butter treat would not get out of my head.

s9

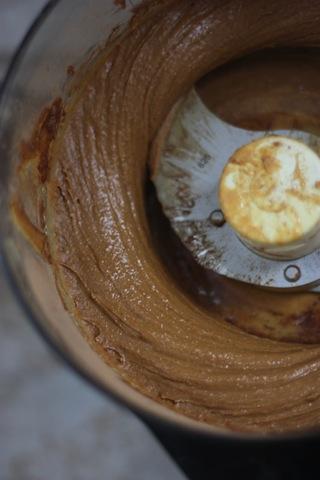
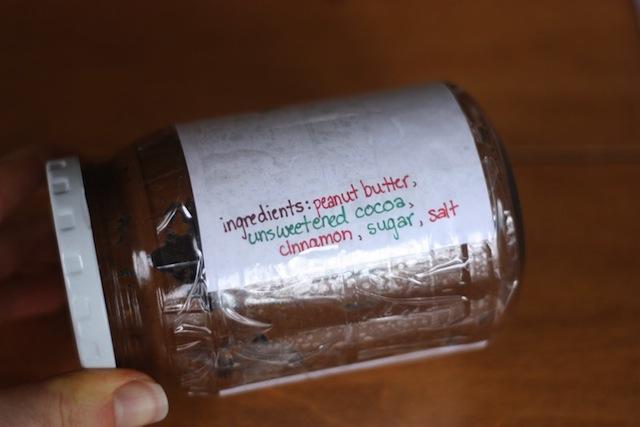
Into the processor went my flavorings and spice: unsweetened cocoa and cinnamon. If I’d had Mexican vanilla–or any vanilla at all*– I probably would have added some of that as well.
*Don’t ask me how that went missing.^
^And no, that was not a lead-in to a story. I really just don’t know.

s10

Then comes the fun part: turning and tasting!

s11

After all, you want to make sure it tastes good before you share it with anyone, right? [Or eat it all yourself. Your choice.]

s12

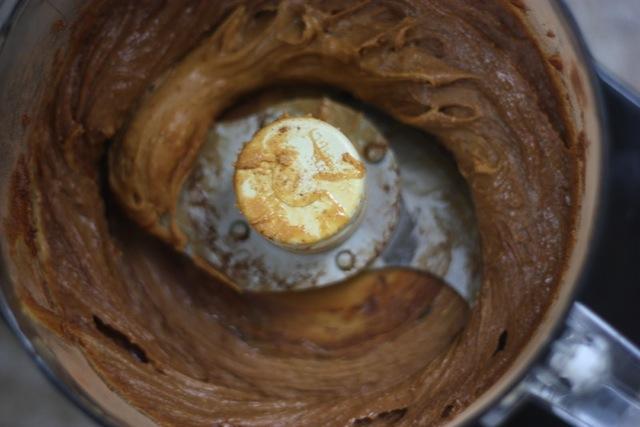
I find that generally speaking, I have to add WAY more seasoning that I think, especially with cinnamon, but if you put extracts in (like vanilla), it’s easy to go overboard.*
*Like Goldie Hawn, in the 1987 family classic.

s13

Also, unless you’ve started with salted peanut butter, adding a little of your own sodium chloride* generally brings out the flavor.
*That would be salt.^
^ It might taste the same if you get it from the big blue canister…but it’s certainly not as much FUN that way, now is it?

s14

And if you want to sweeten things up, you can give Mr. Snowman a plus one to this Mexican wedding (cake).

s15

And that’s really all there is to it.

s16

Unless of course you want to make a fancy label for it featuring (attempted) recreations of the Mexican flag, chocolate bars, and cinnamon in both its stick and powder form

s17

But while that’s totally optional…

s18

…licking the bowl is not.

s19

———————————-

So tell us, do you make your own nut butter? What’s your favorite flavor combo??

Enjoy!
–Lindsay–
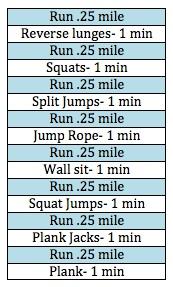
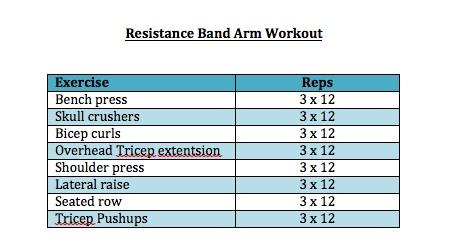
Today’s Workout:

30 Min Quarter Mile Workout

dec27

Inspired by this workout: http://www.fitinheels.com/2011/10/new-workout-obsession-tread.html and this workout:http://www.angrytrainerfitness.com/2011/10/get-with-the-program-the-14-mile-drag-workout/

I ran all of my quarter miles at 7.0 mph and finished the two miles in 17:40. Adding the 8 minutes of exercises and the few minutes of walking warmup I did brought me to just under ½ an hour. I was dripping sweat.

If you want to make this harder you could: run faster, run longer in between exercises, or use dumbells. I did all of the exercises with just body weight and did as many as I could in 1 min. I also didn’t rest at all.

Next time I’m going to add another mile and alternate running my quarter miles at 7.0 and 7.5, or increase my speed each quarter mile for a mile and then start over, pyramid style. I really liked this workout because it got me sweating, kept my heart rate up and the time flew by!

Filed Under: Snack Tagged With: Peanut Butter

Merry Christmas

December 25, 2011 by Lindsay 3 Comments

Happy Holidays!

IMG 1185

From my family to yours 🙂

14

Wishing you a happy & healthy 2012, filled with love and happiness.

Love,
Lindsay

Filed Under: Uncategorized

Pear & Chocolate Bread Pudding

December 24, 2011 by Lindsay 2 Comments

Happy Christmas Eve, friends!

To balance out all the healthy breakfast suggestions from Erin a few days ago, today my friend Megan is here to provide you with a slightly more decadent, but still semi-healthy, suggestion 🙂 You know, to balance things out! I’ve been reading Megan’s blog for a while now. She comes up with amazingly creative recipes, takes gorgeous photos and is currently planning her wedding! I always look forward to reading her blog so I know you’re in for a treat today!

———————————————-

Merry Christmas, everybody! (Merry Christmas, Charlie Brown!) Oh, sorry – Christmas movie lines and my real life are starting to blur together in this weird swirl of an alternate reality.  Holiday-Autopilot has been set.


So let me try this again – Merry Christmas everybody, I’m Megan from Wanna Be A Country Cleaver! I’m thrilled to be stopping by and visiting with you all and Lindsay today on Lean Green Bean.  Lindsay’s blog has been a great resource for me to get inspired by fresh and light cooking (something I’m not exactly known for on my blog) and get a little spring in my step about slimming down the healthy way and eating right as a lifestyle, not just as a diet.  Hello, Lentil Meatballs – you are my salvation! (I’m a lentil nerd…fyi)

With the holidays well under way, I wanted to share with you guys a dessert/brunch recipe I made that satisfied my sweet tooth but didn’t leave me feeling guilty and like I needed to do 300 sit-ups as some sort of penance for my food crimes. Today I bring you my recipe for Pear and Chocolate Bread Pudding.

bread

Traditionally bread pudding is laden with butter, heavy cream, extra eggs, and a side of tight jeans and regret. I’ll pass. This one is a lighter recipe that doesn’t forsake taste for health. It’s a win-win! And we all love those, especially when we can have them around the holidays.

Originally I stumbled upon it in one of my Martha Everyday Food magazines, but after flipping through each one I had I couldn’t find it. Pages flipped furiously, my left eye began twitching and exasperation increased. With the angries growing and Hulk bubbling under my skin, I gave up and decided to adapt my Bourbon Bread Pudding recipe for this adventure in an attempt to replicate the inspired recipe.

Growing up bread pudding was that food my mom inexplicably adored. Weirdo.

It wasn’t until the last year or two that it’s come full circle and I realize that I am becoming my mother.

This stuff is the ISH and I now no longer make fun of my mother for her bread pudding fascination. For other things, yes. But this, no.

Bread pudding is warm, cozy and nostalgic..

After preheating the oven to 350F, slice your bread into 1/2 inch slices, width wise across the whole loaf. They will be long and skinny slices.

I’ve always known cubed bread, but with pears in this recipe it seemed appropriate to slice it all and not to mention – gorgeous.

bread2

The pears were each sliced in halved, the cores removed and then thinly sliced into 1/4 inch slices.

bread3

Into a 13×9 inch baking dish sprayed with Pam, lay out each slice of bread with two slices of pear into between. Lather, rinse, repeat until the whole dish is crammed full. There is no need for daintiness here, the more cramped this dish is – the better.

bread4

Once each bit of pear and bread is intertwined and nestled cozily together get to work on your wet ingredients.

Into a large bowl whisk together 4 cups milk, 1 tablespoon vanilla, 3 eggs, and spices. *Sidebar* For all that is holy, use something other than fat free milk. By default bread pudding is not a healthy dish, but cutting out all that delicious fat is a sacrilege. Don’t anger the bread pudding gods. They don’t like when you mess with them. Just bow and gracefully accept their will. It’s tasty will.

bread5

Now for the fun part – pour the whole lot over your bread and let it soak in and get all soppy.

bread6

Lastly, sprinkle over your chocolate chips and you’re ready to bake. 45 minutes and done.

bread7

Not only does this look impressive when all baked, but it tastes even better! So if you need a dish for Christmas morning breakfast, or a warm dessert, this is it.

Printer Friendly Recipe Here!

So there you have it – a semi-healthy and utterly delicious brunch dish that will hopefully be served for years to come. Thank you again to Lindsay for letting me stop by for a visit and for everyone in the great blogosphere- Happy Holidays, Merry Christmas and all the best for a healthy New Year!

~Megan Pence
Country Cleaver

—————————————–

So tell us, do you like bread pudding? Sweet or savory?

Enjoy!
–Lindsay–
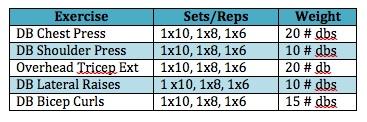
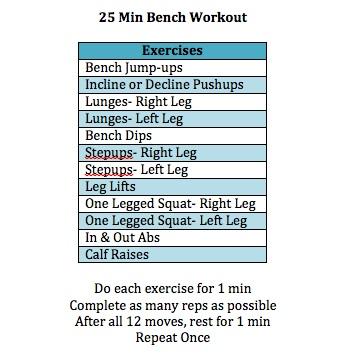
Today’s Workout:

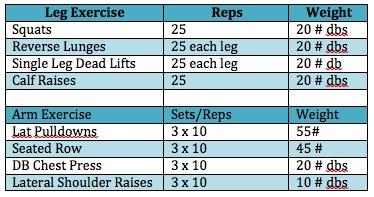
Arms & Legs Strength Workout

dec24

Filed Under: Dessert

Christmas Day Breakfast Ideas

December 22, 2011 by Lindsay 8 Comments

Hi Friends!

Today’s guest post comes from my awesome friend Erin.  She’s here to provide you with some healthy Christmas Morning breakfast ideas! She writes an awesome blog and is always around to tweet me workout motivation! Plus, she’s one of the most positive people I know 🙂 Be sure to hop on over and check out her blog!

———————————————

Hello Lean Green Bean readers! Erin here from Creative Soul in Motion, my home in the blogging world where I chat about living a healthy, active and mindful life that is full of adventure! I am so excited to guest blog for Lindsay, especially since I LOVE being part of her Foodie Penpal program (thanks Lindsay!). Anyways…

I love Christmas. When my brother and I were little I remember devising our Christmas morning plan on Christmas eve, usually on an etch-a-sketch. We would get up really early, around 5 AM, and sneak into the living room where we would cuddle on the couch and gaze at all of the presents. It’s one of my favorite childhood memories and honestly is more memorable than any gift I ever received.

But, if you’re anything like me and my family, once everyone is up Christmas goes by in a blur of chocolate, presents, candy, more presents, cookies and even more presents and breakfast isn’t even taken into consideration. Because really, isn’t it more fun to open gifts than it is to stop and make breakfast? However, over the last few years I’ve realized that not eating breakfast on Christmas does not set me up for a good day. In fact, whenever I skip breakfast I end up shaky, grumpy and generally regretting it by mid-morning.

That’s why I’m giving you some quick and easy but healthy ideas for your Christmas morning breakfast. So we’ll all be fueled up for a full day of festivities!

Easy and Healthy Christmas Morning Breakfast Ideas

Oatmeal with cranberries and nuts

Alright, alright, I know I talk about oatmeal a lot BUT it’s because it’s so good and so healthy for you! If you make it overnight, like I usually do, it’ll give your home a wonderful smell of cinnamon and goodness.

Cereal with a big smoothie

This is my go to breakfast throughout the year (except for winter time) and always gives me tons of energy throughout the year. Also, it takes literally 3 minutes to throw together.


Fruit salad with toast

This is a great choice for a large group! You can cut up some oranges, apples, pears and grapes, toss them with lemon juice the night before and have a beautiful fruit salad. It’s good to have a whole grain along with the fruit to give your body something that will last a little longer so you can make it through all the presents.

Toast with peanut butter and banana

This breakfast is going to give you fuel you up without slowing you down. Sometimes I like to slice up the bananas and apples and layer them on top of the peanut butter – trust me, it’s really yummy!

Pancakes!!

Now, if you have a little extra time and can hold yourself off from tearing open presents I’d suggest making something fun like pancakes with hash browns!! It’s my favorite weekend breakfast and a nice way to celebrate the holiday.
Well, I know the big day is quickly approaching and I wish you, your family and your loved ones the merriest Christmas. And I’d love if you came over and checked out my blog and said hello!!————————————-So there you have it! Now it’s your turn. Tell us what your family eats on Christmas Morning?!?

Enjoy!
–Lindsay–

Filed Under: Uncategorized

Peanut Butter Chocolate Truffles

December 21, 2011 by Lindsay 8 Comments

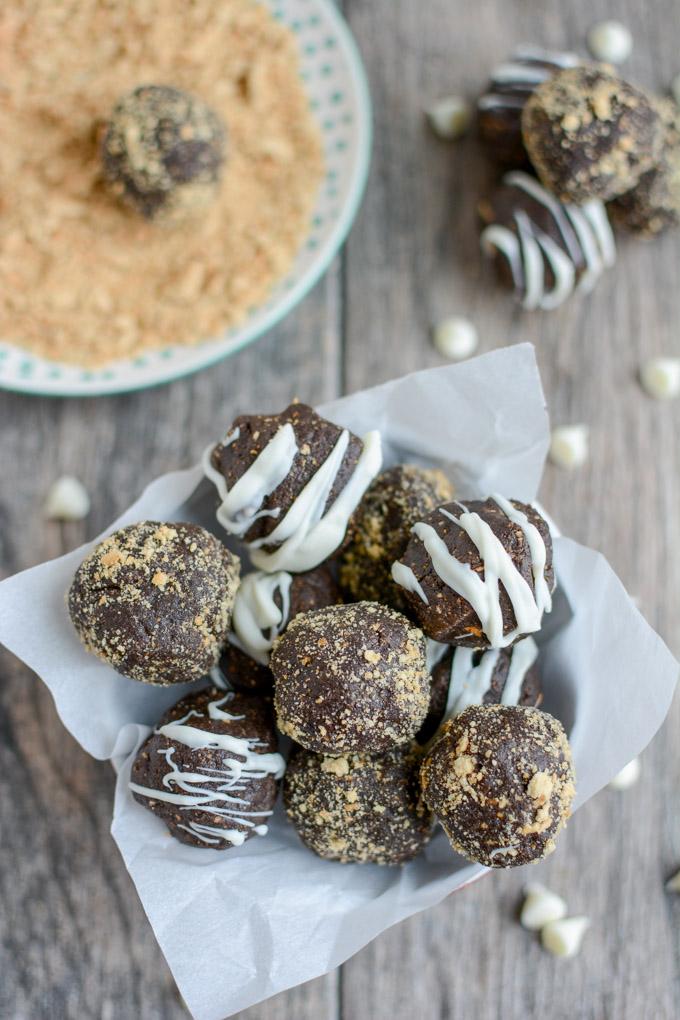
These Peanut Butter Chocolate Truffles are the perfect holiday dessert. Made with just four simple ingredients, they’re easy to make and deliciously rich. Roll them in graham crackers or drizzle with chocolate to make them a little fancier!

These Peanut Butter Chocolate Truffles are the perfect holiday dessert. Made with just four simple ingredients, they're easy to make and deliciously rich. Roll them in graham crackers or drizzle with chocolate to make them a little fancier!

*Post and recipe updated 12/2017*

Hi Friends!

The holiday season is upon us. If you’re looking for a super easy and delicious dessert for your next holiday party, these Peanut Butter Chocolate Truffles are just the ticket!

I’m not a huge chocolate person, if I’m being honest, but these truffles are right up my alley. They’re the perfect blend of chocolate and peanut butter and just the perfect amount of sweet thanks to the dates and graham crackers.

You could definitely eat them plain, but it’s much more fun to jazz them up a little bit! I chose to roll some of mine in graham crackers and drizzle some with white chocolate. You could also roll some in cocoa powder or dip in dark chocolate!

Here’s the super easy recipe:

Print

Chocolate Peanut Butter Truffles

These Peanut Butter Chocolate Truffles are the perfect holiday dessert. Made with just four simple ingredients, they're easy to make and deliciously rich. Roll them in graham crackers or drizzle with chocolate to make them a little fancier!
Print Recipe

5 Stars 4 Stars 3 Stars 2 Stars 1 Star

No reviews

These Peanut Butter Chocolate Truffles are the perfect holiday dessert. Made with just four simple ingredients, they’re easy to make and deliciously rich. Roll them in graham crackers or drizzle with chocolate to make them a little fancier!

  • Author: Lindsay
  • Yield: Makes 16 truffles 1x

Ingredients

Scale
  • 1 cup dates (pitted and roughly chopped)
  • 1/2 cup peanut butter
  • 6 sheets graham crackers
  • 2 Tbsp cocoa powder
  • extra graham crackers & white chocolate for decorating

Instructions

Add dates and graham crackers to a food processor and process until well chopped. 

Add cocoa powder and peanut butter and process until combined. 

Form mixture into balls. Squeeze tightly to make sure they stick together. If necessary, you can add a teaspoon or two of water. 

Roll in crushed graham crackers or drizzle with chocolate. 

Notes

Other decoration options include dipping in chocolate, rolling in cocoa powder, etc.

Did you make this recipe?

Tag @theleangreenbean on Instagram

Time to get busy finding a party to take these to! If you want to add a little crunch, you could add some chopped peanuts to the mix. I like to keep mine in the fridge and eat them cold!

These Peanut Butter Chocolate Truffles are the perfect holiday dessert. Made with just four simple ingredients, they're easy to make and deliciously rich. Roll them in graham crackers or drizzle with chocolate to make them a little fancier!

[clickToTweet tweet=”Impress your holiday guests with these Peanut Butter Chocolate Truffles!” quote=”Impress your holiday guests with these  Peanut Butter Chocolate Truffles!”]

Enjoy!
–Lindsay–
Filed Under: Dessert

Playing Catchup

December 20, 2011 by Lindsay 18 Comments

Today’s post is going to be a bit of a mish mash of random things I wanted to fill you in on! You may have noticed some little changes popping up around the blog and they’re all super exciting so I wanted to tell you about them!

1

1) See that pink Fitfluential badge over on the righthand side of the screen? I’m proud to announce that I’m one of the newest Fitfluential Ambassadors! To learn more about Fitfluential as a company, click here. It’s basically  a collection of health and fitness bloggers and enthusiasts that provide motivation, support and inspiration to fellow ambassadors and others on their fitness journey. It also connects health and wellness brands with these ambassadors. I think it’s a great company and am so excited to be a part of it. My fellow ambassadors already provide me with so much support and encouragement on twitter and through my blog posts that I’m thrilled to be officially part of the club. If you’re on twitter and looking for some advice/motivation/support, check out the #fitfluential hashtag! Oh- and I have my own little page on their website! Check it out.

2. You may notice that there are now two tabs across the top of the page that say Recipes. Some changes are in the works for that page as well. As of yesterday, this amazing service called Recipage, created by fellow food blogger Emily at The Daily Garnish, is now FREE!! I’ve been thinking about using it for a while now and absolutely jumped on board yesterday after I heard the announcement. It’s going to be a bit of a long process changing all my recipes over to the new format but in the end it’ll be much easier to search for recipes and I love the new look and format of it! If you want to see what it will eventually look like, click the second recipes tab to see the ones I’ve done so far. I’ll leave the original recipe tab up until I finish transferring all of the recipes.

3. Remember that contest I bugged you guys to vote in a million times? Well it paid off! I’m officially a Love Blogger for Love Grown Foods!

love

Thank you SO SO MUCH to every single person that voted. This means I’ll be able to give away lots of LOVE in the coming year so get excited. And be sure to check out LGF’s Facebook page to see some of my fellow Love Bloggers and check out their blogs!

4. Starting tomorrow I’m taking a short little break from blogging. I’ll still be around reading blogs and on twitter but I’ll also be trying to soak up some family time around the holidays. I hope you all will be doing the same! I have some really delicious guest posts lined up for you guys from some of my favorite bloggers so be sure to stop by and check those out!!

Happy Holidays everyone! Thanks so much for reading this little blog of mine 🙂

–Lindsay–

Today’s Workout:

Quick Arm Workout

dec20

 Abs: 2 min plank, 1 min plank, 100 crunches, 100 reverse crunches

Filed Under: Uncategorized

Homemade Christmas

December 19, 2011 by Lindsay 25 Comments

So this year I tried a bunch of new Christmas Cookie recipes….but none of them were really my own, so I thought I’d just do a quick little round-up post so you can see all the goodies I made 🙂

xmas cookies

As you can see, I was a busy little bee 🙂

cookies21

1) Peppermint Shortbread- I used this recipe and subbed peppermint extract for vanilla and added crushed candy canes.

2) Reese’s Stuffed Peanut Butter M&M Cookies-  I used this recipe and subbed m&ms for chocolate chips.

3) Cinnamon Roll Cookies- I used this recipe and subbed plain almonds for the nuts and left off the glaze.

4) Chocolate Caramelitas- I made these for the Great Food Blogger Cookie Swap. I used this recipe with skim milk, chocolate chips, m&ms and pecans.

5) Molasses Cookies- I used this recipe and left out the cloves.

6) Peppermint Oatmeal Chocolate Chip Cookies- I used this recipe and subbed applesauce for 1/2 the butter, decreased both sugars by 1/4 cup, used m&ms instead of white chocolate and added extra oats.

7) Toffee Chocolate Squares- I used this recipe but used half the butter, left out the nuts, added m&ms and spread the chocolate chips out when they melted.

8 ) Fudgy Cookies w/ Reese’s- I used this recipe but subbed skim milk for yogurt and added chopped Reese’s.

Put them all together and you’ve got one heck of a cookie plate to give to people!

This year, I was also looking for ideas for Christmas presents that I could make at home. I decided I wanted to make some homemade gift baskets.

Several weeks ago I started searching for ideas. The first one I decided on was homemade vanilla extract! As I kept searching, I ended up with a decent sized list and I was ready to get to work.

Here’s what I ended up putting together:

IMG 1320

Included in the baskets above, which I made for my managers at work and a couple friends:

-A loaf of homemade bread
-A loaf of quickbread (either pumpkin or banana) in a cute disposable miniloaf pan
-A ball jar full of homemade granola
–Homemade chapstick
–Homemade Moisturizing Lemon Hand Scrub
–Peppermint Bark in a Cookie Cutter –Homemade Vanilla Extract

IMG 1312

IMG 1319

These turned out to be a huge hit! They were relatively inexpensive AND they were fun to put together 🙂 A few  pieces of ribbon that I had laying around, some scrapbook paper cut with fun scissors for labels, cardboard boxes covered in wrapping paper and stuffed with tissue paper, some ball jars I had in the basement and a few $1.00 plastic containers.

Do you give homemade gifts?

Happy Holidays!
–Lindsay–
Today’s Workout:

I hopped on the treadmill this morning and walked another 3 miles. For the first 20 minutes I walked and read at 3.5 mph, incline 7.0. From minutes 20-25 I bumped it up to 3.7 mph. Then I put the book down and bumped it up to 4.0 mph. When I hit 2 miles, I increased my speed to 4.2 mph and finished 3 miles in 47:05.

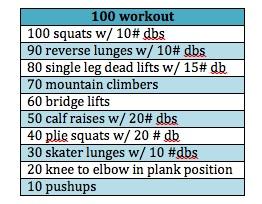
After a short break for lunch, I headed back to the basement and did a new 100 workout. I modified the one I’ve been doing on Mondays: http://www.healthywithheather.com/2011/11/100-workout-strength/

And made it all legs.

Here’s what it looked it:

100 Workout-Legs

dec19

This took me 23 minutes. I used weights for the 100 squats, deadlifts and calf raises but did the rest with just bodyweight. My goal was to finish in under 25 minutes.

Filed Under: Uncategorized

To You, Love Me

December 17, 2011 by Lindsay 13 Comments

Hi!

Has anyone told you lately that your actions make you beautiful?

13

That there’s no magic number to tell you how healthy you are, or how much you’re worth?

23

That your mind should be your best friend not your worst enemy?

43

That there’s more than one way to be beautiful?

53

That you should spend your time focusing on how amazing you are instead of how much you want to be like someone else?

61

How important it is to live in the moment?

8

That just waking up every day and staying true to who you are is a huge accomplishment?

7

That everyone makes mistakes, but that doesn’t mean you have to let them define you?

9

That strong is beautiful?

10

That there’s somebody out there that wants to be just like you?

111

That you can always, always, always

121

No? Well then I’m glad I took the time to remind you.

Love,

Me

Today’s Workout:
I didn’t have much time before I had to be ready to go out to dinner but I still wanted to get some weights in, so I put together a 20 minute circuit with one minute intervals. 10 minutes legs, 5 minutes arms, 5 minutes abs.

2o Min Circuit Workout

dec17

Do each exercise for one minute and move immediately to the next.
To make it slightly easier, take a 15 second break between each exercise.

Filed Under: Uncategorized

Fitness Friday #2

December 16, 2011 by Lindsay 24 Comments

It’s Friday!

To celebrate, we’re going to kick this post off with a little confession. Are you ready?

I’ve been, for the most part, wearing the same sports bras since high school. I know, I know, please don’t judge me. They’ve literally been through thousands of volleyball practices, gym sessions and loads of laundry. They’re faded and let’s face it…old.

SO when Champion offered to send me a few new ones to try, you’d better believe I was all over that offer! They arrived earlier this week and if you follow me on twitter, you may have seen my tweet about my exercise motivation arriving via mail!

photo 101

Since I pretty much live in workout clothes all day, every day, even though I usually don’t exercise until late at night, I immediately put this one on. And lemme just say, it’s awesome. And after my terribly sweaty running workout…you know what? It was still awesome.

I love love love that they’re moisture wicking! And they’re tagless…which is awesome because almost every tag annoys me so much that I cut it out, and then it still itches, or I can’t remember how to wash whatever I’m wearing….anyways, tag free is the way to be. And finally, I love the thin straps. I’m kind of obsessed with this style…fashionable AND effective.

Desktop2

Fact: Sepia photos make your muscles look better!

The next day I tried out this one which was also great. Mine is plain black, but this style is super fun because it’s reversible and they have several different ones with two colors. I’ve yet to try the third one, but i’m sure i will love it equally as much 🙂

Bottom line is, buy yourself new workout clothes….don’t wait 10 years like I did. But you know what, those 10 year old sports bras? Champion. They’re built to last. I’m just sayin….Now if i could just find some workout pants that I liked this much!

And now for a look at this week’s workouts!

Dec 9th– http://iowagirleats.com/2009/12/16/a-quad-burning-gasp-inducing-morning/

Only had to make a few minor changes. Mine looked like this:

26 min interval run
[print_this]wrk1[/print_this] 

Total: 2.5 miles in 26 minutes

Even though the total rest day did me a world of good, I was still a little tired so on the way back down the pyramid, I split the recovery runs into one minute walk, one minute jog…instead of 2 minutes of jogging. Then I amped it up at the end with 2 minutes of running at 6.5 and walked an extra minute to get to 2.5 miles. I really liked this one because it changed up the speed and intervals but it was easy to follow and remember when to change speeds and heights. Next time I do this one I will eliminate at least 2 of the walking minutes.

Dec 10th– I used this workout generator (which is AWESOME by the way- Amy is a genius) for inspiration & put together a bunch of moves to make my own workout.

[print_this]wrk2[/print_this]

This took me about 30 minutes. The stability ball stuff was the hardest because I hadn’t used it in a long time.

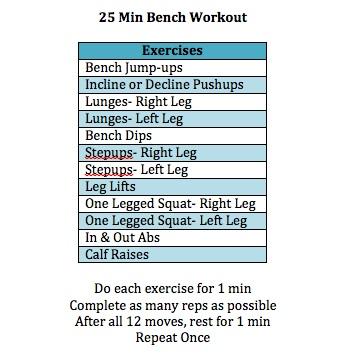
Dec 11th– http://www.yourinnerskinny.ca/25-minute-bodyweight-workout/

I found this workout thanks to Lindsay who tweeted about how awesome it was. Without an interval timer, I decided it would be too much of a hassle to switch between my timer and the list of things I was supposed to be doing so I did reps instead of time, and knocked off the last set to make it still take 25 minutes.

Mine looked like this:

[print_this]wrk3[/print_this]

This took me exactly 25 minutes. I didn’t rest between any of the moves within each set and rested no more than 30 seconds between sets. It definitely worked up a sweat and it was just bodyweight so there were no weights to worry about. I’ll be doing this one again. I want to do it the original way with timed intervals and see which way I like better.

Dec 12th– http://www.healthywithheather.com/2011/11/100-workout-strength/

Did my favorite Monday workout again. Shaved another 4 minutes off my time so took 32 minutes. I used 10 lb dbs for everything except the deadlifts where I used a 15lb. Took it a little easy on the weights because my back has been a little sore. I used to have major problems with my back when I played volleyball and rowed so I try to pay attention when it hurts now. As much as I like this workout, there are a few moves I’m not crazy about so I think I may switch it up just a bit next week.  No quad pain this time but I noticed my knees were sore walking around the rest of the night.

Dec 13th– much needed rest day!

Dec 14th– Made up my own treadmill workout. I wanted to force myself to run for an extended period of time and recover to at 6.0 instead of walking like I have been…but still needed intervals to pass the time more quickly.

My workout looked like this:


[print_this]

Treadmill:
2 min @ 4.0
1 min @ 6.0
1 min @ 6.5
1 min @ 7.0
Repeat running cycle 5 more times to get to 20 min

Abs:
25 stability ball tucks
25 crunches
25 reverse crunches
Repeat once

Treadmill:
2 min @ 6.5
2 min @ 6.5

Repeat running cycle 3 more times
2 more minutes at 6.5 to get to 10 min

[/print_this]
 

Treadmill Total: 3.12 miles, 30 minutes

I really liked this workout. Changing the speed every minute helped pass the time quickly and I pushed myself to use the 6.0 to recover instead of go down to 4.0. This was the longest amount of steady running I’d done in a long time. Truthfully, I was ready to be done after the first 20 min run and the abs….but I pushed myself to get back on and do another mile.

And then I tweeted this:

wrk4

And I truly believe it. I’m making it a goal to push myself just a little bit further when I feel like I’m done with each workout. Doesn’t always have to be as big as a mile…could just be 25 extra crunches. Every little bit counts!

Dec 15th– Made up a weights workout of my own. Combined a lot of moves that are used on various days in the Jillian Michael’s Slimdown App which I have a free trial of.

Here’s how it looked:

[print_this]wrk61[/print_this]

This one was fun because I did some moves I’d never done before like split squats and sumo squats. I also really pushed myself on the arm weights and I could definitely feel it by the end. It took me about 50 minutes.
So there ya have it! A week’s worth of workouts in Lindsay’s world.

One thing I’m finally getting the hang of this time around with exercise is the difference between tired and lazy.

When you’re sitting on the couch telling yourself you’re too tired to work out & you just wanna sit there and watch one more show, or read one more blog, you’re not tired, you’re being lazy. GO WORKOUT!

When you’re sitting on the couch and the mere though of trying to get up and go to the basement/gym/treadmill literally makes you want to cry out in pain or collapse from exhaustion, you’re not being lazy, you’re tired. Your muscles are screaming for time to rest and recover. LISTEN TO THEM.

There’s nothing wrong with a rest day when you really need it.

So tell me, what’s the best workout you did this week? Got any good ones for me to bookmark?

Enjoy!
–Lindsay–

Today’s Workout:

25 Min Incline Run/Walk

dec16

I went 2.06 miles.
Running on an incline is hard for me even when I’m not tired so 6 mph was plenty fast enough to challenge me. I tried bumping it up to 6.5 for one minute and quickly realized I wouldn’t make it through the workout at that speed so I went back down. 3 minutes is a long time for me to run continuously at an incline so the running intervals were definitely challenging. I was dripping sweat when this was over!

Filed Under: Workouts

Sweet & Spicy Shrimp with Soba Noodles

December 13, 2011 by Lindsay 21 Comments

Ready in 15 minutes, this Sweet & Spicy Shrimp with Soba Noodles is a quick and easy weeknight dinner recipe that the whole family will love!

Ready in 15 minutes, this Sweet & Spicy Shrimp with Soba Noodles is a quick and easy weeknight dinner recipe that the whole family will love!

**Note- photos and post were updated 10/22/15**

Hi Friends!


I first made this dinner back in 2011 and since then it has become one of my go-to dinner recipes. It’s quick, it’s healthy and it’s easy to customize with whatever I have on hand. I usually use shrimp because they cook so quickly, but I’ve also made it with fresh chicken, or as a way to use up leftover chicken or pork.

You can use whatever veggies you have on hand. I usually use a mix of fresh and frozen and my standard choices are onions, red pepper and broccoli but I’ve also used corn, green beans, carrots, etc.

I’ve also made this with zoodles instead of soba noodles! (Check out my 6 Quick and Easy Zoodles Recipes).

Ready in 15 minutes, this Sweet & Spicy Shrimp with Soba Noodles is a quick and easy weeknight dinner recipe that the whole family will love!

Here’s the recipe…and I use that term loosely because I never measure when making this. It’s very forgiving 🙂

Print

Sweet & Spicy Shrimp with Soba Noodles

Sweet and Spicy Shrimp with Soba Noodles 2
Print Recipe

5 Stars 4 Stars 3 Stars 2 Stars 1 Star

No reviews

Ready in just 15 minutes, this recipe for Sweet & Spicy Shrimp with Soba Noodles is easy to customize and perfect for busy nights.

  • Author: Lindsay L
  • Prep Time: 5 minutes
  • Cook Time: 10 minutes
  • Total Time: 15 minutes
  • Yield: 3-4 1x

Ingredients

Scale
  • 2 cloves garlic, minced
  • 1/2 c onion, diced
  • 1 red bell pepper, diced
  • 2 cups broccoli, chopped
  • 1 pound shrimp
  • 3 Tbsp Thai chili sauce
  • juice from one lemon
  • 1 – 2 tsp sriracha
  • buckwheat soba noodles (I use about half the box)

Instructions

  1. Cook soba noodles according to package directions and set aside.
  2. Add garlic and vegetables to a large pan and saute over medium heat for 5-10 minutes or until desired texture is reached.
  3. Add remaining ingredients to pan and cook another 5 minutes or until shrimp are cooked through.
  4. Add noodles to pan, toss and serve!

Notes

Feel free to add additional veggies or sub in your favorites. [br]Adjust amount of sriracha to fit your desired spice level.[br]Try serving over zoodles to change things up![br]Also works well with chicken or tofu

Did you make this recipe?

Tag @theleangreenbean on Instagram

I often double this recipe because we love the leftovers!

Ready in 15 minutes, this Sweet & Spicy Shrimp with Soba Noodles is a quick and easy weeknight dinner recipe that the whole family will love!

And it doesn’t always look this pretty on my plate, as you can see by the original photo below 🙂

DSC 1039

{original photo}

[Tweet “Sweet and Spicy Shrimp with Soba Noodles via @leangrnbeanblog – the perfect weeknight dinner!”]

Enjoy!
–Lindsay–

Filed Under: Dinner

Lollihop

December 10, 2011 by Lindsay 11 Comments

Hi Friends!

I’ve got an awesome company to tell you about today! Have you heard of Lollihop? It’s essentially a program where you pay a monthly subscription fee and in return, they send you a box of healthy snack samples each month!

——————————————–

From their website:

The membership.

Lollihop is a monthly, 6-, or 12-month membership to the best of healthy eating delivered to your doorstep. That means that for as low as $18.95 a month, you can discover a fun and simple way to eat healthier via our monthly snack box. Along with our box filled with a diverse selection of wonderful snacks, you’ll also get tips and articles from our nutritionist to explain how to best incorporate the snacks into your day and feel better about how you eat everyday. There’s no catch, no hidden fees, and free shipping. You’ll hear from any of our current members from all around the US, Lollihop is the best way to kickstart your healthier lifestyle today! So what are you waiting for?

The box.

Each monthly box includes at least eight organic and healthy snacks picked by our nutritionists. We source snacks from all different places, and work with brands big and small. The one thing they all have in common is that they are good and wholesome. What does that mean to us? Our team of nutritionists have a set of guidelines that they check every ingredient and company against, and if the label doesn’t provide enough information, you can bet they will go directly to the source to find their answer. Snacks are hand-chosen for flavor, quality, nutrients, texture, and that thrilling something extra that great food always has. Your box goes out on the 15th of each month, rain or shine.

The good life.

That’s what it’s all about, isn’t it? Lollihop is on a mission to discover and try new snacks and new meals — ones that fit easily into daily life — and share what we find. We truly do love bringing fun and healthy eating to all!
———————————————————–

Over the past month or so, Lollihop reviews started showing up on a few of the blogs I read…Not one to miss out on the fun, I asked them if I could see for myself what all the fuss was about. They immediately offered to send me a box and about 2 days later it was sitting on my doorstep!

IMG 1121 2IMG 1122 2

On the day I got my box, I had just gotten home from a super long day of studying and taking a really hard test. Seeing it on my steps totally made my day! I was STARVING and immediately dug into the box!

IMG 1123IMG 1125
They send you a little card that tells you about the theme of the box. This month was whole grains, so it shows you whether each item is a good source of fiber, vitamins and minerals and/or healthy fats.

I immediately grabbed the Food Should Taste Good Chips! Love them 🙂

IMG 1126

Later that night I tried the Popcorners and lemme just say: ADDICTED. They might be my new favorite snack. In fact, I had just so happened to have a larger bag of them sitting in the pantry from Sarah Smart Kitchen that I had yet to try. After trying the sample bag, we opened the big bag the next morning. I went to work and when I came home, the whole bag was GONE! Hubby ate them all. I think it’s safe to say we both liked them.

IMG 1132Next up, the Somersaults!

IMG 1205IMG 1206IMG 1207
Like I mentioned in my last WIAW post, these were a bit too salty for me. But now that I know they exist, I’m definitely going to try out some of the other flavors!

The larabar made a great post-workout snack and I threw the Kind bar and the Gnu bar in my school bag to eat during class.

Best of all, I still have some stuff I haven’t tried yet!

Overall I was really impressed with my Lollihop box. The only downfall is that they’re a little bit expensive (in my opinion). I can’t afford to subscribe myself, but here’s the cool thing…you can give gift subscriptions! What a great Christmas present these would be!!!

If you’re able, I’d highly recommend subscribing to Lollihop! It’s the perfect way to learn about some fun, new healthy snacks. If you subscribe, tell them I sent you by using the referral code LINDSAY-LEANGREENBEAN.

Have you tried Lollihop? What’d you think? If you haven’t tried, is this something you’d consider subscribing too??

Happy Saturday 🙂
–Lindsay–

Today’s Workout:

3 Set Legs/Arms/Abs Workout + 1 mile run

dec10

Took 30 min.

Filed Under: Uncategorized

Fitness Friday

December 9, 2011 by Lindsay 24 Comments

Hi Friends!

We’re going to do something a little different around here today. Hope you like it. I know at least one friend is looking forward to it (Hi Britta!!) Over the past few months I’ve been posting some inspirational workout mantras, usually over the weekend to help encourage you to exercise…but I’ve never really talked about exercise on my blog. I’ve been thinking about it a lot lately and since I’m studying to become an RD, I strongly believe in finding a healthy balance between eating well and exercising.

Growing up I was always an athlete. I played volleyball, soccer, softball, basketball, swam on a swim team, ran track….you name it, I did it. As I got to high school, I narrowed it down to volleyball and played pretty seriously year-round. In college, I did crew (rowing) for the first couple years. Then, somewhere around my junior year I kinda fell off the wagon. I wasn’t eating right and was having a lot of fun, so even though I would head to the gym occasionally, it wasn’t really doing much.

After I graduated, I got serious about eating right AND I started exercising. Then, over the next few years I went through exercise cycles. I’ve kept my eating pretty much on track but when it came to exercise, I’d go through a few months where I was really into it, and then I’d get sick, or busy, or just stop caring and I’d do nothing for a while. Between the hubby and I, we wasted a lot of money on unused gym memberships…

But over the last year or so I’ve slowly gotten my act together. Especially since late spring. My gym membership expired, so I started running outside and I’ve been running pretty consistently since March. And that was all well and good for the cardio side of things. But I knew something was still missing- weights.

I’ve lifted weights before. I took a class in high school, I had lift for volleyball, I’ve been to personal trainers…I know how to do it correctly. In fact, I used to be pretty freakin’ strong.  And being a nutrition major, I know how important it is. But quite frankly, I just haven’t felt like doing it for ohhh, the past 6 years or so.

Good news is, I’ve fallen in love with weights again. You may have noticed that as soon as Thanksgiving hit this year, all sorts of exercise posts started popping up about avoiding holiday weight gain. A lot of bloggers, like Samantha & Kristin, are hosting awesome exercise challenges. I don’t know what it was about this year…I read these same kinds of posts last year…but this year I got the spark! Two weeks ago I decided I was going to make exercise a habit again. And not just cardio…weights too.

I’ve challenged myself to break a sweat every day until the new year and so far I’m on a roll. I also started doing something I haven’t done in a long time….I’ve been writing (well, typing) down my workouts. Mostly for myself, but also so I can share them with you! I’ve had about 1.8 million workouts bookmarked from other bloggers and I thought this challenge would be the perfect excuse to start going through and actually doing them!

So here you go…my first two weeks of workouts. I’m literally just copying and pasting what I sat down and wrote after each workout so it’s kinda like an exercise journal. There are links to the original workouts, plus how I modified them, how far I went and how long it took me. I’ve been trying to do two more intense strength training workouts a week, plus a few full body and some running. I’ve found that circuits and intervals work much better for me than just getting on the treadmill and running 5 miles. It helps keep my attention span and passes the time quickly. I’ve also been using Saturday as an active rest day, typically to walk the dogs. But don’t let that fool you- they provide quite the workout!

Nov 28th– http://www.healthywithheather.com/2011/11/100-workout-strength/

Took about 45 minutes. Used 15 lb dbs for the 100 squats and 8lb dbs for the rest of the workout. Exhausted by the end!

Nov 29th– http://www.eatingbirdfood.com/2011/05/protein-overnight-oats-and-incline-walking-hiit/

Changes- after incline 15 at minute 17, I went back down to 12, 8 & 4 and then walked two extra minutes at incline 2 to get to 1.5 miles.
took 22 minutes

Nov 30th– http://www.sweettoothsweetlife.com/workout-log/30-minute-speedy-interval-run/

Changes- had to modify this one since 8.0mph was as fast as I’d gone on a treadmill and didn’t want to push myself too much. Mine looked like this:

tbl1

2.62 miles, 30 minutes. If I did it again, I would cut the warmup and cooldown to 4 minutes and add and on two extra running intervals, plus cut the two 2 min walking breaks down to one minute each. Could easily reach 3 miles next time. Still super sore from Monday’s workout so taking it a little easy.

December 1st– made up my own supersets workout!

tbl2
Took about 35 minutes, sweaty by the end. Tried to think of two supersets where you could do the exercises simultaneously and three where you alternated

December 2nd– http://www.sweettoothsweetlife.com/2011/11/19/20-minute-give-it-your-all-hiit-workout/

Modified: Again, I didn’t want to run at anything about 8 so after confirming that by running the first interval at 8.5, I dropped all of the 8.5s down to 8.0. I also added an incline for the warmup and added a couple walking breaks.

Mine looked like this:

tbl3

*incline 8.0

Although I wasn’t nearly as sore as I thought I’d be when I got up this morning, as soon as I got on the treadmill and started running I could tell how tired my legs were. I wanted to bring the 6.5 down to 6.0 so many times but I compromised by giving myself two walking breaks instead. Near the end I could tell I wouldn’t get to 2 miles if I walked the last 3 minutes so I walked one and ran two.

2.00 miles in 20 minutes

Considering I walked 5 of them, I’m pretty happy with that! Next time I do this I’ll try to eliminate the two walking breaks or increase them from 4.0 to 6.0

Dec 3rd– Active rest day. Walked the dogs 2.35 miles in 32 minutes.

Dec 4th– http://insweetnessandinhealth.com/2011/12/04/incline-pyramid-interval-workout/

Modified this to make it a bit harder. I knew walking at 3.5 would be too slow for me so I bumped them all up to 4. I decided to challenge myself and run them all at 6 instead of decreasing speed. Mine looked like this:

Pyramid Interval Treadmill Workout

tbl42.0 miles in 25 minutes. This wasn’t the hardest workout ever but it definitely got me sweating. I could really feel my legs using different muscles than when I run at no incline. The 4 minutes at the 10 incline were tough!

Dec 5th– http://www.healthywithheather.com/2011/11/100-workout-strength/

Loved this one so much last week I did it again this Monday. Took me 36 minutes. 10 minutes faster than last week. Used 10 lb dumbells the whole time. My arms were feeling it! My right quad was a little tight. Hurt on some of the lunges but pushed through! On the chest flies and back flies I did arms and legs separately.

Dec 6th– intended to do this workout: http://www.faithfitnessfun.com/14123/a-blessing-in-disguise/

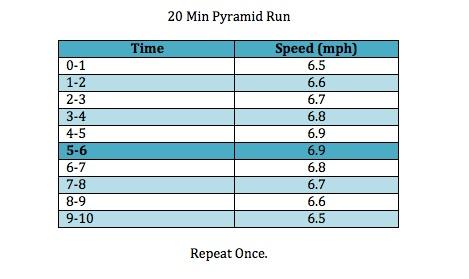
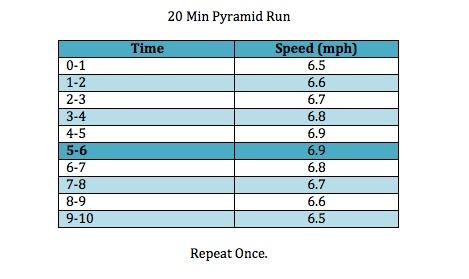
Could tell as soon as I started that my body is too tired. Adjusting to all this working out it catching up to me so I adapted. Wanted to get my muscles moving. I was sore today but not nearly as sore as I was after last Monday’s workout. My upper body was more sore and I could definitely tell I used 10 lb dbs instead of 8. Today’s run was long intervals and it was BORING. They seemed to last forever and it made the run go slowly. I could tell I was tired because running at 6.0 mph was hard for me and that’s usually my slow slow pace. I wanted to stop so many times during the last 6.7 interval but I knew it was mental so I pushed through it.

tbl5Total 3 miles, 33 minutes.  It wasn’t anything crazy but it got me sweating and covered the distance I wanted it to.

Dec7th– http://pinterest.com/pin/612408822/

Modified the crunch and leg lift part of each set

Mine looked like this:

 99 workout

tbl6This took me 1 hour and 5 minutes. I covered a mile in my very slow run/walk at the end. This workout was a bit long to do all the time. I’d say it’d be good to do once a month or so to change things up but not every week. I was sweating by the end.

Dec 8th-  In honor of this post, I took a total rest day 🙂 It was MUCH needed.

So whaddya think? More fitness on The Bean? Or should I just stick to food? Please note that future fitness posts would not be this long!!!

Happy Friday 🙂
–Lindsay–


Filed Under: Workouts

Toffee Peanut Butter Chocolate Chip Cookies

December 6, 2011 by Lindsay 42 Comments

These Toffee Peanut Butter Chocolate Chip Cookies can be enjoyed plain or drizzle with chocolate. They’re the perfect addition to a party or a holiday dessert tray.

These Toffee Peanut Butter Chocolate Chip Cookies can be enjoyed plain or drizzle with chocolate. They're the perfect addition to a party or a holiday dessert tray.

*Post and photos updated 12/2017*

Hi friends!

I realized this year that I’ve been severely lacking in the Christmas Cookie offering department. Every year I bake cookies around the holidays but it’s been a while since I shared a new recipe with you guys.

I was searching back through the archives and came across these gems. I originally shared them as part of a blog cookie swap that I did with a few friends, but they’d be the perfect addition to any holiday dessert tray! The original recipe I posted was a little bit over the top on the butter and sugar. I’m all for enjoying a real cookie, but there were definitely a few swaps that could be made to the original recipe.

Toffee Peanut Butter Chocolate Chip Cookies

Since I needed to take some new photos anyways, I tweaked the recipe a little bit and they turned out just as great as I remember. Here’s the thing about toffee- I love it. But the only time I seem to think to use it is during holiday baking. Why is that??

I guess what I’m saying is, these cookies would be great year round….but for me, there’s just something about them that screams Christmas cookie.

Here’s how you make them:

Print

Toffee Peanut Butter Chocolate Chip Cookies

These Toffee Peanut Butter Chocolate Chip Cookies can be enjoyed plain or drizzle with chocolate. They're the perfect addition to a party or a holiday dessert tray.
Print Recipe

5 Stars 4 Stars 3 Stars 2 Stars 1 Star

No reviews

These Toffee Peanut Butter Chocolate Chip Cookies can be enjoyed plain or drizzle with chocolate. They’re the perfect addition to a party or a holiday dessert tray.

  • Author: Lindsay
  • Prep Time: 10 min
  • Cook Time: 12 min
  • Total Time: 22 minutes
  • Yield: makes 2 dozen cookies 1x

Ingredients

Scale
  • 8 Tbsp butter
  • 3/4 cup brow sugar
  • 3/4 cup peanut butter
  • 1 egg + 1 egg yolk
  • 1 tsp vanilla extract
  • 1.5 cups white whole wheat flour
  • 1 tsp baking soda
  • 1/2 tsp salt
  • 1/2 cup dark chocolate chips
  • 3/4 cup toffe pieces
  • white or dark chocolate chips for decorating (optional)

Instructions

Melt butter in a large, microwave-safe bowl. 

Add brown sugar, peanut butter, eggs and vanilla to the bowl and mix well. 

Add remaining ingredients and stir until just combined. 

Scoop onto baking sheet, sprinkle with sea salt and bake at 350 degrees F for 12-14 minutes.

Let cool and drizzle with or dip in melted chocolate if desired.

Notes


Did you make this recipe?

Tag @theleangreenbean on Instagram

Pretty easy right? Serve one up with a nice cold glass of milk and you’ve got dessert perfection.

Toffee Peanut Butter Cookies with chocolate drizzle

Like I said, these are great plain…but if you want to jazz them up a little, drizzle them with some melted chocolate or dip in white chocolate!

These Toffee Peanut Butter Chocolate Chip Cookies can be enjoyed plain or drizzle with chocolate. They're the perfect addition to a party or a Christmas dessert tray.

[clickToTweet tweet=”Add these Toffee Peanut Butter Chocolate Chip Cookies to your Christmas cookie tray this year!” quote=”Add these Toffee Peanut Butter Chocolate Chip Cookies to your Christmas cookie tray this year!”]

Enjoy!
–Lindsay–

Filed Under: Baking, Dessert Tagged With: Peanut Butter

SRC: Baked Garlic-Beer Potato Wedges

December 5, 2011 by Lindsay 17 Comments

It’s that time once again. Time for Secret Recipe Club!


This month I was assigned Jaida’s blog Sweet Beginnings. I really enjoyed looking through the wide variety of recipes on her site, but these Baked Garlic-Beer Fries grabbed my attention almost immediately!

As you know, I make roasted potatoes all the time, and I thought these would be a fun way to change things up for the hubby and I.

I made a few adjustments to Jaida’s recipe: I used mini yellow potatoes instead of russet because that’s what I had. I used Yuengling for the beer, reduced the amounts of salt and oil and I also only baked mine for 25 minutes because I didn’t want to burn them.

potatoes1


Baked Garlic Beer Fries

by Lindsay L

Prep Time: 20 min

Cook Time: 30 min

Keywords: bake side healthy vegetarian potato beer

Ingredients (Serves 2)

  • 12 oz beer
  • 10-12 mini/fingerling potatoes
  • 2 cloves garlic, minced
  • 1 Tbsp olive oil
  • 1/2 tsp salt
  • 1/2 tsp black pepper

Instructions

1. Preheat oven to 425°F

2. Quarter potatoes, then cut each quarter in half. Put potato wedges in a bowl and add the beer. Let soak for 15 minutes, tossing a few times so that the potatoes soak evenly.

3. Drain beer and toss the potatoes with the oil, garlic, salt and pepper.

4. Spread the fries in a single layer on a baking sheet and bake for about 30 minutes.

Powered by Recipage


DSC 0903

The result? Good! They had a different flavor than our regular potatoes thanks to both the beer and the garlic. They got super brown and crispy….my only complaint is that about 15 minutes after they came out of the oven they weren’t nearly as crispy as they were straight out of the oven…so eat them fast 🙂

Today’s Workout:

25 Min Pyramid Interval

dec4

2.0 miles in 25 minutes. This wasn’t the hardest workout ever but it definitely got me sweating. I could really feel my legs using different muscles than when I run at no incline. The 4 minutes at the 10 incline were tough!

Enjoy!
–Lindsay–


Filed Under: Side Dish

Vegetarian Stuffing

December 1, 2011 by Lindsay 7 Comments

Every year since I was little, my mom has made stuffing for Thanksgiving. And I’ve never eaten it.

A couple years ago, she made it and the hubby LOVED it. The following year, it was our year to stay here for Thanksgiving and even though we didn’t see my parents, the hubby requested my mom’s stuffing. So she froze some for him, and he ate it when we visited them for Christmas.

This year, I decided to surprise the hubby and try to make my mom’s stuffing for him. I asked her for the recipe and she said there wasn’t one! But she  gave me a list of ingredients and a general outline of what she did and I decided to give it a whirl.

The only thing was, her version was not vegetarian. BUT, with just a couple substitutions, I adapted it to our current dietary needs. Instead of regular sausage, I used Morningstar vegetarian breakfast sausages…and instead of chicken broth, I used homemade veggie broth! Piece of cake!

Vegetarian Stuffing


by Lindsay L

Prep Time: 10 min

Cook Time: 20 min

Keywords: stovetop saute side healthy vegetarian rice apple cranberry Thanksgiving fall

Ingredients (Serves 4-6)

  • 2 Tbsp butter
  • 1/2 c celery, thinly sliced
  • 1/ c leeks, thinly sliced
  • 1/2 c apple, chopped
  • 2-3 Morningstar breakfast patties, diced
  • 1 tsp McCormick’s grill seasoning
  • salt & pepper to taste
  • 1/2 c Craisins
  • 1 c wild rice, cooked
  • 1 Tbsp fresh parsley, minced
  • 5 c old bread, cubed
  • 3/4 – 1 c vegetable broth

Instructions

1. Saute the leeks and celery in the butter until soft.

2. Add the apple, sausage, Craisins and seasonings and saute 5 minutes more

3. Stir in the rice, parsley and breadcrumbs until well combined.

4. Slowly add broth until all of the bread is moistened.

5. Cook until heated through and serve warm.

Notes

-If you’re not vegetarian, feel free to use real sausage and chicken broth

-If you don’t have any stale bread, slice up some fresh bread, cut it into cubes and lightly toast it in the oven.

-If you don’t have McCormick’s you could use any kind of poultry seasoning if you have it, or whatever combination of spices you do have on hand.

Powered by Recipage


DSC 0930DSC 0931DSC 0932

The good news: The stuffing was a big hit. The hubby immediately said, “you gotta put this on The Bean!” So there you have it.
More good news: I actually tried the stuffing…and I liked it 🙂 Although I don’t really have anything to compare it to because I never ate my mom’s, I’ll definitely be making this again.

The hubby has already requested another batch!

DSC 0971DSC 09761DSC 0977
Check out yesterday’s post to see what I did with all the extra wild rice I accidentally made!

Have you ever adapted a family recipe to make it fit your dietary needs or made it healthier?

Enjoy!
–Lindsay–

Today’s Workout:

5 x 50 Supersets Workout

dec1

Filed Under: Uncategorized

Foodie Penpals November

November 29, 2011 by Lindsay 11 Comments

It’s time again for another Foodie Penpals reveal day!

This month, I received my package from my girl Jordan over at Food, Sweat & Beers. Jordan is HILARIOUS and I look forward to reading her posts because they usually make me laugh out loud at least once. Plus, she writes about beer…so that’s awesome. Also…she’s so fun to follow on Twitter!

Check out some of the awesome stuff she sent me!

IMG 1026

{A box that was stuffed to the brim}

IMG 1033{A sweet card & a fun little painting!}
{Jordan did you paint that?! I love it}

IMG 1027{Precision Packing- tetris style}

IMG 1030{Blueberry Granola that was great with my Lemon Chobani}
(Two new flavors of bars that I had never tried!}
{I’m saving them for finals week snacks}

IMG 1031{Candied ginger, which I’ve heard such good things about}
{Spicy chocolate = AWESOME}
{A fun new flavor of gum!}

IMG 10321{Spiced Apple Cider- the perfect drink for cold winter nights}
{And some fuel to fight off the inevitable winter sickies!}

So there you have it! Big thanks to Jordan for hooking me up with some great stuff!

And now it’s time for some details about Foodie Penpals.  In case you’re a new reader, here’s a reminder of what the program is all about:

-On the 5th of every month, you will receive your penpal pairing via email. It will be your responsibility to contact your penpal and get their mailing address and any other information you might need like allergies or dietary restrictions.
-You will have until the 15th of the month to put your box of goodies in the mail. On the last day of the month, you will post about the goodies you received from your penpal!
-The boxes are to be filled with fun foodie things, local food items or even homemade treats! The spending limit is $15. The box must also include something written. This can be anything from a note explaining what’s in the box, to a fun recipe…use your imagination!
-You are responsible for figuring out the best way to ship your items depending on their size and how fragile they are. (Don’t forget about flat rate boxes!)
-Foodie Penpals is open to blog readers as well as bloggers. If you’re a reader and you get paired with a blogger, you are to write a short guest post for your penpal to post on their blog about what you received. If two readers are paired together, neither needs to worry about writing a post for that month. *US Residents only please at this time- hopefully we can expand soon!*

If you’re interested in participating for December, please send  an email to me at [email protected] and include the following information:
-Your full name
-Your email address
-Your blog name/address
-Your twitter handle (if applicable)

I will need to hear from you by December 4th as pairings will be emailed on December 5th!

*You may have noticed that today is only November 29th…which is not in fact the last day of the month, but tomorrow is Wednesday and I didn’t want to interfere with Jenn’s WIAW party!!

Enjoy!
–Lindsay–


Filed Under: Uncategorized

  • « Go to Previous Page
  • Page 1
  • Interim pages omitted …
  • Page 58
  • Page 59
  • Page 60
  • Page 61
  • Page 62
  • Interim pages omitted …
  • Page 65
  • Go to Next Page »

Primary Sidebar

Lindsay Livingston The Lean Green Bean Healthy Living Tips and Tricks

I'm a Registered Dietitian and mom of three from Columbus, Ohio. I use this blog to share simple, healthy recipes, nutrition tips, and an honest glimpse of motherhood!

Learn More →

Questions? Comments? Email me: [email protected]

The Lean Green Bean Facebook The Lean Green Bean Instagram The Lean Green Bean Pinterest The Lean Green Bean Twitter The Lean Green Bean Feed
footer-logo
The Lean Green Bean Facebook The Lean Green Bean Instagram The Lean Green Bean Pinterest The Lean Green Bean Twitter The Lean Green Bean Feed
Recipes

Breakfast
Dinner
Snack
Slow Cooker

Kids

Cooking With Kids
Favorite Gifts
Toddler Meals
Indoor Activities

Resources

Easy Packed Lunches for Kids
Dinner Spark
Snack Spark
Ultimate Guide to Food Prep

About

Meet Lindsay
Become an RD
Work with Me

The Lean Green Bean is a participant in the Amazon Services LLC Associates Program, an affiliate advertising program designed to provide a means for sites to earn advertising fees by advertising and linking to amazon.com.
Read the full privacy and disclosure policy here.

Copyright © 2022 · The Lean Green Bean

table talk series

Learn how food affects your body.

Get my free Table Talk email series where I share bite-sized nutrition information about carbs, protein, and fat, plus bonus information about snacks and sugar!

[email protected]