• Skip to main content
  • Skip to primary sidebar

Get My Top Food Prep Tips. Subscribe Today

the-lean-green-bean-logo
  • Home
  • Recipes
  • Kids
  • Resources
    • Ebooks
    • Food Prep
    • Videos
    • Snack Round-Ups
  • About
    • Become An RD
    • Work With Me
  • Search
the-lean-green-bean-logo
Menu
  • Home
  • Recipes
  • Kids
  • Resources
    • Ebooks
    • Food Prep
    • Videos
    • Snack Round-Ups
  • About
    • Become An RD
    • Work With Me
  • Search

blog

Pumpkin Gingersnap Muffins

October 7, 2016 by Lindsay 30 Comments

So, the making of these muffins was a bit of trial and error. I bought a bag of gingersnaps last week and I’ve been doing some experimenting….I made some bars that had a gingersnap crust (still working on those) and I made these muffins.

The first time I made them, I used this recipe, which I saw on my girl Rachel’s blog. I turned the bread into muffins, and then used the streusel topping from this recipe, except I used chocolate chips and left out the pecans. I think I was craving a streusel topping after Kerstin posted these Pumpkin Oat Bran Muffins with Crumble Topping a few weeks ago.

Truth: the muffins were a bit of a bust. The muffin itself was a little too light and airy to hold up to the crunch of the topping from the gingersnaps. So I set out to make a bit of a heartier muffin. I also noticed that when I put the gingersnaps in the topping, they tasted a little bit burnt. I may have overcooked the muffins…but it got me thinking about what it would taste like if the gingersnaps were mixed IN the muffin. . Finally, I wasn’t crazy about how much butter and sugar was in the topping.

So, for round two, I used my own pumpkin muffin recipe, except instead of oat flour, I used oat bran…and I used 1/2 c of it instead of 1/4 c. I finely crushed about a cup of gingersnaps and mixed them right into the batter and I also increased the amount of pumpkin to 3/4 cup. Then I topped the muffins with dark chocolate chips, pressing them in gently to make sure they stuck.

The result? Much better. I really liked the faint gingersnap taste that came from mixing them into the batter…and I loved the oat bran edition! These heartier muffins would probably be really good with the crunchy streusel topping as well. I think I’m gonna freeze some of these to save for later. I normally don’t freeze muffins and sometimes I have too many and they go bad, so my goal is to start stocking my freezer instead of wasting them 🙂

So friends, I’m gonna leave it up to you. Use my pumpkin muffin recipe, or use your favorite. Make the streusel topping, or don’t. Top with chocolate chips, or top with gingersnaps. Mix the gingersnaps in, or don’t. The main thing is, enjoy this flavor combination. It’s a match made in heaven.

muff1

Also, I took pictures after the first batch. And they’re pretty. And it was dark and late when batch #2 finally came out of the oven. So I’m not taking pictures of batch #2. Just enjoy the pictures of batch #1…but don’t worry if yours don’t look the same 🙂

DSC 0821DSC 0832DSC 0834
Happy Monday!
–Lindsay–


Filed Under: Uncategorized Tagged With: Pumpkin

Brew Your Own Beer! Yes You Can – Even The Bean Did It!

September 29, 2016 by Lindsay 28 Comments

After much anticipation, here begins the long awaited Hubby guest post. Today, I’m the boss, and I’m taking over the Lean Green Bean. Lindsay has been asking me to contribute something for about a year now, and inspiration has struck!

I’m a bit of a renaissance man. I’ve always enjoyed figuring out how things work, and spent most of my childhood taking things apart and almost always successfully putting them back together. This interest persisted as I majored in Physics- the most GPA-damaging method of learning about how stuff works- and has carried on to this day, manifesting itself as a large collection of power tools, and a near constant stream of projects and hobbies going on around the house. One of these hobbies seemed to be a perfect fit for a guest post, creating the perfect marriage of cooking and ultimate renaissance-person pursuits: Home Brewing.

DSC 06731
Me in my Garage-based Brewery… also, this is my fav Ohio State shirt

I’ve been brewing beer for about a year now, and Lindsay has had a front row seat, acting as taste tester and victim of the occasional hostile kitchen takeover. At this point, I’m hooked. Here’s what I enjoy about brewing, and what you might like too should my post inspire you to try it yourself:

1)      I really like beer- this is probably a prerequisite
2)      There’s a lot of Science and History behind the process- NERD ALERT
3)      You get to engineer and build a lot of your own equipment
4)      There are only 4 basic ingredients- but total creative freedom with infinite recipes to create
5)      When you’re done, you get to drink delicious beer of your own concoction while astonishing your friends

That should be reason enough to immediately run out to your local homebrew shop and get started, but in case you want to know a little more, I thought we would walk through the creation of a batch. I promise to keep it both fun and informative, while trying to suppress nerdy scientific tangents.  Added Bonus: Lindsay will play the role of Assistant TO THE Regional Brewer for the first time!

The Ingredients

Fundamentally, beer only has four ingredients: Water, Barley, Hops, and Yeast (as defined by the Reinheitsgebot aka German Beer Purity Law of 1516). Many beers deviate from this, like Wheat Beer or Spiced Ales, but we will be purists and just focus on the core four. I’m assuming you already have some familiarity with Water, so let’s quickly look at Barley, Hops, and Yeast.

Barley: Barley is a grain/member of the grass family/topic of an annoying Sting song, and is similar to Wheat. Before if can be used for brewing beer, it must be malted. Malting is process of partially germinating the grain by soaking it while controlling temperature and humidity. This starts to break down the starch reserves to create sugar, then heat is used to stop germination and save that sugar for the brewer. Malt gives beer it’s color and sweetness. Darker beers are produced with Malts that were cooked for longer, carmelizing some of the sugar.

DSC 06702
A typical “Pale Ale Malt”

Hops: Hops are a vine plant in the mulberry family that produce a cone-like flower. The cones are very aromatic and boiling them adds the bitter finish to the taste of beer (by isomerizing the alpha acids found in the pollen-like Lupulin of the cone- NERD INSERT). There are many different varieties that have unique tastes that they bring to the beer.

DSC 0667
Cascade Hops- I actually grew these on a trellis in our front yard

Yeast: Yeast are really cool, so don’t be put off by the fact that they are technically a fungus. Lucky for us, they can live without oxygen by a process called fermentation. When they eat sugar – which we get from the Malted Barley- they produce both CO2 and ethyl alcohol. Obviously, the ethyl alcohol is more exciting outcome of this process. The more fermentable sugar in your batch, i.e. Malted Barley, higher the alcohol content.

DSC 0715
There are about 140,000,000 yeast cells in there. whoa.

The Process

Now that we’ve met the main players, let’s make a batch. Grab a buddy and let’s get to it! Brewing is mostly boiling things together in a pot, but there’s a little more to it than that. Here are the basic steps to outline the journey:

1) Mashing- Essentially getting the sugar out of the Malt, and dissolved into a pot of water.
2) Boiling
3) Adding hops during the boil to add the bitter element
4) Cooling the liquid down
5) Add Yeast to start making that sweet alcohol

Now then, Lindsay and I woke up this past Sunday to brew a Black IPA. This is robust, bitter, and dark beer.  Delicious, but not for the timid. We were up 8AM and moved the party out to the garage- the home base for my brewing operation.

DSC 06831
Brewing/making people stare as they drive by

Mashing:

For the beginner, this process is skipped altogether. I recommend that first time brewers use a Malt Extract, where the sugar has already been extracted from the Malts in a syrup or powder form. Just dissolve the syrup in your boiling pot of water and you’re off to the races. However, there’s a slight drawback that extracts are more limited in the range of flavors that can be achieved.

Once you graduate, you get to start with the malted grain like an actual brewery, dial in your own recipes, and build some of your own brewing equipment. AND- have way more fun making your neighbors think you’re distilling moonshine on your driveway…

Meet the Mash Tun– A converted 10 gallon igloo beverage cooler designed to extract sugar from the grain. You’ll notice two key features, a wire mesh filter (that allows sugary water through and keeps grain out) and an upgraded ball-valve spigot to control flow the flow of liquid. This is a favorite design in the home brewing community (trust me, I didn’t think of this thing on my own) and requires many entertaining trips to the hardware store. The “filter” is actually the outer stainless steel casing you find on a toilet water supply line. Don’t worry, I bought it new and cleaned it before making it part of this apparatus.

DSC 0669DSC 0668

So what do you do with this Mash Tun?! Glad you asked. The goal is to extract the fermentable sugars from the malted barley, and this is done by soaking the grain in hot water for around an hour. Prior to mashing, the grain has been cracked open by running it through a roller mill. This maximizes the water contact with the grains to dissolve the sugars. I don’t have my own mill yet, but lucky for me, my local home brew store has a big self-serve powered mill that is very fun to use.

The two things that need controlled during the mashing process are the Water to Grain Ratio (which is typically in the range of 1-2 quarts of Water per pound of Grain) and the Temperature. Ideal extraction occurs around 155 degrees, but knowing that the grain will steal some of the water’s heat, the water is typically heated to about 165 degrees.

The recipe I created had about 12 pounds of grain, so we started with 4 gallons of 165 degree water in the Mash Tun. My lovely assistant Lindsay is shown below, mashing in our malted barley. We were using three kinds – about 10 pounds of lightly roasted Pale Ale Malt (where the majority of the sugar will come from), 1.5 pounds of “60L” Caramel Malt (caramel describes the caramelization of the roasted grain and the “L” is the Lavibond color scale- the higher the number, the darker the grain), and about 1 pound of Chocolate Malt (darker still, this one is around 300 Lavibond, and does not contribute much sugar, but provides a smoky flavor).

DSC 0672
Expert Masher

Once the grain has been adequately mixed around in the water it will look something like this!

DSC 0676
mmmm….almost-beer

The next step is to let this sit at a constant temperature for about an hour. That’s why an igloo beverage cooler is so ideal. Pop the lid on, and fast forward.

DSC 0674[Fast forward complete]. Spoiler Alert- It’s all going into the big stainless steel kettle. The next step in this process is Lautering (and Sparging).

Lautering (and Sparging):

Now that the mashing is complete, the next step is to separate the sugary liquid (called Wort) from the grain and get it into the brew kettle for boiling. This process is called Lautering. We begin by slowly draining the liquid out of the valve at the bottom of the Mash Tun, while pouring more hot water into the top to continually “rinse” the grain. The “rinsing” is called Sparging. The liquid is transported through food grade tubing to better control its destination, i.e, not splatter sugary liquid all over the place.

In the picture below, Lindsay is starting the flow of wort. The first runnings will be cloudy and have some bits of grain, so we catch it in a pitcher and pour it back into the Mash Tun. this recirculation process is called vorlauf (aren’t these words fun?).

DSC 06771
Green Bean attempts the vorlauf

Once the first few quarts have come out, the grain bed starts to act like a giant filter and the wort will have more clarity. At this point, we start draining the wort into the brew kettle while simultaneously sparging the grain. In brewing terms, the sparge water is delivered from a “hot liquor tank”, meaning a vessel that holds hot water. In my operation, this is simply a plastic bucket with a valve I added. Not exactly hi-tech, but it’s effective. Also, you’ll note that gravity is our friend with this stair step set-up.

DSC 0681
Lautering in full swing!

The water in the mash tun starts to clear as the wort drains out. And yes, that’s a plastic lid in there- I think it was from a package of bleu cheese crumbles. It helps to disperse the water as not to disturb the grain bed…again, cutting edge technology.

DSC 0682DSC 0685

 After about 20 minutes, we have a brew kettle full of wort.

DSC 0679DSC 0692

Now we get a roaring boil going on the giant propane burner. This is called a “Bayou Burner” (presumably it’s normally used for crawfish). It was a great purchase, mostly because Lindsay was ecstatic that I was out of her kitchen and not making the house smell like a brewery.

Boiling the wort helps to kill any bacteria, coagulate proteins suspended in the liquid, and bring the heat up high enough to extract bitterness from the HOPS– our next step!

Adding Hops (getting bitter):

No beer would be complete without that crisp bitter finish. We achieve this by boiling hops in the wort. The duration of the hop boil and the type of hop are what determine the taste/effect they will have on the beer. A long boil will simply extract bitterness, a short boil will add more of the aromatic elements of the plant. For this reason, hops are generally added several times during the brewing process. Don’t be fooled my Miller Lite’s “triple hops brewed” nonsense. Pretty much every beer you’ve ever consumed had hops added multiple times.

So here go the hops…

DSC 0689
Hops on Deck
DSC 0703
Nice Photography, Linds!

In this batch I used Warrior, Amarillo, and Cascade varieties. I grew the Cascade myself (I told you I’m a Renaissance man), and bought the other varieties at my local brew shop. I boiled the Warrior for the whole hour for bitterness, and added the Amarillo and Cascade near the end to get the aroma elements. I also threw in some Irish Moss (which is actually dried seaweed) which helps to clarify the beer and prevent “chill haze” when we eventually cool it down and drink this stuff at some point. Weird yes, but apparently it works.

Now that we’ve got a bitter wort, we’re ready to cool this bad boy down (and explain those metal pipes sticking out of the kettle in the previous picture.)

Cool it Down!

As I nerdily mentioned earlier, the boiling coagulates proteins suspended in the liquid. These make the beer hazy when cold, but if we cool the wort fast enough, they drop out of the liquid and make the beer more clear (the irish moss helps with this as well). Also, the prime time for bacteria to grow is when the beer is “warm” in the time between it’s boiling and cool, so we want to minimize that window.

Enter the HEAT EXCHANGER (ER…ER…ER- that was an echo). This is another fun toy to build, made out of flexible copper tubing.

DSC 0695
Dropping in

Inserting this into the pot and running cold water through it rapidly cools the beer. You can actually get burned by the water coming out the other side- it’s physics in action! The reason I put it in while I was still boiling the hops was to give it a chance to sterilize.

DSC 0706
Wort, hops, and a heat exchager
DSC 0708
Water running through

After 15-20 minutes we’re back down to room temperature and ready to put the wort in a fermenter and feed it to the yeast.

 Fermenting Time.

Now we transfer the wort to our fermentation vessel. This is a plastic bucket with a sealing lid- glamorous as most of the equipment in this process. A strainer is used to separate the hops out and splashing is encouraged in this stage. We want to get as much oxygen in the wort as possible to help activate the yeast cells as they start fermenting.

DSC 0711
Straining the wort! I start by using a sterilized pitcher since the full kettle is kind of heavy.

After properly sloshing the wort around, the foamy top shows that we have adequately aerated the wort and are ready for the yeast. We had already started activating the yeast in a malt solution the night before, so now we just dump them in.

DSC 0716
Expert Yeast Dumper

Next, we seal up the vessel and let those yeast start doing what they do best- munching on sugar to make CO2 and ethyl alcohol. The little air lock inserted in the top acts as a one way valve to let the CO2 out while keeping the container air tight. The yeast will work on this feast for about 7 days, and then we’ll have beer!

DSC 0718
Wild stuff going on in there

Once this is done, we still have to bottle and carbonate the beer, but we’ll save that for another post (?- only if you’re intested). However, to prove that this actually works, here’s a picture of a previous finished batch I’m enjoying as I write.

photo 85 e1320903374787
BEER!

Summing Up:

Thanks for taking this detour from your normal Lean Green Bean content. I encourage you to give brewing a whirl- nothing like treating a friend to a beer you brewed yourself.

If I’ve been successful in inspiring you to try “getting your ‘brew’ on”, I would find a home brewing store in your area and have them set you up with starter kit. You can also find kits online from sites like Northern Brewer.  There’s also a great (and free) on-line book by a home brewing guru, John Palmer, at the aptly named “howtobrew.com”.

It’s been real Lean Green Bean readers, but now I’m going to relenquish control back to Lindsay for regularly scheduled programming. We’ll let you know how the finished product tastes (and just maybe I’ll be invited back for another guest post in the future!).

Cheers!!

The Hubby

Filed Under: Uncategorized

Easy Sweet Potato Hummus

August 10, 2020 by Lindsay 23 Comments

Welcome to snack time, my friends. I did a post about sweet potato hummus last year. But it was lame, and written before I started making it once a week. I pretty much consider myself an expert now, so I thought we’d have a little do-over, ok?

Good. I can’t really remember exactly when I started eating hummus…but it wasn’t all that long ago. I don’t buy it in the store all that often because it’s so freakin’ easy to make yourself…and you can totally customize it to include pretty much any flavor you want.

A couple things:
1) I like adding a sweet potato because it makes it just a little bit sweet.
2) I hate adding tahini, because I don’t like the way it tastes.
3) I don’t add any extra salt to my hummus because it’s totally unnecessary.

So here we go!

hummus

Sweet Potato Hummus


by Lindsay L

Prep Time: 10 min

Keywords: food processor appetizer snack healthy low-sodium vegetarian chickpeas sweet potato

Ingredients (approx 2 cups)

  • 2 cans chickpeas, drained & rinsed, 1/4 c liquid reserved
  • 1 medium sweet potato
  • juice from one lemon
  • 1/3 c water
  • 1 tsp paprika
  • 1/2 – 1 tsp cayenne pepper
  • 1/2 – 1 tsp garlic powder (or 1 bulb roasted garlic)

Instructions

Place the chickpeas in a food processor along with 1/4 c reserved liquid and puree for about a minute.

Prick the sweet potato all over with a fork and microwave on high for 5 minutes. Slice the sweet potato in half and scoop the insides into the food processor. Pulse several times.

Add the spices and lemon juice (and the roasted garlic if you’re using it) and turn the food processor on. Slowly add the water until the mixture reaches your desired consistency.

Powered by Recipage

Notes:
*I definitely prefer the roasted garlic over the garlic powder but sometimes I just don’t plan ahead 🙂 Roast the whole head of garlic with a little olive oil and then squeeze all the cloves in. I like my  hummus pretty garlicky so feel free to scale back and only use half the cloves if you’d like.
*If you don’t mind the taste of tahini, you could add 1/4 c to make it a little creamier but I’ve found that the sweet potato makes it pretty creamy.
*If you want to make my favorite hummus of all time, roast a red pepper along with the garlic and add that into the food processor too 🙂

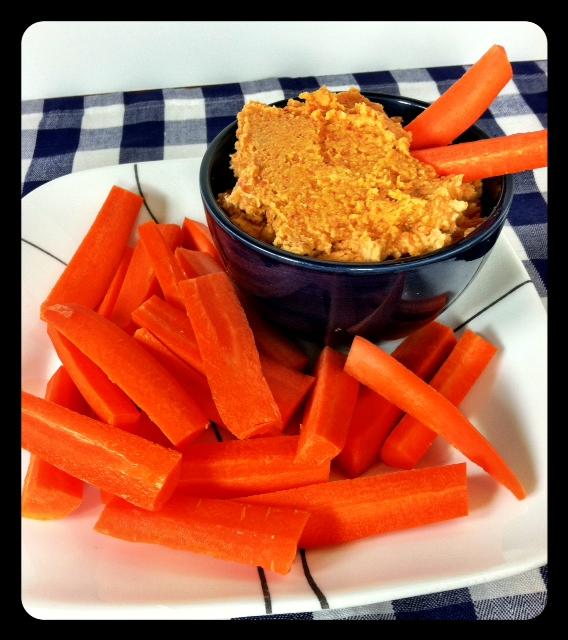
Serve with your favorite crackers or veggies!

hum1
hum3

What’s your favorite kind of hummus? I’m always looking for new combos!

Enjoy!
–Lindsay–

Filed Under: Appetizer, Snack Tagged With: Sweet Potato

Corn Chowder Couscous

August 10, 2020 by Lindsay 22 Comments

A few months ago, I made this couscous and never told you about it. THEN, this weekend I came across this recipe:

photo 80and THEN, I had the brilliant idea to do a combination of sorts. So, I headed to the kitchen and got to work. Ok, that’s not really what happened.

What actually happened was I spent an entire day debating whether or not to add cheese, or make it more like a pasta salad like the first recipe. It was a long, intense mental debate…and finally I settled on cheese. Then I went to the grocery store, changed my mind, and headed home with no cheese.

cous

Corn Chowder Couscous

by Lindsay L

Prep Time: 5 min

Cook Time: 15 min

Keywords: stovetop saute side healthy vegetarian vegetables couscous

Ingredients (Serves 4)

  • 1 c fingerling potatoes, diced
  • 1 c red pepper, diced
  • 1/2 c red onion, diced
  • 2 cloves garlic, minced
  • 1/2 tsp cayenne pepper
  • 2 tsp Old Bay seasoning
  • 1 tsp paprika
  • 1/2 c corn
  • 2 c baby spinach
  • 1 c whole wheat Israeli couscous, cooked
  • 1/2 c non-fat Greek yogurt
  • 3 Tbsp reduced-fat Italian dressing

Instructions

1. Saute the potatoes, red pepper, garlic and onion in a pan over medium-high heat for 10 minutes or until potatoes are tender.

2. Add the seasonings, corn and spinach and heat until spinach is wilted.

3. Add the couscous, greek yogurt and italian dressing and stir to combine.

4. Serve warm

Powered by Recipage

Confession, I added 1/4 c shredded Mexican cheese when I made this. And I didn’t like it nearly as much as I did when I tasted it prior to adding the cheese. So don’t add the cheese.

This was a fun twist on a side dish. Thanks to the Old Bay, it really reminded me of corn chowder. The Greek yogurt makes it nice and creamy and the extra veggies I added help boost the nutritional value even further.

11

We enjoyed ours with black bean burgers and green beans.

21
But let’s be clear. I’m working on a recipe for mac and cheese that involves Greek yogurt AND cheese 🙂

Enjoy!
–Lindsay–

Filed Under: Uncategorized

How to Make Risotto Cakes

November 7, 2011 by Lindsay 16 Comments

Over the weekend I made a little challenge for myself. I have this binder:

photo 78
I get a lot of cooking magazines and I’m constantly tearing out recipes and ideas that I want to try. Occasionally (read: about twice a year), I sit down and actually organize my huge pile of torn out pages into categories, cut the recipes down to smaller sizes and put them in my binder. This is all well and good…except that i RARELY ever actually make any of the recipes.

So, this week, after I had everything all organized, I spent some time looking through the binder and made a list of some things I wanted to try this week. This is the first week in a while where I finally have some time to cook so the timing worked out pretty well! I pulled out a few recipes that I’m planning to try this week and stuck them in the front cover of the binder for easy access.

Today for lunch I tried out the first recipe- Risotto Cakes. It’s a tiny little scrap, not even really a recipe, that explains how to turn your leftover risotto (or orzotto in my case) into risotto cakes!

photo 79

This is a fun way to transform your leftovers into what feels like a completely new dish! I served mine on a bed of spinach…modeled after my all-time favorite crab cake salad that I can’t get any more because the restaurant that served it closed 🙁

These are quick and easy enough to make for lunch, and hearty enough for dinner.

DSC 0723DSC 0725DSC 0726

[print_this]
Risotto Cakes

Makes 6-8 cakes

2 cups cold leftover risotto/orzotto
1 egg
1 c breadcrumbs (panko or regular), divided

Directions:
1. In a small bowl, beat the egg.
2. Add the risotto and 1/2 c breadcrumbs and mix well.
3. Pour the remaining breadcrumbs onto a plate.
4. Form the risotto mixture into patties and coat with breadcrumbs.
5. Heat a large skillet (cast iron or nonstick) with vegetable oil. Pan sear until golden brown on both sides.
[/print_this]

DSC 0734DSC 0735
Add a little of your favorite salad dressing and a few extra veggies if you want!

What’s your favorite way to transform leftovers?

Enjoy!
–Lindsay–

PS…Hubby told me these were the best risotto cakes he’d ever had. I told him he’d never had risotto cakes before…He told me not to split hairs 😉

Filed Under: Uncategorized

SRC: Vegetable Orzotto

September 30, 2016 by Lindsay 21 Comments

Hi Friends!

It’s that time again! Time for another Secret Recipe Club post. This month I was assigned another new-to-me blog: The Keenan Cookbook. Chris and Rachel are totally cute blogging couple with an ADORABLE baby boy. I had so much fun going through their recipe index and looking at all of their tasty recipes. Several of them caught my eye, but the one I picked jumped out at me and sounded especially delightful for a cold fall night: Spinach and Tomato Orzotto. I’ve made risotto a few times before, and I’d heard you could make it with orzo, but I’d never tried it!

I followed their recipe pretty closely, but I did make a few changes:

-1/4 c onion instead of shallots
-added 1/2 c diced sweet potato and 1 c diced red pepper at the same time as I added the onion and garlic.
-used water instead of white wine
-added some extra spinach
-used two fresh tomatoes instead of canned
-only used about 3 1/4 c vegetable broth instead of 4 cups
-used 1 tsp paprika and some black pepper instead of herbs de provence

orzo1I was surprised by how similar this turned out to risotto using arborio rice. I guess I expected it to be more “pasta-like” but it was still nice and creamy and tasted great!

orzo2
We enjoyed our orzotto with a side of sweet potato soup and it was a perfectly hearty meal.

orzo3

So tell me, have you ever made orzotto? Did you like it better than risotto?

Enjoy!
–Lindsay–

Filed Under: Uncategorized

Fall Favorites Revisited

August 6, 2020 by Lindsay 12 Comments

I think the thing the hubby hates most about me having a food blog is that sometimes old favorites get lost in the shuffle as I try to come up with new recipes for the blog. So, I think it’s important that each season I take some time to revisit some of those tried and true favorite recipes that we enjoy eating year after year.

Here’s a couple of our Fall Favorites:
Click the links to see my original posts from last year. Try not to laugh at the miserable photography 🙂

Curried Sweet Potato Soup
I grew up eating this recipe. My mom made it all the time. I never really liked it when I was younger but now it’s a favorite of the hubby’s and mine!

photo 74
Crockpot Applesauce
A great way to use up all those apples that are on sale this time of year! I made it this year without any added sugar and didn’t miss it a bit.

DSC 0595DSC 0596
Pepitas!
My absolute favorite part of carving pumpkins 🙂

photo 75And of course I couldn’t leave you with a few Halloween pics 🙂

photo 76photo 77Yes that is a Pillsbury Doughboy snuggie 🙂 That’s how I roll.

What’s your favorite Fall recipe?
–Lindsay–


Filed Under: Uncategorized

October Foodie Penpals

September 30, 2016 by Lindsay 23 Comments

It’s that time again! Foodie Penpals reveal day 🙂 It’s like getting to relive the excitement of getting your own box all over again by seeing what everyone else got!

This month I was lucky enough to get my box from one of my best foodie friends, Sarah @ The Smart Kitchen! If you aren’t familiar with Sarah and her blog, I’m sure you’ll be racing to check it out by the end of this post. The girl is amazing. Her culinary imagination never fails to impress me and I seriously look forward to reading her blog every.single.day. Plus, she lives in Austin which, as far as I can tell, is pretty much the best foodie city ever and she gets to participate in all sorts of amazing events. AND she has an amazing job and gets to try all sorts of fun foodie products. All of these things combined make her both an amazing person, and an amazing foodie penpals partner 🙂

Let’s take a peek at what she sent me, shall we? Oh, and might I add that she somehow timed her box delivery so that it perfectly coincided with my longest day stretch of days so far this quarter where I did nothing but study for a huge midterm for approximately 4 days. After I took the test, I came home exhausted, starving and crabby…and look what was waiting for me!

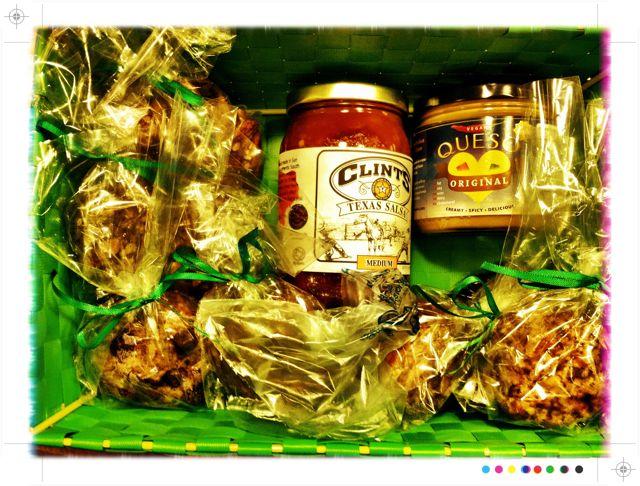
IMG 0804I mean, how cute is that for the outside of a box?! After I spent a few minutes figuring out the best way to open the box AND preserve the frog sticker, I got to check out the goodies inside.

IMG 0799Helloooooooo deliciousness!

IMG 0800-Homemade granola- delicious on my oatmeal yogurt bowls. I’m not sure I’ve ever even had a fig prior to tasting this stuff!

-Pomegranate salsa- amazing with my favorite chips! Totally unique flavor.

-Homemade nut butter- tastes like Christmas in a jar. Seriously. Best ever.

IMG 0801-Dark chocolate & pomegranate…for the win! Love it. I’ve been nibbling away on this little guy every night 🙂

IMG 0802-Homemade (S)ara(h) bars. How cute are her labels?! These were awesome. Definitely a flavor combo I would never have tried on my own.

IMG 0803-If you read my blog you’ll know I already blogged about these. THEY ARE SO GOOD. I didn’t even know I liked chai until I tasted these. It’s like she knows me better than I know myself. I literally could not stop eating these!

So, if you can’t tell, I was just slightly thrilled with my box this month. Whoever gets me next month has some big shoes to fill 😉

And now it’s time for some details about Foodie Penpals.  In case you’re a new reader, here’s a reminder of what the program is all about:

-On the 5th of every month, you will receive your penpal pairing via email. It will be your responsibility to contact your penpal and get their mailing address and any other information you might need like allergies or dietary restrictions.
-You will have until the 15th of the month to put your box of goodies in the mail. On the last day of the month, you will post about the goodies you received from your penpal!
-The boxes are to be filled with fun foodie things, local food items or even homemade treats! The spending limit is $15. The box must also include something written. This can be anything from a note explaining what’s in the box, to a fun recipe…use your imagination!
-You are responsible for figuring out the best way to ship your items depending on their size and how fragile they are. (Don’t forget about flat rate boxes!)
-Foodie Penpals is open to blog readers as well as bloggers. If you’re a reader and you get paired with a blogger, you are to write a short guest post for your penpal to post on their blog about what you received. If two readers are paired together, neither needs to worry about writing a post for that month. *US Residents only please at this time- hopefully we can expand soon!*

If you’re interested in participating for November, please send me an email at [email protected] and include the following information:
-Your full name
-Your email address
-Your blog name/address
-Your twitter handle (if applicable)

I will need to hear from you by November 4th as pairings will be emailed on November 5th!

Last month we more than doubled the number of participants from the first month. Let’s keep growing!

Enjoy!
–Lindsay–

Filed Under: Uncategorized

Indian Spiced Cauliflower & Potatoes

August 10, 2020 by Lindsay 20 Comments

Confession #1: I wasn’t going to blog about this recipe.
Confession #2: I only took 1 picture of it initially
Confession #3: I plated the leftovers and took another picture before I put them away because it was such a big hit with the hubby.
Confession #4: I did have the presence of mine to write down the ingredients so I’m going to share the recipe with you despite the lack of pretty pictures 🙂

**Edited to add: Confession #5- I had no idea that this was actually very similar to an indian dish called Aloo Gobi!

This dish was inspired by a head of cauliflower we got at the grocery store this week. Hubby said something about a cauliflower side dish he had last time he went out for Indian and really liked it. I told him to get some cauliflower (which we never eat) and I would figure something out.

I started with google and found this recipe. Then I tweeted and my girl Parita came through for me, emailing me this recipe that she’d used before. I didn’t have Pav Bhaji Masala so I decided to just wing it.

I started with garlic, onion and ginger…added potatoes and cauliflower…added some spices and curry paste…threw in some green beans, chickpeas and tomatoes…added a bit of coconut milk and called it a day!

Aloo Gobi


by Lindsay L

Prep Time: 10 min

Cook Time: 25 min

Keywords: saute entree vegetarian chickpeas potato cauliflower Indian

Ingredients (Serves 2-3)

  • 3 cloves garlic, minced
  • 3/4 c onion, diced
  • 1 tsp fresh ginger, grated
  • 1 c potatoes, diced
  • 1 1/2 c cauliflower, chopped
  • 1 jalapeno, minced
  • 1 tsp cumin
  • 1 tsp paprika
  • 1 tsp tumeric
  • 1 tsp garam masala
  • 1 tsp cayenne pepper
  • 2 Tbsp red curry paste
  • 3/4 c light coconut milk
  • 1 tomato, diced
  • 1 c green beans, cut
  • 1 can chickpeas, rinsed
  • basmati rice, cooked

Instructions

1. Saute the onion, garlic and ginger in a hot skillet.

2. Add the potatoes and cauliflower and saute until slightly softened.

3. Add the remaining ingredients and saute until the green beans are at desired tenderness.

4. Serve over basmati rice, with naan.

Powered by Recipage

photo 73DSC 0588

Sidenote: this is pretty spicy so feel free to scale it back a bit if you’re not a fan of spicy dishes 🙂

Enjoy!
–Lindsay–

Filed Under: Uncategorized

Spicy Black Bean Burgers with Goat Cheese

August 10, 2020 by Lindsay 18 Comments

So, something rather annoying happened over the weekend. My oven stopped working. I used it to make some naan to go with dinner, and then when I turned it back on two hours later to make some brownies, it wouldn’t heat up. The stove part still works fine, but the oven is definitely not ok.

I consider myself to be pretty creative in the kitchen, so it hasn’t become a major inconvenience yet, BUT I have another test coming up and we all know that when I get stressed, I bake. So….this problem is gonna need to resolve itself pretty quickly.

IMG 0834

Meanwhile, I’ve still been whipping up some pretty tasty meals in the kitchen. As you may recall, we’ve had a surplus of guac this week so I LOVE guac on my burgers….so I decided to whip up some black bean burgers. I’m still working on finding a go-to bean burger recipe that sticks together really well. This one did a pretty good job, but still crumbled a little bit. I’ve gotten better about not trying to flip them too often and that helps a lot. I also like to bake them, but clearly that wasn’t an option this week.

I used these as an inspiration.

Spicy Black Bean Burgers w/ Goat Cheese

by Lindsay L

Keywords: pan sear burger entree healthy vegetarian black beans goat cheese

Ingredients (4-6 burgers)

  • 2 c black beans, cooked
  • 1/2 c oats
  • 1/4 c pepitas (pumpkin seeds)
  • 1/2 c carrots, grated
  • 1/2 c mushrooms, chopped
  • 2 cloves garlic, minced
  • 1/2 c onion, chopped
  • 1 tsp paprika
  • 1 tsp cayenne pepper
  • 1 tsp cumin
  • pinch of salt
  • 1 tsp sriracha
  • 1 egg
  • 1/2 c goat cheese crumbles

Instructions

1. Place the oats and pepitas in a food processor and pulse until roughly chopped.

2. Add all of the remaining ingredients except the egg, goat cheese and 1/2 c black beans.

3. Pulse several times until well combined.

4. Transfer the mixture to a bowl and add remaining ingredients. Use your hands to mix everything together and form into patties.

5. Place patties in the freezer for 30 minutes.

6. Cook in a skillet, flipping twice.

Powered by Recipage


burger
These burgers had great flavor and I loved the crumbled goat cheese.

DSC 0575DSC 0576

While the burgers were in the freezer, I got to work on some baby potatoes. I roasted them in my cast iron skillet since I couldn’t use the oven.

DSC 0574

And voila! Dinner is served.

DSC 0579DSC 0580

Enjoy!
–Lindsay–
Filed Under: Uncategorized

PB Chocolate Almond Clusters

October 6, 2020 by Lindsay 21 Comments

Hi Friends!

Thanks for all the well wishes on the race yesterday! It went really well. It was the first year this 5K was put on and everything went really smoothly. It was sponsored by Panera and raised money for breast cancer research. I ran it in 27:37 and my goal was to finish in the 27th minute so hurray! I ran the whole thing without stopping and felt great afterwards! Already contemplating running another 🙂

And now, a fun little snack for you! Couldn’t be easier.

DSC 0538DSC 0539DSC 0543

PB Chocolate Almond Clusters

by Lindsay L

Ingredients

  • 1/4 c peanut butter
  • 2 c unsalted, raw almonds
  • 1/2 c dark chocolate chips, more if desired

Instructions

Melt the peanut butter in the microwave in a medium sized bowl.

Add the almonds and stir until well coated.

Spread the almonds onto a baking sheet covered in aluminum foil and place in the refrigerator for 15 minutes until peanut butter has cooled.

Melt the chocolate in the microwave. Add the almonds to the bowl of chocolate and stir until well coated.

Spread the almonds on the baking sheet again, on a clean sheet of foil.

Place in the freezer for 15-20 minutes or until the chocolate is set.

Break into clusters and store in an airtight container.

Powered by Recipage

DSC 0545DSC 0546

The perfect afternoon snack 🙂

DSC 0551

Enjoy!
–Lindsay–

Filed Under: Dessert

The Best Sandwich Ever

October 18, 2011 by Lindsay 19 Comments

Want to make the best sandwich ever? I thought you might.

DSC 0514

Here’s what you need to make one for yourself and a friend:


[print_this]

The Best Sandwich Ever

4 slices of this homemade bread
2 scoops of my favorite homemade hummus (Roasted Garlic & Red Pepper w/ Sweet Potato)
3 eggs, fried
2 slices of cheese
1/2 a red pepper, thinly sliced
1/2 a small avocado, sliced

Directions:
1. Butter the bread. Top two of the non-buttered sides with hummus.
2. Cook the fried eggs in a small pan and add one and a half eggs to each sandwich.
3. Top with a slice of your favorite kind of cheese.
4. Add the avocado and red pepper and top with the remaining pieces of bread, buttered sides out.
5. Place on a panini press or George Foreman for a few minutes until the outsides are golden brown.
6. Slice in half and serve with roasted potatoes.

[/print_this]


SAMMIE

Enjoy for breakfast, lunch, or dinner.

DSC 0515
Seriously….life-changing. In fact, why don’t you just go ahead and make both of those to eat for yourself.

Enjoy!
–Lindsay–

Filed Under: Uncategorized

Quinoa Stuffed Squash with Cranberry Cider Glaze

October 7, 2016 by Lindsay 25 Comments

Hi Friends!

DSC 0503

I’m spending alllll morning studying for a HUGE midterm this afternoon….but here’s a tasty little recipe I whipped up for dinner last week. It involves squash. And cranberries. And sweet potatoes. And apple cider. Pretty much all things Fall.

At the grocery store last week I picked up my first delicata squash. Ever had one? I hadn’t. But I certainly will again. I really liked the mild flavor of it.

DSC 0479

So here’s how dinner went down. I started by googling. My original idea was to just roast the squash and make something else for the main meal. Then I decided I needed some quinoa in my life so I thought I might stuff the squash. Then I remembered the apple cider in the fridge and thought that might be pretty good on the squash. Here’s a few of the recipes I used for inspiration:
Apple Cider Beer Glaze
Apple Glazed Carrots
Cider-Glazed Roots w/ Cinnamon Walnuts

DSC 0482DSC 0483DSC 0484

Annnnd, as usual, here’s my own spin:

[print_this]
Quinoa Stuffed Squash with Cranberry Cider Glaze
Serves: 2

1 delicata squash
1/2 a large sweet potato, diced
1 small apple, diced
8 baby carrots, sliced
1 c quinoa, cooked
1 c apple cider
1/2 c beer
1/4 c apple cider vinegar
2 tsp brown sugar
1 c fresh/frozen cranberries
1/2 c chopped walnuts
1/2 Tbsp butter
sprinkle of cinnamon

Directions:
1. Cut the squash in half lengthwise and scoop out the seeds. Drizzle with olive oil and place face down on a foil lined baking sheet.
2. Place the diced apples, sweet potatoes and carrots on the other half of the baking sheet and drizzle with olive oil.
3. Bake at 425 degrees for 20 minutes, stirring the vegetables occasionally.
4. Meanwhile, in a small saucepan combine the cider, beer, vinegar, sugar and cranberries. Bring to a boil and let the mixture simmer until reduced by almost half.
5. Place the walnuts in a medium hot skillet and toast for 2-4 minutes. Remove from pan, add butter to melt and return the walnuts to the pan. Toss to coat, sprinkle with cinnamon and set aside.
6. Remove the vegetables from the oven and place in a large bowl. Add the quinoa, walnuts and half the glaze. Stir to combine.
7. Flip the squash halves over, fill with the quinoa mixture and return to the oven for 10 more minutes.
8. Serve with the rest of glaze on the side.
[/print_this]


DSC 0485DSC 0486DSC 0488


squashI loved everything about this dish. The glaze gave it great flavor and the vegetables were cooked perfectly.

DSC 0497DSC 0502

The only downside of this meal? Hubby hates squash.

DSC 0504

Oh well, can’t win them all 🙂

Enjoy!
–Lindsay–

Filed Under: Uncategorized Tagged With: Cranberry

Post-Run Strawberry Peach Oatmeal Smoothie

December 10, 2020 by Lindsay 7 Comments

I’m a girl of many talents, many of which are trivial and meaningless. They include the following:
-I have some sort of innate sense of time and whenever I cook or bake something in the oven, I somehow just KNOW when the timer is about to go off…like almost down to the second, even if I haven’t been thinking about whatever is in the oven at all since I put it in there and am totally distracted doing other things.
-If I need to be up at a certain time, I wake up the SECOND my alarm goes off. Or the second my hubby’s alarm goes off…but if I go to bed knowing I don’t need to get up at a certain time, I could sleep through 17 alarms and not hear a thing. It’s like my brain sends me into a deeper sleep on those days…and I love it.
-Every time I make a smoothie, I make the perfect amount for the glass I’m going to put it in, without even trying. There’s never any left over and there’s never too little. It fills the glass to the perfect height. Always…

DSC 0457

…and today was no exception. A couple of weeks ago, I received a customized Tervis Tumbler as part of the Foodbuzz Tastemaker program. (*I received this mug for free, but all thoughts and opinions are my own.) We were asked to create a tasty drink  to enjoy in our new mugs.

So here’s the thing. If you follow me on twitter, you may know that I’ve recently started running consistently for the first time in about 12 years. In fact, I even signed up for a 5K next weekend! Anyways, running and my stomach don’t exactly get along. Especially post-run. I know a lot of people get super hungry after a hard workout, but I’m the exact opposite. The thought of eating anything, even several hours after a hard run, makes me gag. However, I’m a dietetics student and I understand the importance of refueling your body post-workout. So, recently I’ve been doing some experimenting, trying to come up with something that works for me and my body.

DSC 0453

For me it seems that smoothies are the answer. I can blend up lots of stuff nice and smooth and after I drink my water, I drink my smoothie and it’s almost like I’m fooling my body into thinking it’s just drinking some extra water instead of eating 🙂

Post Run Strawberry Peach Oatmeal Smoothie

by Lindsay L

Prep Time: 5 min

Keywords: blender beverage snack healthy vegetarian oats fruit chia seeds

Ingredients (1 smoothie)

  • 3-4 frozen peach slices
  • 6-8 frozen strawberries
  • 1 packet plain instant oatmeal
  • 1/2 c plain, fat-free Greek yogurt
  • 1/4 c orange juice
  • 4-5 ice cubes
  • 1 Tbsp chia seeds

Instructions

1. Cook oatmeal according to the package directions. Remove from microwave and let cool.

2. Add the remaining ingredients, except the chia seeds to the blender and blend away!

3. Stir in the chia seeds and let sit for 5 minutes to thicken.

Powered by Recipage


*You could easily substitute your favorite fruits for the strawberries and peaches, or even add some spinach if you’re feeling crazy!

DSC 0449DSC 0450DSC 0453

I cook the oatmeal right away when I get done running and let it cool while I drink my water and stretch. The yogurt adds some protein and the oatmeal provides some fiber making it a very well-balanced drink. The chia seeds never cease to amaze me. They thicken up the smoothie, but I’m still able to drink it through a straw if I want to. Sometimes I pour it into a bowl and eat it with a spoon.

DSC 0459DSC 0460

The Tervis Tumbler was great. Immediately after opening the box, I dropped it on the floor after one of the dogs ran into me and it bounced all around without picking up so much as a scratch. It kept my smoothie cold and there wasn’t a trace of condensation for my fingers to slip on! Definitely planning on investing in another one. Maybe one with a lid?!

So tell me, what’s your favorite post run/workout meal?

Enjoy!
–Lindsay–
Filed Under: Uncategorized

Crockpot Vegetarian Chili

October 26, 2020 by Lindsay 12 Comments

This vegetarian chili is made in the slow cooker. It's packed with beans and vegetables and makes plenty of leftovers!

As promised, here’s the Vegetarian Chili recipe that some many of you spotted in my latest WIAW post! I don’t make chili all that often, but I’ve started to see it pop up around the blog world since colder weather is approaching so I thought it was appropriate for me to make some too. And quite honestly, we REALLY needed to go to the grocery store so this was a the perfect way to clear a little room in the pantry and use up some veggies that were headed past their prime.

This vegetarian chili is made in the slow cooker. It's packed with beans and vegetables and makes plenty of leftovers!

Remember that this is not a firm recipe. SO many substitutions can be made. Use a different kind of beans, add more beans, use less beans, use chickpeas, use lentils, add some ground turkey, use more chili powder, use less cumin….you get the idea! Get creative!

DSC 0431DSC 0432DSC 0433

Crockpot Vegetarian Chili

by Lindsay L

Prep Time: 10 min

Cook Time: 4-6 hours

Keywords: slow-cooker soup/stew healthy vegetarian black beans sweet potato tomato

Ingredients (Serves 4-6)

  • 1 can no salt added black beans
  • 1 can no salt added kidney beans
  • 1 c onion, chopped
  • 1 bell pepper, diced
  • 1 medium sweet potato, diced
  • ½ c carrots, diced
  • ½ c zucchini, diced
  • 3 cloves garlic, minced
  • 1 can fire roasted diced tomatoes
  • 1 beer (I used Yuengling)
  • 1 28 oz can no salt added crushed tomatoes
  • ¼ c tomato paste
  • 1 Tbsp cholula or other hot sauce
  • 2 Tbsp Worcestershire
  • ½ tsp cayenne pepper
  • 2 1/2 Tbsp chili powder
  • 1 Tbsp cumin

Instructions

1. Add the first nine ingredients to the crockpot.

2. Add the crushed tomatoes, tomato paste, Worcestershire, cholulu and beer and stir to combine.

3. Add the spices, stir until well mixed and cook on low for 4-6 hours, until the sweet potatoes are tender.

4. Taste and adjust seasonings as needed.

Powered by Recipage


I ended up adding a bit more cayenne and chili powder to ours after it cooked to give it a bit more kick. You could also add a jalapeno if you had one. For the cornbread, I used the recipe off the container but I’m not crazy about it. Anyone have a really good cornbread recipe?

This vegetarian chili is made in the slow cooker. It's packed with beans and vegetables and makes plenty of leftovers!DSC 0468

And then, since this makes a fairly large batch of chili for just two people, we enjoyed the leftovers the next night in the form of chili tacos/burritos!

DSC 0445
How do you feel about chili? Love it or hate it?

Enjoy!
–Lindsay–
Filed Under: Dinner, Slow Cooker

Sweet Potato & Hummus Stackups

October 7, 2016 by Lindsay 12 Comments

Over the weekend, the hubby and I went to The Pita Pit for the first time. We both got hummus pitas, and in what can only be described as a stroke of genius, I asked for some bbq sauce on mine. I have no idea why…hummus and bbq sauce probably isn’t a combination I would have come up with on my own. But I saw the list of sauces and that’s the one that jumped out at me so I went with it.

The resulting pita was delicious and I’ve been thinking about the bbq/hummus combo ever since. I wanted to whip up a little pre-dinner snack last night and since we haven’t been to the grocery store in a while, my options were somewhat limited. As usual, however, we had a ton of sweet potatoes. AND I had just made a fresh batch of hummus on Sunday night. When I saw I also had some tofu in the fridge, the wheels started spinning.

First, I pressed the tofu. After about 30 minutes, I got to work. I sliced the sweet potato, misted the slices with olive oil, sprinkled them with cayenne pepper and paprika and put them in the oven at 425 degrees. I also sliced up 1/2 a block of tofu and cut it into squares. After brushing them with bbq sauce I put them in the oven as well.

After 10 minutes I flipped the potato and tofu slices over and let them cook for 10 more minutes after brushing the other side of the tofu squares with more bbq sauce.

potato

Once everything was out of the oven, I spread some hummus on each potato slice, topped it with a square of tofu and a piece of red pepper.

DSC 0412DSC 0419

These are easy to make and a perfect finger food! If you don’t like tofu, you could easily leave it off and just add a drop of bbq sauce on top of the hummus. You could also roast the red peppers and add them to the top, or even top with a little cheese. If you eat meat, you could use a slice of sausage or a little piece of chicken…Lots of possibilities!

DSC 0423DSC 0427

What’s your favorite finger food?

Enjoy!
–Lindsay–

Filed Under: Uncategorized Tagged With: Sweet Potato

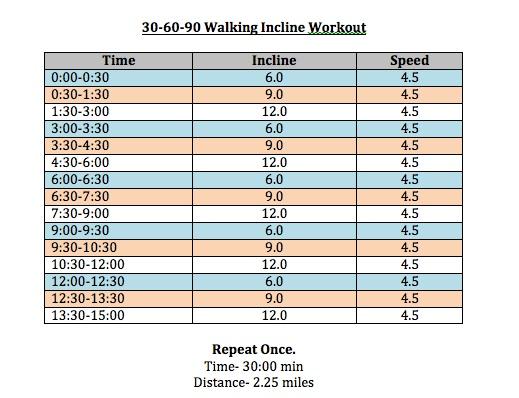
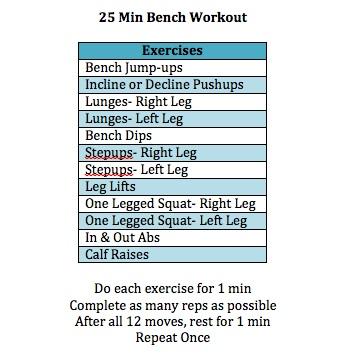
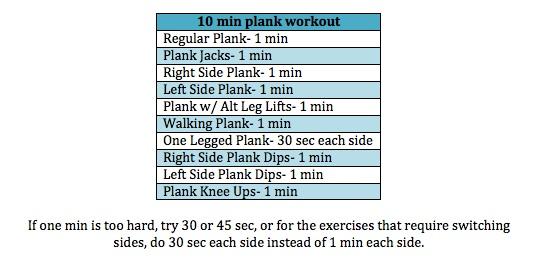
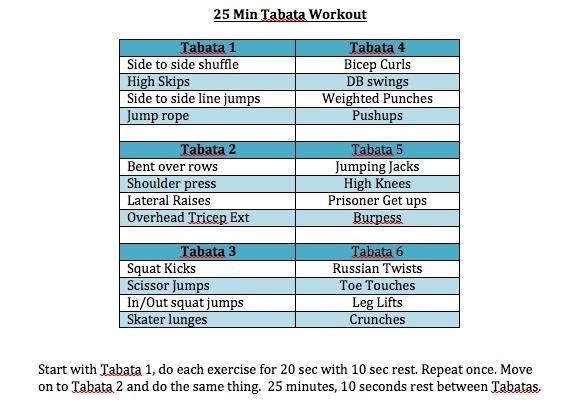
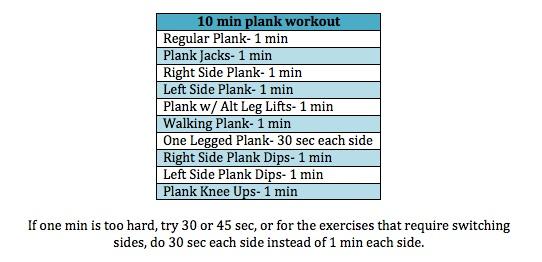
Workout Motivation

October 9, 2011 by Lindsay 18 Comments

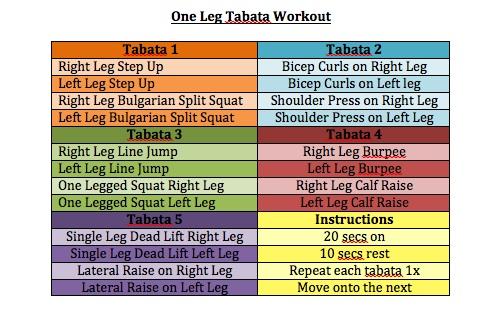
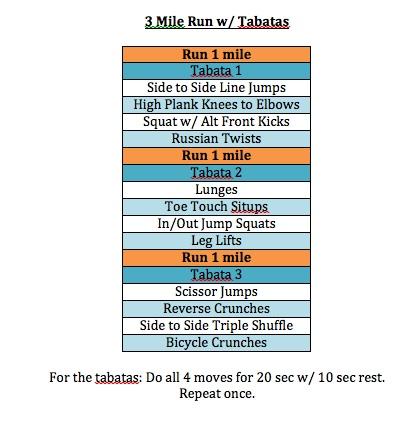
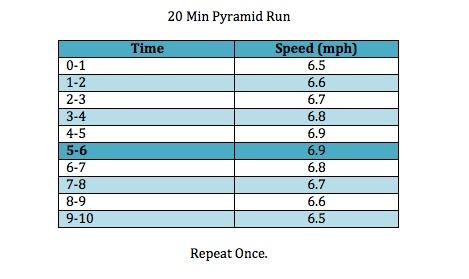
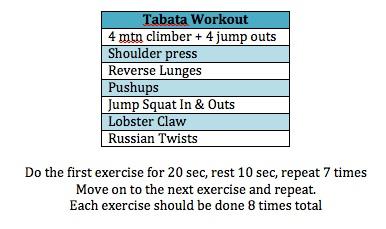
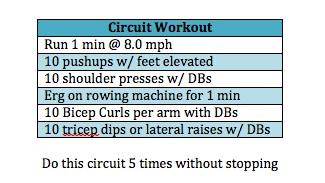
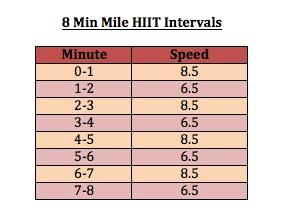
Just in case you need some for the week ahead:

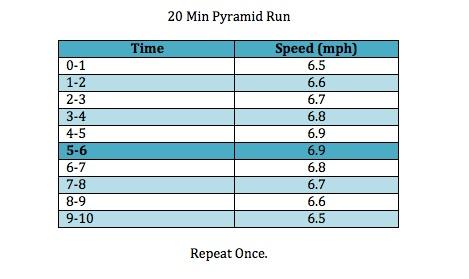
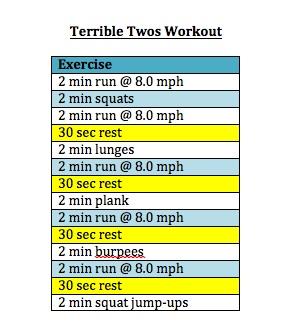
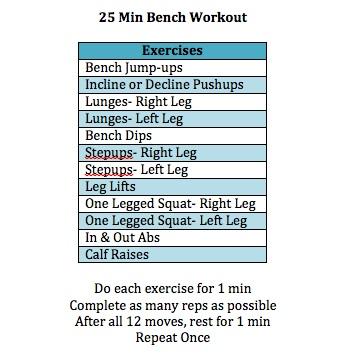
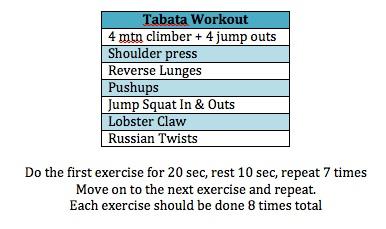
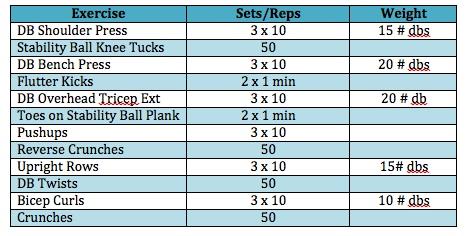
12345678910Get goin!

–Lindsay–

Filed Under: Uncategorized

Lentil Pot Pies

August 10, 2020 by Lindsay 23 Comments

Growing up, chicken pot pies were the ultimate comfort food. Now that I’m grown, and currently not eating meat, lentil pot pies are the ultimate comfort food.

These Vegetarian Lentil Veggie Pot Pies are healthier and more flavorful than the ones you remember from your childhood!

potpie1

And even though I replaced the chicken with lentils and exchanged the pie shell for a simple puff pastry top (if you don’t have puff pastry, just top with a biscuit!)…

potpie2

I’m gonna let you in on a little secret: It still tastes just as good!

Lentil Pot Pies

by Lindsay L

Prep Time: 20 min

Cook Time: 20 min

Keywords: bake saute entree vegetarian healthy low-carb lentils vegetables

6012498


Ingredients (3 pot pies)

  • 1 Tbsp butter
  • 2 cloves garlic, minced
  • 3 cups vegetables, diced
  • 1 ½ c lentils, cooked
  • 1 ½ c low-sodium vegetable broth
  • ½ c skim milk
  • black pepper, to taste
  • ½ tsp cayenne pepper
  • 1 tsp paprika
  • 2 Tbsp flour
  • 1 sheet puff pastry

Instructions

1. In a large skillet, saute the butter, garlic and veggies over medium high heat until just tender.

2. Add lentils and heat through.

3. Sprinkle flour over lentil and veggie mixture, add broth, milk and spices and stir to combine.

4. Bring the mixture to a boil, reduce heat and let simmer for about 10 minutes or until sauce thickens slightly.

5. Lay the puff pastry sheet flat on a cutting board, turn a ramekin upside down and press lightly to make circles. Cut out two circles and two squares and set aside.

6. Grease 3 ramekins and divide mixture evenly among them. Top two with circles of puff pastry and one with a leftover square. Make two slits in the middle of each pastry to let steam out.

7. Bake at 375 degrees F for approximately 20 minutes, or until puff pastry is golden brown.

Powered by Recipage

These Vegetarian Lentil Veggie Pot Pies are healthier and more flavorful than the ones you remember from your childhood!

What’s your favorite comfort food?

Happy Weekend!
–Lindsay–

Filed Under: Dinner

Savory Breakfast Bread Pudding

December 10, 2020 by Lindsay 32 Comments

Yesterday was one of those mornings where I really needed some coffee….You know what I really didn’t need? For my coffee maker to throw a hissy fit and leak all of the coffee onto the counter and down under the refrigerator, instead of into the pot so I could drink it!

Needless to say, by the time I had that hot mess all cleaned up, I was running late and didn’t have time to make another pot. So I suffered through class without it and then came home and set to work brewing my second pot of coffee for the day.

DSC 0366

The good news is, I have a nice little stockpile of coffee right now thanks to Foodbuzz. As part of the Foodbuzz Tastemaker’s program I was provided with two bags of Peet’s Coffee to taste and pair with breakfast dishes. (*I was provided with this coffee free of charge, however, all thoughts and opinions are my own.)

Cafe Domingo is a “blend of Central and South American coffees that is smooth, balanced and medium-bodied with more pure coffee taste. Peet’s coffee experts describe it as a medium roast cup with hints of toffee sweetness and clean crisp finish.”

Cafe Solano is a “blend of African, Indo-Pacific and South American coffees that is lively and aromatic. Peet’s experts describe it as a world blend with floral notes and a subtle fruit essence for a lively, yet rounded cup.”

I am no coffee expert. Would you believe I didn’t even drink coffee until finals week of my senior year of college? I basically just buy whatever kind the hubby wants and I only drink 1/2-1 cup per morning…some mornings I just skip it all together, although that’s harder to do in the winter because I always seem to be wanting to drink something warm!

I was immediately drawn to the description of the Cafe Domingo so I tried that first and really enjoyed it. The flavor was subtle, yet pronounced and was very smooth.

DSC 0391

As I was thinking about what kind of foods go well with coffee, I realized that I generally tend to enjoy drinking coffee more on the weekends, when I’m eating things like eggs and pancakes, instead of cold cereal.

I wasn’t really in the mood for anything sweet yesterday, so after rummaging through the pantry and coming up with 1/2 a loaf of garlic bread (not garlic bread like the kind that goes with spaghetti…more like a baguette that was garlic flavored) I settled on a breakfast bread pudding of sorts.

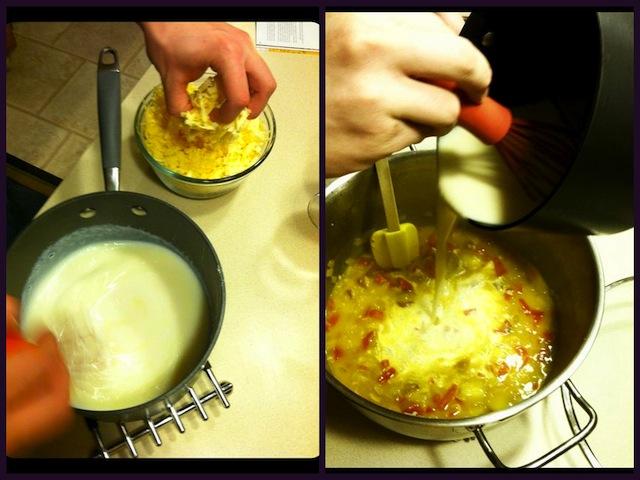
eggprep

Savory Breakfast Bread Pudding

by Lindsay L

Prep Time: 15 min

Cook Time: 45 min

Keywords: bake breakfast healthy vegetarian egg

Ingredients (8×8 pan)

  • 3 cups diced bread, slightly stale
  • 1 red pepper, diced
  • 1/2 c onion, diced
  • 1/2 c mushroom, diced
  • 3 cloves garlic, minced
  • 3 Morning Star breakfast patties
  • 4 eggs
  • 1 c skim milk
  • 1/2 tsp paprika
  • 1/4 tsp cayenne pepper
  • black pepper, to taste
  • 6 slices fresh mozzarella cheese

Instructions

1. In a medium-sized bowl, combine the bread, peppers, onion, mushroom, garlic and breakfast patties.

2. Whisk the eggs and milk in a small bowl until well combined.

3. Pour the egg mixture into the larger bowl, add the seasonings and stir until everything is well coated.

4. Pour the mixture into a greased 8×8 baking pan and top with slices of cheese.

5. Bake at 375 degrees for 40-50 minutes or until eggs are set.

Powered by Recipage


It turned out better than expected!

DSC 0379DSC 0380DSC 0382

This would be really good with any combination of vegetables, and I definitely would have added some spinach if I had some!

I also tried the Cafe Solano blend and although I didn’t like it as much as the Domingo, it was still good! It tasted a little bit sweeter to me and had a little bit less of a “coffee” taste.

What’s your favorite thing to eat with coffee?

Enjoy!
–Lindsay–

Filed Under: Breakfast

Roasted Vegetable Puffs

October 3, 2011 by Lindsay 13 Comments

I was cleaning out the freezer last week when I came across a partial box of puff pastry. I love using as the top for my pot pies, which we enjoyed last night…but I thought it was about time that I get a little more creative with it.

This dinner came together in a snap thanks to a little advance prep work! The night before I was planning to make this, I was whipping up a batch of soft pretzel bites for a get together we were having. While the dough was rising, I diced up a bunch of vegetables and stuck them in the oven to roast. I used potatoes and sweet potatoes so I stuck those in first and after about 20 minutes, I added some carrots, green beans, onion, red pepper and broccoli and let them roast for another 20 minutes.

DSC 0327

After removing them from the oven, I put them in a container with a few cloves of minced garlic. I love roasted garlic, but not when it’s diced, because it always burns….so I just mixed it in later. I also pulled the puff pastry out of the freezer and stuck it in the fridge.

The following night, I cut the puff pastry into 6 squares, put veggies on top of 3 of them, sprinkled each one with black and red pepper and paprika and then topped them with slices of goat cheese (Yep, more goat cheese…once I buy a log I have to find ways to use it up!) I added the other pastry squares to the top and brushed them lightly with an egg wash.

DSC 0353DSC 0354

After about 20 minutes in the oven, dinner was served 🙂 They were eaten in a hurry so I apologize for the lack of pictures of the finished product!

DSC 0355
I liked these just the way they were, but if you are looking for some sort of sauce to go with them, you could try just plain old marinara sauce to dip each bite in!

Enjoy!
–Lindsay–

Filed Under: Uncategorized

  • « Go to Previous Page
  • Go to page 1
  • Interim pages omitted …
  • Go to page 61
  • Go to page 62
  • Go to page 63
  • Go to page 64
  • Go to page 65
  • Interim pages omitted …
  • Go to page 68
  • Go to Next Page »

Primary Sidebar

Lindsay Livingston The Lean Green Bean Healthy Living Tips and Tricks

I'm a Registered Dietitian and mom of three from Columbus, Ohio. I use this blog to share simple, healthy recipes, nutrition tips, and an honest glimpse of motherhood!

Learn More →

Questions? Comments? Email me: [email protected]

The Lean Green Bean Facebook The Lean Green Bean Instagram The Lean Green Bean Pinterest The Lean Green Bean Twitter The Lean Green Bean Feed
footer-logo
The Lean Green Bean Facebook The Lean Green Bean Instagram The Lean Green Bean Pinterest The Lean Green Bean Twitter The Lean Green Bean Feed
Recipes

Breakfast
Dinner
Snack
Slow Cooker

Kids

Cooking With Kids
Favorite Gifts
Toddler Meals
Indoor Activities

Resources

Easy Packed Lunches for Kids
Dinner Spark
Snack Spark
Ultimate Guide to Food Prep

About

Meet Lindsay
Become an RD
Work with Me

The Lean Green Bean is a participant in the Amazon Services LLC Associates Program, an affiliate advertising program designed to provide a means for sites to earn advertising fees by advertising and linking to amazon.com.
Read the full privacy and disclosure policy here.

Copyright © 2022 · The Lean Green Bean