• Skip to main content
  • Skip to primary sidebar

Learn how food affects your body. Get Free Nutrition Info Today

the-lean-green-bean-logo
  • Home
  • Recipes
  • Kids
  • Resources
    • Ebooks
    • Food Prep
    • Videos
    • Snack Round-Ups
    • Gift Guides
  • About
    • Become An RD
    • Work With Me
  • Search
the-lean-green-bean-logo
  • Home
  • Recipes
  • Kids
  • Resources
    • Ebooks
    • Food Prep
    • Videos
    • Snack Round-Ups
    • Gift Guides
  • About
    • Become An RD
    • Work With Me
  • Search

blog

Elf4Health: True Beauty

December 8, 2012 by Lindsay 15 Comments

Hi Friends!

This weekend, Round 1 of Elf4Health is coming to a close. I can’t even begin to tell you how awesome the first two weeks have been! This challenge has more participants than Elle or I ever dreamed it would when we were putting it together, and every single one of them is amazing! I’ve had such a great time watching everyone rock challenges like going meatless for the day, trying new workouts, tracking their fiber, donating to Goodwill and sharing healthy snacks…but i have to say, yesterday’s challenge to go makeup-free absolutely blew me away.

In fact, it moved me almost to tears at times throughout the day.

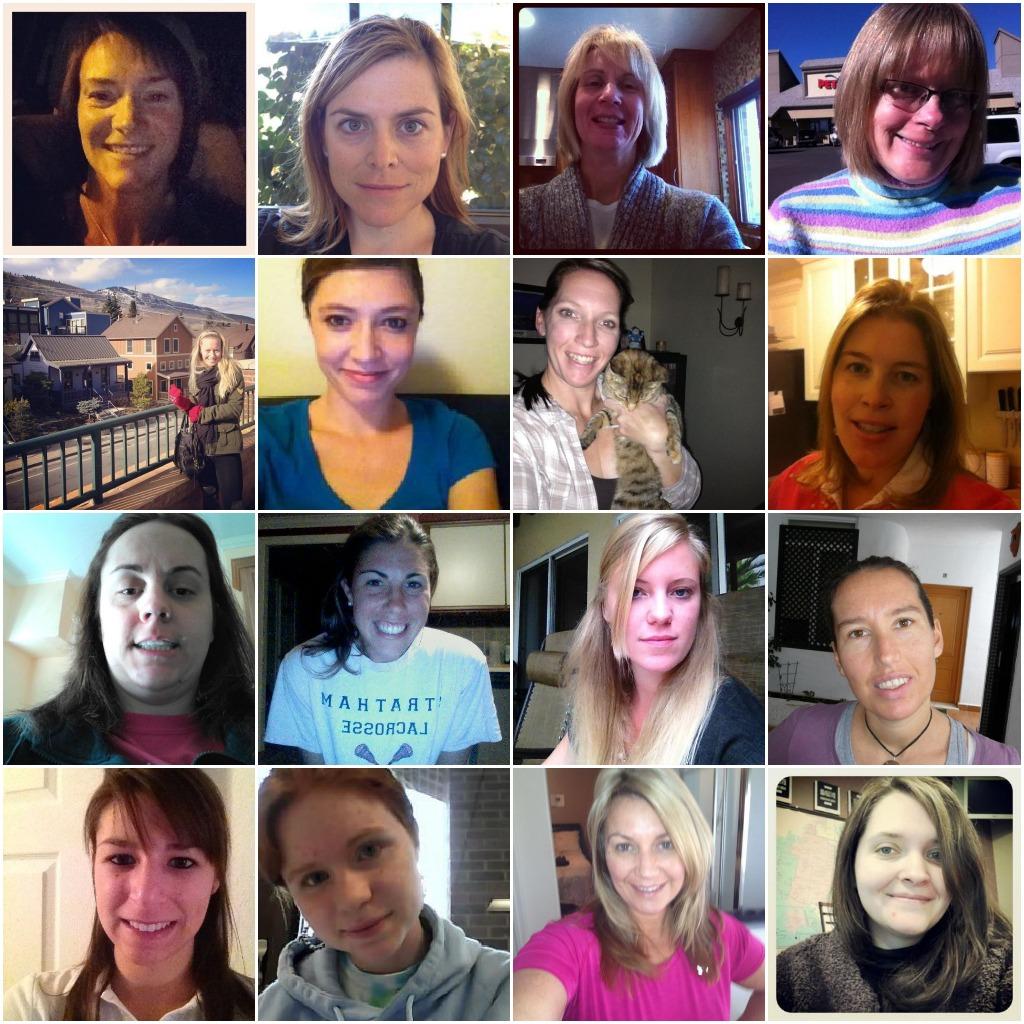
Just look at all of these BEAUTIFUL smiling faces:

makeupfree1
makeupfree2
makeupfree3
makeupfree4
makeupfree5

Aren’t they gorgeous?! Every.single.one.of.them! I’m SO PROUD of all of my elves that went makeup-free yesterday! I know it was a big step for a lot of you and I’m so happy you took a risk and let your true beauty shine!

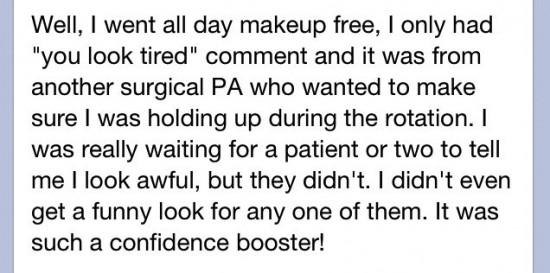
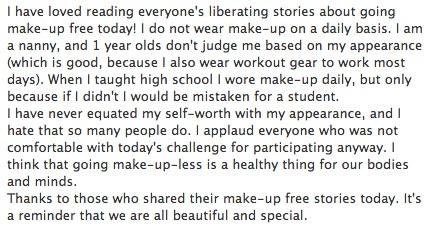
I got so happy reading some of the FB posts and tweets throughout the day about how they felt after going makeup-free. Here’s just a few:

IMG 0014 e1354940291419
IMG 0015 e1354940437921

IMG 0016
IMG 0018 e1354940486517

IMG 0019 e1354940386426

6

7

1
3
4
5

See what I mean? If those posts don’t inspire you, then I don’t know what will! HUGE thank you to every single elf that participated in Round 1. Stay beautiful!
–Lindsay–

Filed Under: Uncategorized

3 Ways to Cook Spaghetti Squash

December 4, 2012 by Lindsay 39 Comments

Hi Friends!

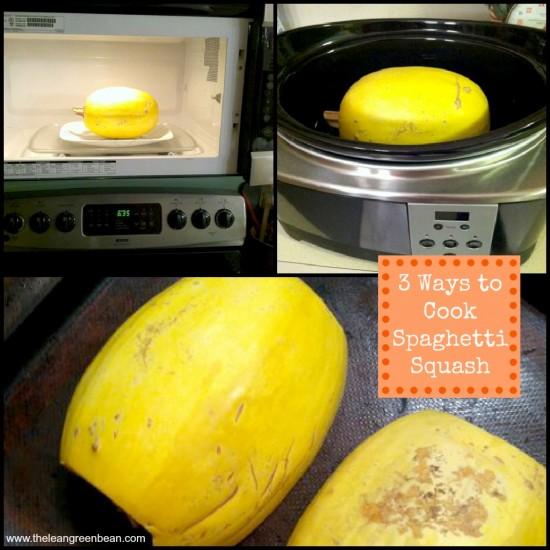
Let’s talk about spaghetti squash shall we?! It’s one of my favorite squash and this year I’ve been eating more of them than ever. I’ve also been experimenting with different ways to cook them. I’ve pretty much gotten the hang of three different ways so I thought I’d share them with you guys!

Do you know how to cook spaghetti squash? You can use the microwave, slow cooker or oven! Click to learn how!

Basically, for me, it boils down to which end result I’m looking for. Do I want it to cook quickly, have the best flavor or do I want it ready for later?

Option #1: For Best Flavor –> Roast it in the oven

This method takes a little bit of time, but I really like the flavor that develops in the oven.

Do you know how to cook spaghetti squash? You can use the microwave, slow cooker or oven! Click to learn how!

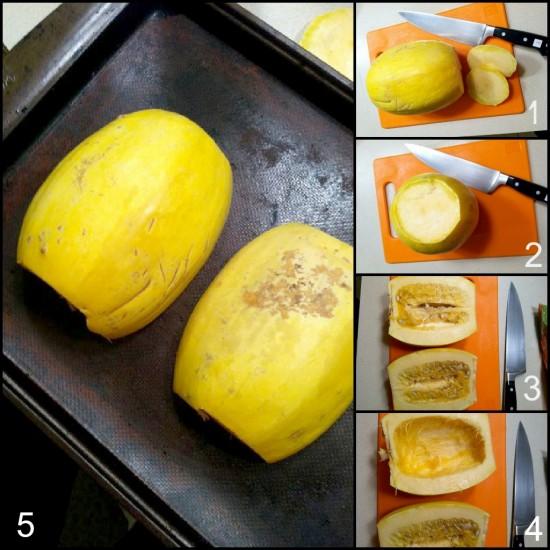
Step 1: Cut the ends off the spaghetti squash. This can be difficult to do, so I stick the whole squash in the microwave for 3-4 minutes first. This should make it a little softer so you can cut the ends off.

Step 2: Stand the squash on end and cut in half length-wise.

Step 3: You have a few options here. You can do what most people do and totally scoop out the seeds and pulp and throw it away. Or, if you’re like me and like the seeds, you can scrape the pulp and seeds to loosen them so they’ll be easy to remove, but leave them in the squash until after you’re done roasting.

Step 4: Whether or not you choose to scoop out the seeds or leave them in, the next step is to put the two halves face down on a baking sheet.

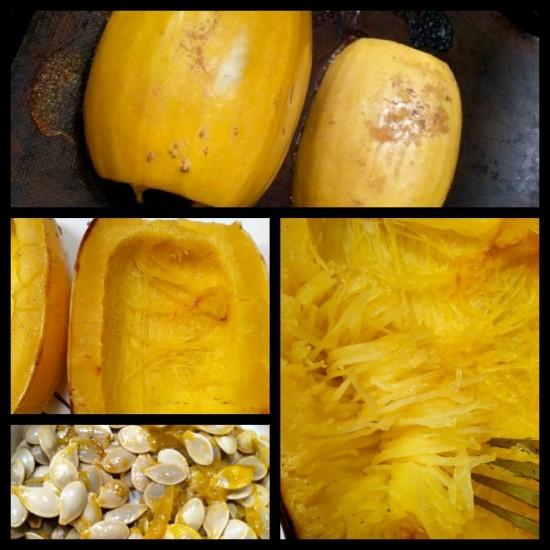
Step 5: Place the baking sheet in the oven and bake at 375 degrees F for 45 minutes -1 hour depending on the size of your squash. If you want the squash strands totally mushy, cook it closer to an hour or an hour and 15 min. If you like them to still have a bit of crunch, like me, cook it closer to 45 min.

spagsquash4 e1354507597418

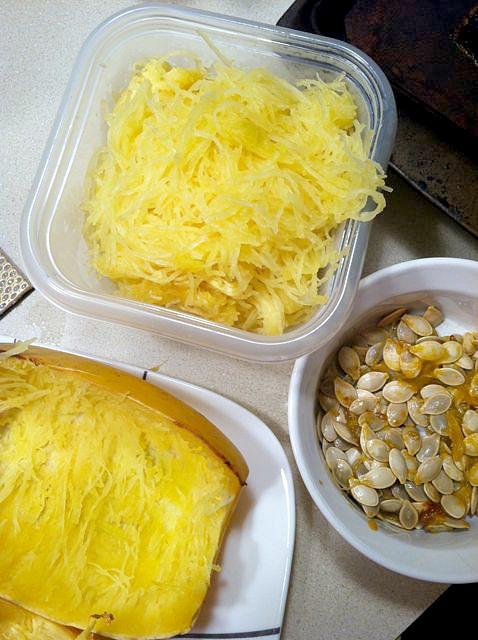
Once your squash is roasted, remove the two halves from the pan and let them cool slightly. Scoop out the seeds if  you left them in and set them aside. Then, using a fork, pull the strands of squash away from the sides. Scoop the strands into a container or onto a plate to eat! Separate the seeds from the pulp and eat those too! If you don’t like the idea of leaving them in the squash while it cooks, you can scoop them out at the beginning and roast them like you do with pumpkin seeds!

Do you know how to cook spaghetti squash? You can use the microwave, slow cooker or oven! Click to learn how!

Option #2: If you’re feeling lazy and want it ready for dinner later –> Cook it in the crockpot 

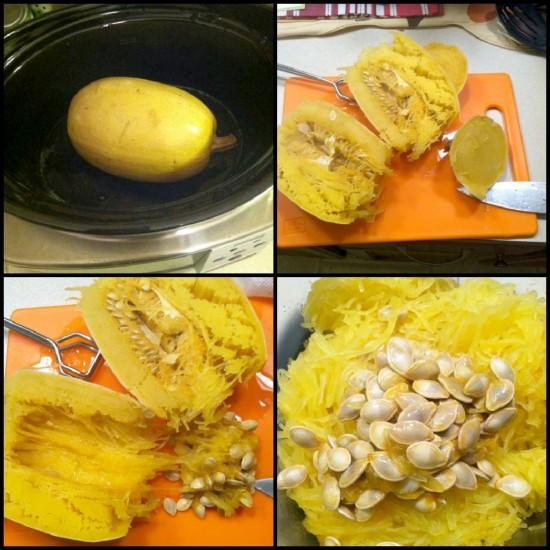
This is about as easy as it gets, friends. Poke holes in the squash with a knife and put the whole squash in a crockpot with two cups of water. Cook on low 4-6 hours depending on size. Mine was about 7-8 inches long, medium sized I’d say. I cooked it 4 hours and it was perfect for me, but I still like it a bit crunchy. If you want the strands softer, cook it another hour or two.

Do you know how to cook spaghetti squash? You can use the microwave, slow cooker or oven! Click to learn how!

Once it’s done, slice the ends off, cut it in half lengthwise, scoop out the seeds and then pull the strands out with a fork! Add the seeds back in if you wish!

Option #3: If you’re in a hurry –> Cook it in the microwave

You can either cook it whole or cut in the microwave. If you want to cut it, cook whole for three minutes, slice the ends and scoop out the seeds as described above, then put it on a plate or in a glass dish with a little water and microwave 10-12 minutes.

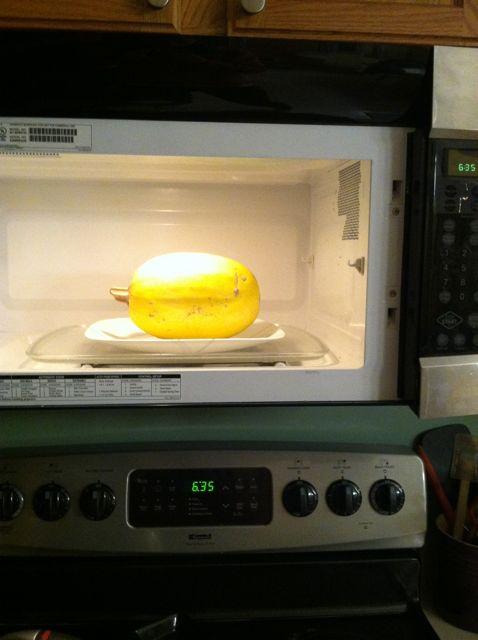
If you want to cook it whole, stab it all over with a knife, put it on a plate and microwave for 10-12 minutes, rotating every few minutes until it gets squishy. Then cut and remove the seeds as described in the crockpot method.

IMG 9905

There you have it, friends! 3 ways to cook this delicious squash. Time to dig in!

Enjoy!
–Lindsay–

Filed Under: Side Dish

Foodie Penpals for Hurricane Sandy

December 3, 2012 by Lindsay 28 Comments

FPP Sandy1

Hi Friends!

Today we’re kicking off Foodie Penpals for Hurricane Sandy! Here’s a little reminder about why we’re doing this:

As you know, each month, I organize Foodie Penpals. As you may or may not know, my parents live in NYC and their neighborhood was one of the hardest hit by Hurricane Sandy. While I’m grateful that my parents are safe and escaped with very little damage, my heart is breaking for those that were not so lucky. Looking at photos of their neighborhood, seeing all of the small businesses that flooded, the parks and streets littered with trash and debris is overwhelming. Thinking of all the people that lost their homes, those that are still without power, those that are struggling to stay warm as the cold temperatures set in makes me want to cry. A natural disaster + the approaching holidays means there are lots of people out there that need more help than ever. So I’m turning to you guys. 

Whether you’ve participated in Foodie Penpals in the past, are doing it currently, or are thinking about doing it in the future…this is the month to get involved! Heck, even if you’ve never done it and aren’t planning to, you can still help!

My suggestion would be to donate $15-$25, the amount you would have spent on Foodie Penpals had this been a regular month. HOWEVER, every little bit helps…so please give any amount you’re able to. No amount is too small!

————————-

Please read the following instructions carefully if you’d like to donate:

I did a lot of research and even though this setup is not the way I originally envisioned this event would be, I strongly believe that it will allow for the maximum amount of money to be donated directly to those who need it.

I contemplated using a site like Paypal, Razoo or Crowdrise to collect donations, but each of those sites take a certain percentage of the money so not all of it is going directly to charities. So, this is how we’re going to do things.

I’ve selected New York Cares as our charity. We will all be making donations directly through their site.

From their website:

New York Cares is on the frontlines of disaster relief, working around the clock to bring post-Hurricane Sandy aid where it is needed most. In the weeks following the storm, we have deployed thousands of volunteers to the hardest hit neighborhoods, distributing hot meals and warm coats, helping local social service agencies get back up and running, and mucking out homes that were ravaged by the storm.We were the first faces that many displaced New Yorkers saw- a reminder that in these especially tough times, New York Cares is here for them.

But our work didn’t start when the waters rose, and it won’t stop when the headlines have faded.

Every year, more than 400,000 New Yorkers depend upon New York Cares to build a better life. Day in and day out, we help high-risk students get into college, we provide job training  to unemployed adults; we teach kids the joy of reading- and so much more. And now, for as long as it takes- we bring hurricane relief and restoration to our suffering neighbors .

———————-

fppsandy3

———————————–

Step 1:

Make a donation.
In the tribute box on their donation form,
I put “on behalf of Foodie Penpals”
You will receive a confirmation of your donation via email.
—————————

Step 2:

Come back and fill out the simple form below to tell me how much you donated so I can keep track of how much money we raise. I will update the total throughout the day.

Amount raised so far: $1,915

PLEASE NOTE THAT FILLING OUT THE FORM HERE ON MY WEBSITE IS ONLY FOR TRACKING PURPOSES!!!!! You have to go to the actual website by clicking the link above to donate the money!

As you know, my parents live in Brooklyn. Their building was affected by the storm, but they remained safe and lost only the food in their refrigerator and electricity. Since a lot of us don’t have any first hand experience with what it’s like in the areas that were hardest hit, I asked my mom to share a little bit about what she’s observed in their neighborhood:

We returned to our apartment in Brooklyn the Sunday after Thanksgiving. Our building now has heat, hot water and electricity and one elevator. The basement has been stripped to the bare walls while discussions continue on how to rebuild both there and on the first floor. Most of our neighbors on the first floor are living elsewhere while their apartments are being rebuilt.

The neighborhood is adjusting to the new normal – most businesses have reopened but some are greatly missed.  The new restaurant across the street is still cleaning out and rebuilding, the French bakery is virtually destroyed and trying to figure out how they can pay for rebuilding and the world famous River Café is dark. Our major grocery store won’t be open for at least 3-4 months.  And yet, as a neighborhood, we count ourselves lucky.

One month after Sandy, others elsewhere in Brooklyn are still without hot water and heat in their buildings or elevators in building as high as 20 floors. They cart water up 12 flights of stairs. Some don’t have a home to heat- they have lost everything in neighborhoods like Red Hook, Breezy Point and in the Rockaways. Whole neighborhoods were destroyed in Staten Island. These New Yorkers carted all their belongings to the curb and they were hauled away.  They are isolated – cell phones still only work sporadically in the hardest hit areas. Many now face having their homes leveled by bulldozers because the city deems them to be a safety hazard. Housing is tight in the best of times in New York City. Where do these people go? How do they eat when many of these people were already living in poverty before the storm with few resources?

I know the emotions I personally experienced over the last month as I dealt with the minor inconvenience of being displaced even though I had the means and the invitation to go elsewhere and live. I can’t imagine what these people are feeling as they face the long winter ahead of them.

Thank you for thinking of my fellow New Yorkers this holiday season who are struggling after the storm. 

————————–

Let’s do this you guys! WE CAN MAKE A DIFFERENCE! Please give what you can. Every little bit helps.

————————-

Did you donate? Grab a button below to spread the word! If you have a blog, I’d love it if you shared the info so we can recruit more donors!!

The Lean Green Bean
<div align="center"><a href="http://www.thleangreenbean.com" title="The Lean Green Bean"><img src="https://www.theleangreenbean.com/wp-content/uploads/2012/11/fppsandy1.jpg" alt="The Lean Green Bean" style="border:none;" /></a></div>


The Lean Green Bean
<div align="center"><a href="https://www.theleangreenbean.com" title="The Lean Green Bean"><img src="https://www.theleangreenbean.com/wp-content/uploads/2012/11/fppsandy2.jpg" alt="The Lean Green Bean" style="border:none;" /></a></div>


Thank you!
–Lindsay–


Filed Under: Uncategorized

GaiamTV Review

November 29, 2012 by Lindsay 31 Comments

Hi Friends!

It’s foodie penpal reveal day tomorrow so we’re moving Fitness Friday up a day. Today I wanted to take some time to tell you guys about GaiamTv. I recently had the opportunity to test it out and really enjoyed my experience! Thanks to GaiamTV for sponsoring this post.

gaiam1

So what is GaiamTV?

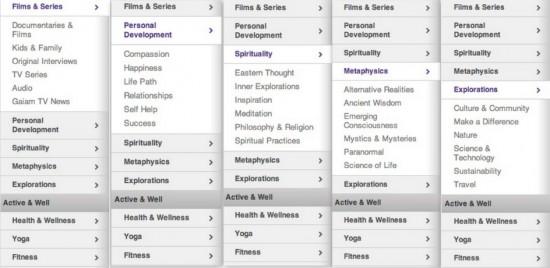
It’s an streaming internet TV channel. For $9.95 a month, you get access to over 2,000 titles right from your computer. These titles include documentaries, feature films and special interest programs in categories like films, personal development, spirituality, metaphysics and explorations. Check out all of the different categories and subgroups:


gaiam2 e1354070672754

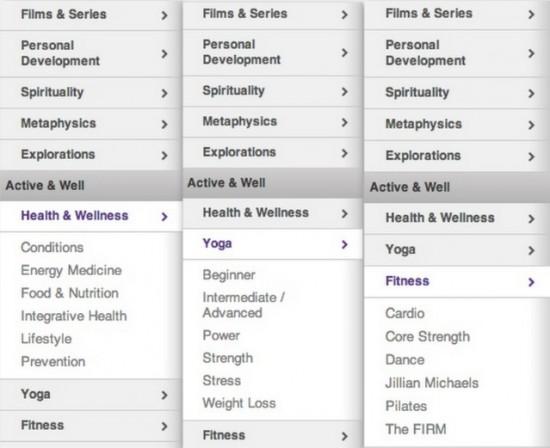
On the fitness side, the site offers hundreds of fitness and yoga workout videos, plus food and nutrition documentaries like Fat, Sick and Nearly Dead, and many more!

gaiam14 e1354070737664

Before I had a chance to review this website, I knew that GaiamTV offered workout videos, but I thought that was it. I had no idea they had so many other great documentaries and videos available! The first thing I did after logging in was spend some time exploring the non-fitness side.

So what’s on my watch list??

watch e1354072784855

I can’t wait for winter break when I finally have time to watch them!

Next, I moved on to the fitness side. Over the span of a couple weeks, I tried out several different workouts.

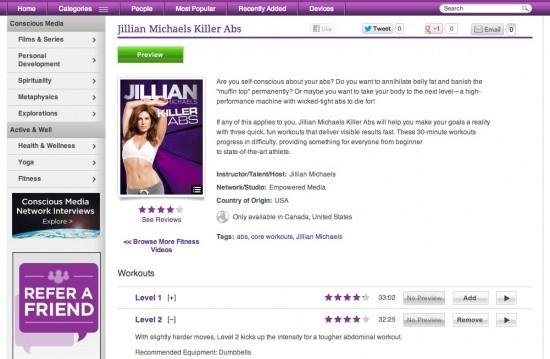
First up, abs! When you click on one of the titles, it gives you a description of the video, the length, the different levels available and tells you any equipment that you will need. It also lets you add videos to your queue so you can start a list of ones you want to try.

4 e1354073148332


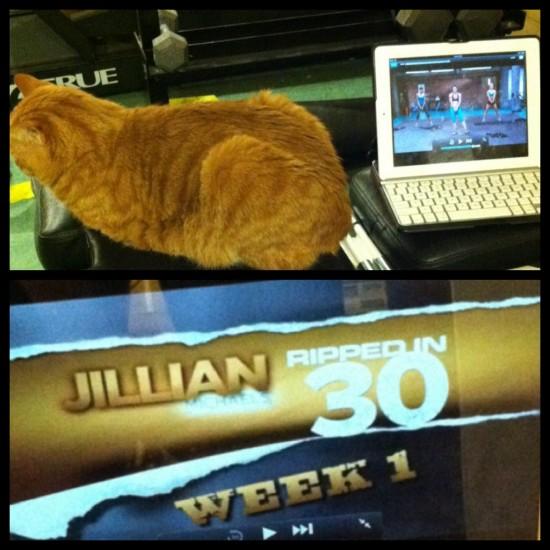
I found it was most convenient for me to go to the GaiamTV website on my ipad. Then I could just set up shop in the basement and get to work. I’m a sucker for anything Jillian Michaels so I also tried her Ripped in 30 workout. Marucs, however, is not a Jillian fan. He turns his back on her.

photo 324 e1354073998270

This was definitely my favorite workout! Fast paced, a mix of strength, cardio and abs and done in 30 minutes. Win!

Up next, yoga! So many yoga videos to browse through…can’t wait to try some of them out.

So, if you like workout dvds, I’d highly recommend GaiamTV. It’s reasonably priced and has tons of great options that you can do at home, in a small space, with minimal equipment. I truly enjoy making up my own workouts and sharing them with others, and I will continue to do so, but there are some days when I’m just to tired to come up with anything on my own. On those days, GaiamTV is perfect because it gives me instant access to tons of great workouts! The access to tons of great documentaries and films was definitely an added bonus.

Let’s chat! Do you like workout videos?

Enjoy!
–Lindsay–

Fitfluential LLC compensated me for this campaign. All opinions are my own.


Filed Under: Uncategorized

Hot Mexican Layer Dip

November 27, 2012 by Lindsay 36 Comments

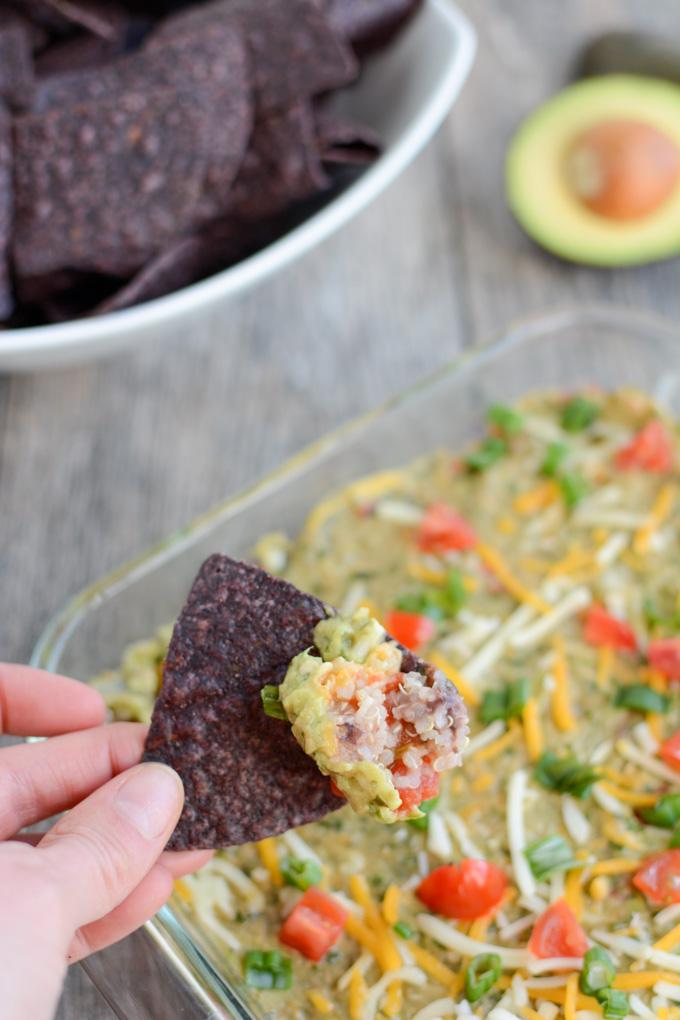
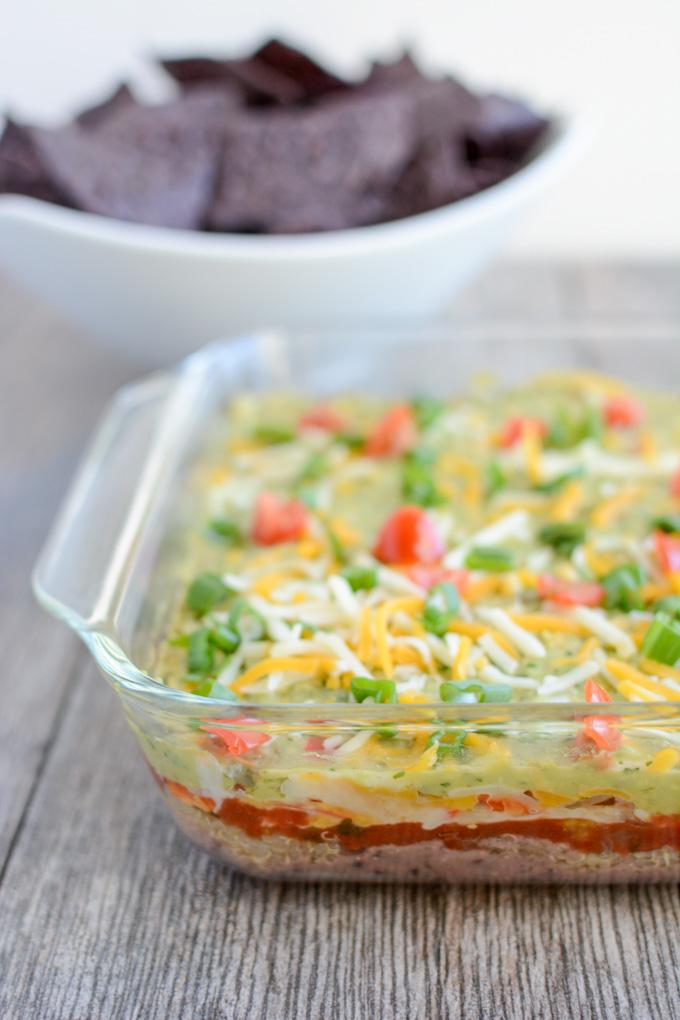
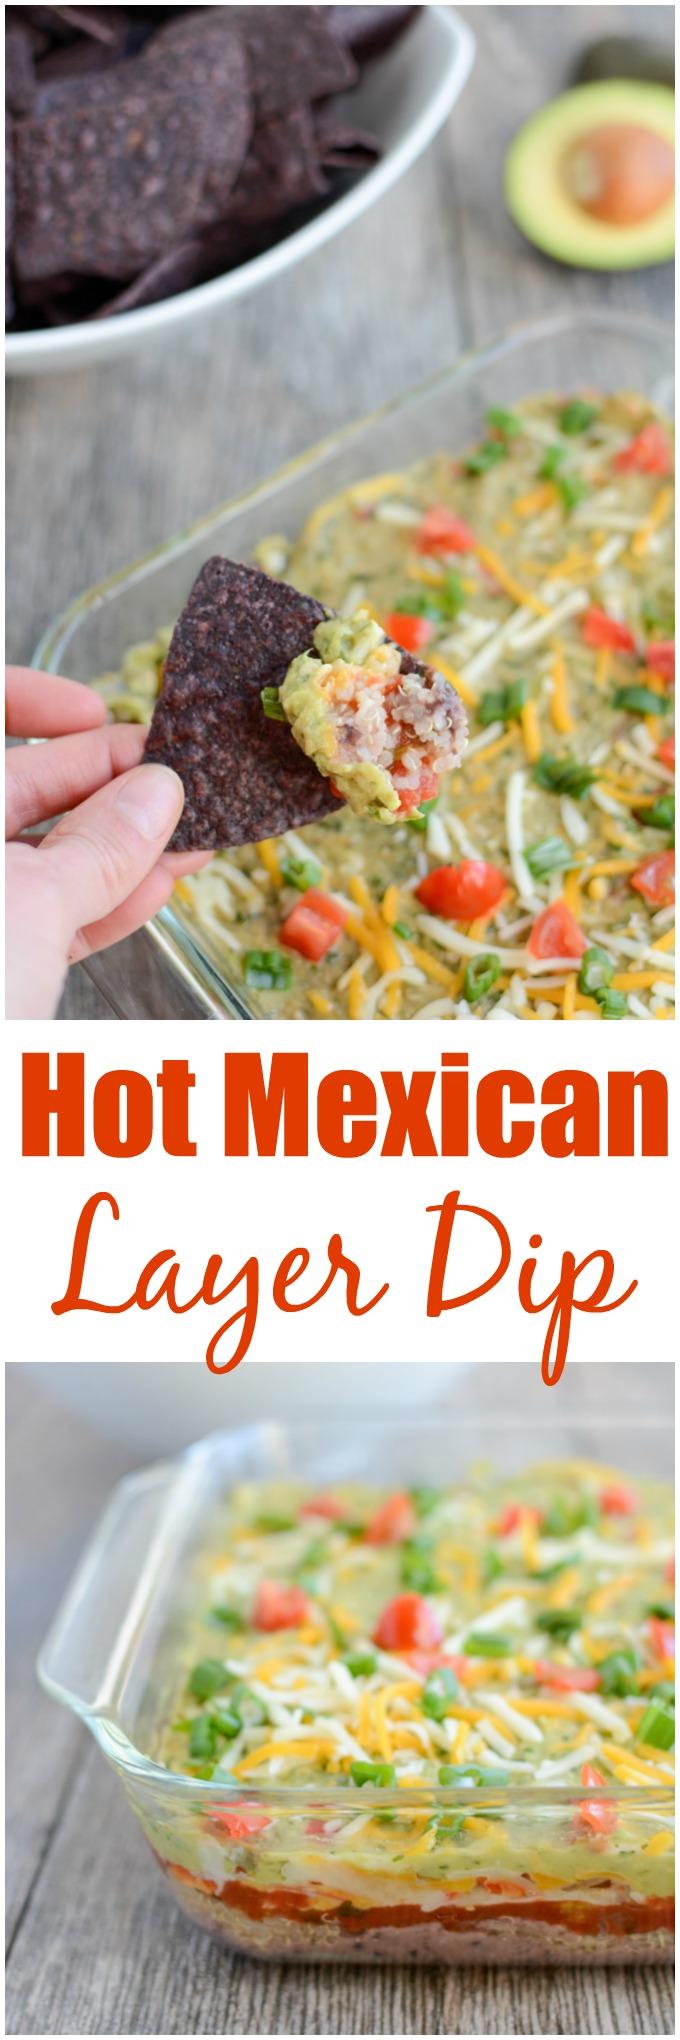
This recipe for Hot Mexican Layer Dip is an easy, healthy appetizer that’s perfect for parties, game days and other gatherings. Plus it’s full of protein thanks to the quinoa, cottage cheese and black beans so you can feel good about eating it!

Packed with protein, this recipe for Hot Mexican Layer Dip is an easy, healthy appetizer that's perfect for parties, game days and other gatherings.

**Post and photos updated 3/24/16**

Hi Friends!

I originally shared this recipe way back in 2012 and it took me a solid 3.5 years to make it again. WHY?! Now that I’ve reminded myself how good it is, I plan to make it on the regular. I serve this dip warm, but fact is it’s equally good cold. I just wanted to change things up…so serve it whatever way you prefer. You can also try this recipe for Mexican Layer Dip if you’re looking for something a bit quicker.

Anyways, when I originally made this dip, it was my goal to pack as much protein into it as possible! I pureed some cottage cheese into the black beans, added a layer of leftover quinoa because I always seem to have some extra in the fridge.

This recipe for Hot Mexican Layer Dip is an easy, healthy appetizer that's perfect for parties, game days and other gatherings. Plus it's full of protein thanks to the quinoa, cottage cheese and black beans so you can feel good about eating it!

Here’s how you make it:

Print

Hot Mexican Layer Dip

Hot Mexican Layer Dip 2
Print Recipe

5 Stars 4 Stars 3 Stars 2 Stars 1 Star

No reviews

This recipe for Hot Mexican Layer Dip is an easy, healthy appetizer that’s perfect for parties, game days and other gatherings. Plus it’s full of protein thanks to the quinoa, cottage cheese and black beans so you can feel good about eating it!

  • Prep Time: 5 minutes
  • Cook Time: 20 minutes
  • Total Time: 25 minutes

Ingredients

Scale
  • 1.5 cups black beans
  • 2 cloves garlic, minced
  • 1/2 cup cottage cheese
  • 2 medium avocados
  • 1 cup diced onion, divided
  • 2 Tbsp chopped cilantro
  • juice from one lime
  • 1 medium tomato, diced
  • 1 red pepper, diced
  • 1 cup salsa (drained if watery)
  • 1 cup cooked quinoa
  • 1.5 cups shredded Mexican cheese
  • Chopped green onions, optional

Instructions

  1. In a food processor, puree beans, garlic and cottage cheese.
  2. In a small bowl, mash avocado and stir in 1/2 cup onion, cilantro and lime juice.
  3. In the bottom of a 8×8 or 9×9 pan (i used a glass baking dish), spread the bean mixture evenly.
  4. Sprinkle quinoa evenly on top of bean mixture.
  5. Top with salsa.
  6. Sprinkle with 1/2 cup onion, tomatoes, peppers and 3/4 cup cheese.
  7. Cover with foil and bake at 375 for 20 minutes.
  8. Remove, top with guacamole, remaining cheese and green onions.
  9. Serve with chips.

Did you make this recipe?

Tag @theleangreenbean on Instagram

You can return the pan to the oven for a few minutes after you add the guac and remaining cheese to melt it if you’d like, but leaving it in too long may cause the guac to start browning.

 This recipe for Hot Mexican Layer Dip is an easy, healthy appetizer that's perfect for parties, game days and other gatherings. Plus it's full of protein thanks to the quinoa, cottage cheese and black beans so you can feel good about eating it!

 And just for fun, here’s one of the pictures from the original post 🙂

7 Layer Dip taken to the next level. Try this Protein Packed Hot Mexican Layer Dip at your next party!

Who’s coming over to help me eat this?!

Enjoy!
–Lindsay–


Filed Under: Appetizer

Sweet Potato Quinoa Black Bean Burgers with Cranberries

November 26, 2012 by Lindsay 48 Comments

Hi Friends!

Hope you all had a lovely Thanksgiving weekend! We’re skipping Bean Bytes today because quite honestly, I didn’t do a whole lot of blog reading. I did some skimming, but I focused most of my attention on food, family and fun 🙂

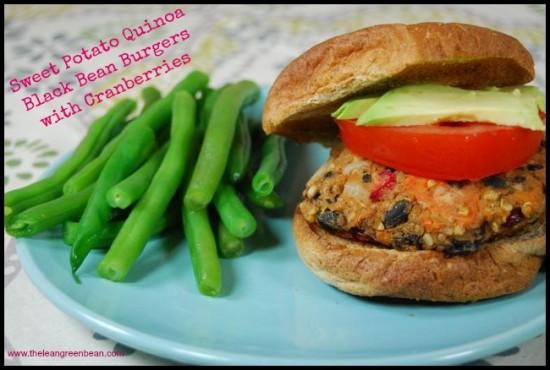
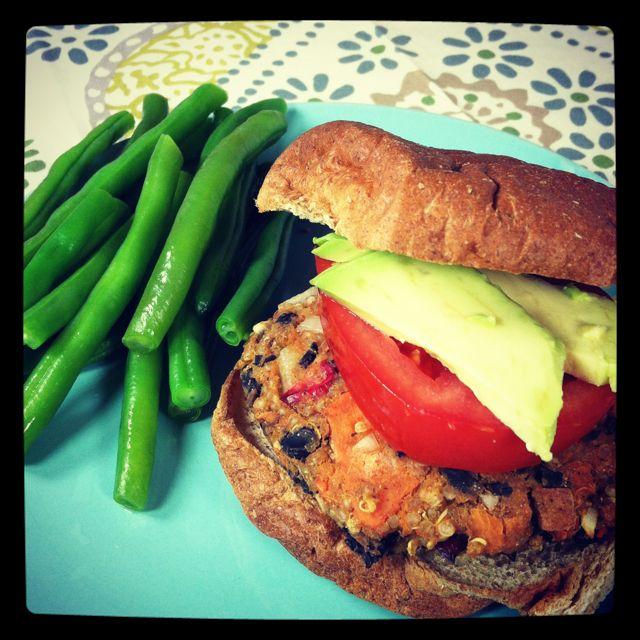
Try these Sweet Potato Quinoa Black Bean Burgers next time you need a quick dinner. They're gluten-free and vegan and the tart cranberries perfectly compliment the sweet potatoes!

But have no fear, I have a great recipe to share with you guys today! We’re kicking off the Elf for Health challenge today and I couldn’t be more excited! We had over 700 people sign up!!!!! That’s amazing!! I’m so excited that so many of you are ready to stay healthy and active through the holidays. The first challenge is to go meatless for the day! So I’ve got a delicious veggie burger to share with you!

If you don’t already know, sweet potatoes and cranberries are one of the best combinations ever. So are sweet potatoes and black beans…put all three together and you’ve got me hooked! I make a lot of veggie burgers and through a lot of trial and error, I’ve found that quinoa really seems to help my burgers stick together! Plus it’s another protein source and I like to pack as many of those into my burgers as possible! I’ve also found that chickpea flour helps things stick together (like my sweet potato falafel!) I used both in these burgers.

Print

Sweet Potato Quinoa Black Bean Burgers with Cranberries

sweet potato quinoa black bean burgers e1353804143584
Print Recipe

5 Stars 4 Stars 3 Stars 2 Stars 1 Star

No reviews

These gluten-free, vegan burgers are so delicious, they’ll please even the most avid meatatarians. And with all the healthy fats and vitamins they provide, what’s not to love?

  • Author: Author: Lindsay
  • Prep Time: 10 minutes
  • Cook Time: 20 minutes
  • Total Time: 30 minutes
  • Yield: 6 1x

Ingredients

Scale
  • 1 medium sweet potato
  • 2 c black beans, cooked
  • 1/2 c onion, diced
  • 2 cloves garlic, minced
  • 1/2 an avocado
  • 1 c quinoa, cooked
  • 1/2 c fresh cranberries, roughly chopped
  • 1/4 c chickpea flour
  • 1 tsp cayenne pepper
  • 1 tsp paprika

Instructions

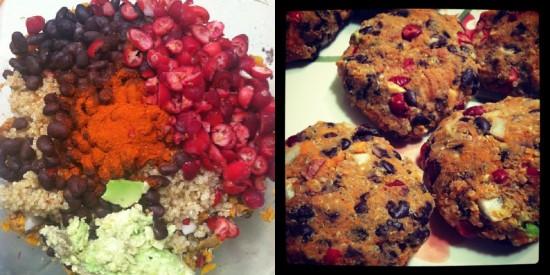
  1. Stab the sweet potato all over with a fork and microwave on high for 5 minutes.
  2. Scoop the flesh into a small bowl.
  3. Add 1 cup of black beans and avocado and mash well.
  4. Add the remaining ingredients and use your hands mix until well combined.
  5. Form into six patties.
  6. Bake at 400 degrees for 18 minutes, flipping once.

Did you make this recipe?

Tag @theleangreenbean on Instagram

These burgers are gluten-free AND vegan.

burger1 e1353804201456

If you don’t have chickpea flour, you could try grinding up some oats in the food processor to make oat flour.

Try these Sweet Potato Quinoa Black Bean Burgers next time you need a quick dinner. They're gluten-free and vegan and the tart cranberries perfectly compliment the sweet potatoes!

If you’re not vegan, i’d highly recommend topping these with goat cheese.
SO GOOD.
Or any cheese for that matter 🙂

Enjoy!
–Lindsay–


Filed Under: Dinner, Lunch Tagged With: Cranberry, Sweet Potato

Elf for Health Holiday Challenge

November 19, 2012 by Lindsay 48 Comments

Hi Friends!

Hope you all had a great weekend. We’re postponing Bean Bytes today because I have something super exciting to share with you guys! I know a lot of you loved the #LiveLeanEatGreen challenge in October and asked for another one. Well…. ask and you shall receive! I’ve teamed up with one of my best blogging buddies, Elle from nutritionella, to bring you guys a six week challenge to help you stay on track during the holidays! Elle just finished her dietetic internship so we’ll both be becoming Registered Dietitians in early 2013.

We’re super passionate about nutrition and wellness and LOVE helping others eat right and stay active. Since we know the holidays can make it hard to stay on track with healthy habits, we wanted to come up with a way we could help you guys! Here’s what we came up with…

Introducing the Elf for Health Holiday Challenge! This is a six week challenge that will run from the Monday after Thanksgiving thru the first week in January. There will be daily tasks, daily winners, prizes, weekly newsletters, and a Facebook group for support.

And are you ready for the best part? You’ll have an elf to support and encourage you! When you sign up, you will also be committing to be an elf for someone in return. Over the course of the challenge, you will have three different elves.

Sounds like a great way to stay motivated and meet new people over the holidays doesn’t it?! Since this challenge is internet based, anyone can participate… no matter where you’re located! All you need is access to the internet and an email address.

So what does an Elf do?

Elf Duties

As an Elf, you are expected to support your assigned buddy with their holiday health goals and the daily challenges. Elves & buddies will be reassigned every 2 weeks. You are only asked to email your buddy 2 times per week:

  • Monday: Send your buddy an email to help them with the challenges for that week. Ideas of things to include/attach: your own personal tips & tricks, inspiring words and/or images, a new, healthy recipe or workout to try.
  • Thursday – Saturday: Any time during these days, check in with your buddy! For example, ask them if they tried a new recipe, workout, or had fun with any certain challenges. Feel free to tell them how you did with your challenges, too!

Anything more than those 2 emails is up to you but feel free to go above and beyond this to show your support! Just a few ideas: send your buddy Tweets, shout outs on our Facebook Page, email a fun workout you liked or send a hand written recipe or note.

Important Dates

  • *Friday, November 23rd at midnight: sign up deadline for all 6 weeks
  • Sunday, November 25th: Round 1 Elf assignments emailed
  • Monday, November 26th – Sunday, December 9th: Round 1
  • Sunday, December 9th: Round 2 Elf assignments emailed; Round 1 “Best Elf” winners chosen
  • Monday, December 10th – Sunday, December 23rd: Round 2
  • Sunday, December 23rd: Round 3 Elf assignments emailed; Round 2 “Best Elf” winners chosen
  • Monday, December 24th – Sunday January 6th: ROUND 3
  • Sunday, January 6th: Round 3 & participant grand prize winners chosen

*If you missed the initial sign up deadline, you can still participate:

  • Sign up before December 7th for Rounds 2 & 3
  • Sign up after December 7th but before December 22nd for Round 3

Not clear about something? Email Elle or Lindsay!

Prizes

We are working on getting some of our favorite companies involved to provide you guys with awesome prize packages. We will update our challenge pages with prize specifics once we finalize the brands we’re working with (hopefuly later this week) but for now we will have:

  • 3 prizes for “Best Elf”, one awarded at the end of each round
  • 1 grand prize for best participant awarded at the end of the challenge determined by participation, hashtagging and being an awesome Elf.

There will be a daily challenge winner chosen each day. Daily winners will be entered for a chance to win the grand prize!

Best elf prizes will given based on participation and nomination. If you love your elf, let us know so we can consider them for a Best Elf prize. Best Elf prizes will be awarded at the end of each round.

Still with me?


Sign Up

Want to sign up?! Fill out the form below.

We will be sending out a weekly newsletter reminding you of the weekly challenges so look out for a confirmation email to confirm your participation & newsletter subscription. If you don’t receive a confirmation email, check your spam box. If you still can’t find a confirmation email, let one of us (Elle or Lindsay) know ASAP and we’ll add you to the list.

Buttons

Info Pages

Also, we’ll both have Elf for Health info pages on each of our blogs if you’re looking for the calendar of daily challenges, the sign up form, important dates etc…
 
I think that about does it, for now. We’re excited to get things started after a relaxing Thanksgiving weekend!

Tell us, what are you most challenged by during the holidays?

Filed Under: Uncategorized

When It’s Their Turn

November 16, 2012 by Lindsay 32 Comments

Hi Friends.

We’re skipping Fitness Friday again because there are more important things to address. This week has been a particularly tough one in the blog world. All week long my google reader has been filled with grief , frustration, devastation and loss. What makes it even harder is that the people struggling and suffering are my friends.

These are ladies who have supported me, encouraged me and believed in me for the past two years. And my heart is breaking for them.

When it was my turn to have a rough week, they were there with comments, emails, tweets and kind words to get me through one more day.

So what do you do when it’s their turn? What do you do when friends are struggling and you find yourself stuck far away?

You send cards…not because you have to or because it’s expected, but because you want to.

a

You send virtual hugs because you can’t give real ones.

You let them know that you’re there if they need you, but more importantly, you understand that they may not. They may have someone else to lean on. They may want to talk to someone who has been through what they have. They may not need you until later, or at all. And that’s ok. But that doesn’t mean that you don’t let them know.

Friendship quote 2

You think about times when you’ve struggled, about what you needed then, and you pass it on to those who need it now.

You let their struggles remind you to be grateful for everything you have going well in your own life. You take the time to appreciate your family, your pets, your health…. because a lot of us don’t do it often enough.

b

You shift your perspective and realize that the things you’ve been complaining about all this week really don’t matter that much in the long run. When a friend loses their baby, the fact that you have to work late three days in a row no longer seems like a big deal.

You send positive thoughts their way… because they deserve it.

You remind them that they are beautiful, incredible, amazing individuals…because they are.

And you have faith that they will face adversity and come out even stronger than they were before…because they will.

hoperise

That’s what you do when it’s their turn.

Because someday, it will be your turn…and someone will do the same for you.

Go tell your friends you love them!
–Lindsay–

Filed Under: Uncategorized

Perfectly Roasted Chickpeas

November 15, 2012 by Lindsay 48 Comments

Hi Friends!

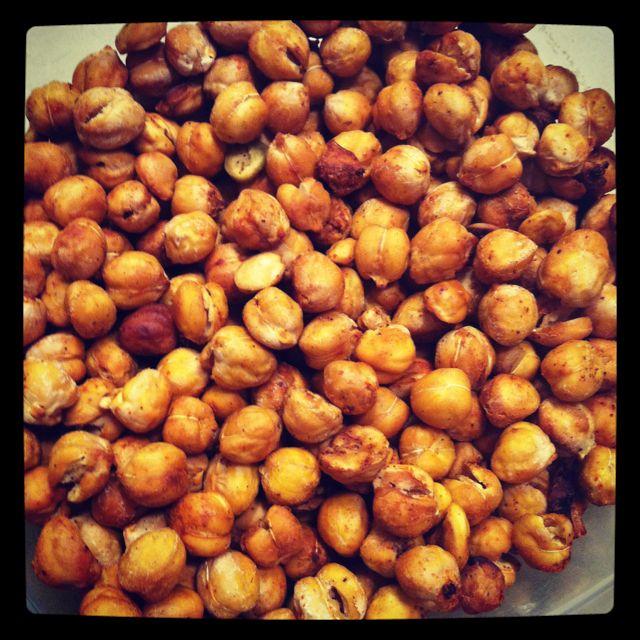
Time for another Quick Tip Thursday. Today we’re chatting about chickpeas. Specifically roasted chickpeas. Quite honestly, I’m not totally crazy about chickpeas straight out of a can. Turn them into hummus and you’ve got my attention. Stick them in the oven and roast them so they turn into tiny little crunchy puffs of deliciousness and consider me pretty much addicted.

I’ve been battling with roasted chickpeas for the past couple years. No matter how hard I tried, I could never seem to get them perfectly crispy. I tried all sorts of oven temperatures, cooking times, etc to no avail. Well, my friends, I’ve finally unlocked the secret. And believe it or not, it came about because I was in a hurry to get to yoga!  I didn’t have time to wait for the oven to preheat so I just put them in while the oven was still cold. I left them in as long as I could, which ended up being 45 min, then I turned off the oven and ran out the door. When I came home 90 minutes later, I discovered perfectly roasted chickpeas!

Find out the secret to perfectly roasted chickpeas. They make a great snack!

So here are you directions:

1. Rinse the chickpeas and put them on a baking sheet. Pat them dry with a paper towel and then let them sit and dry some more for about half an hour.
2. Mist with olive oil and season with desired spices- I use cayenne pepper and paprika usually.
3. Put the pan in the oven BEFORE you turn the oven on.
4. Turn the oven on to 425 degrees and roast them for 45 minutes, stirring every 10 min or so.
5. Shut the oven off and leave them in there for about an hour and a half*
6. Transfer to container and enjoy!

*If you leave to go somewhere they can stay in there longer than that because the oven will just keep getting colder.

Enjoy!
–Lindsay–

PS…If you haven’t added roasted chickpeas to your homemade trailmix…you haven’t lived 🙂

Filed Under: Snack

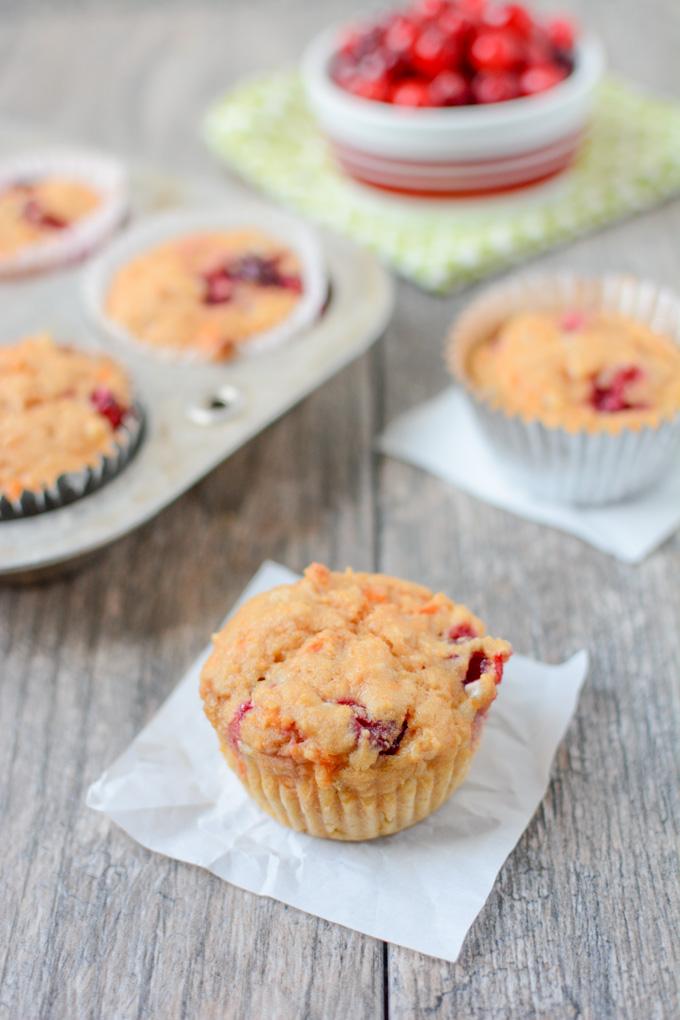
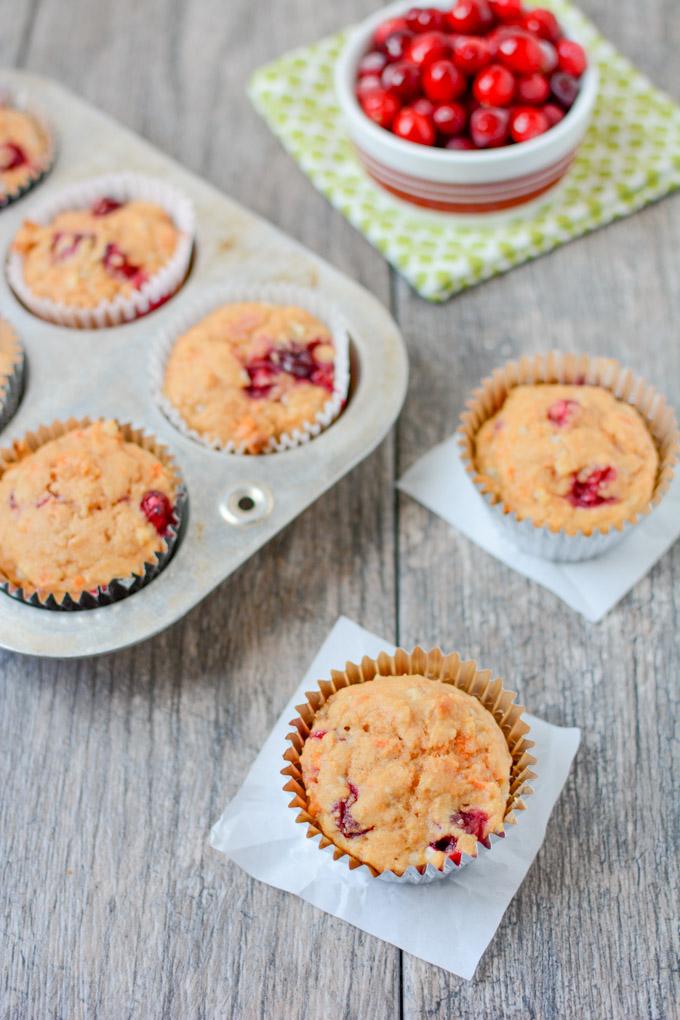
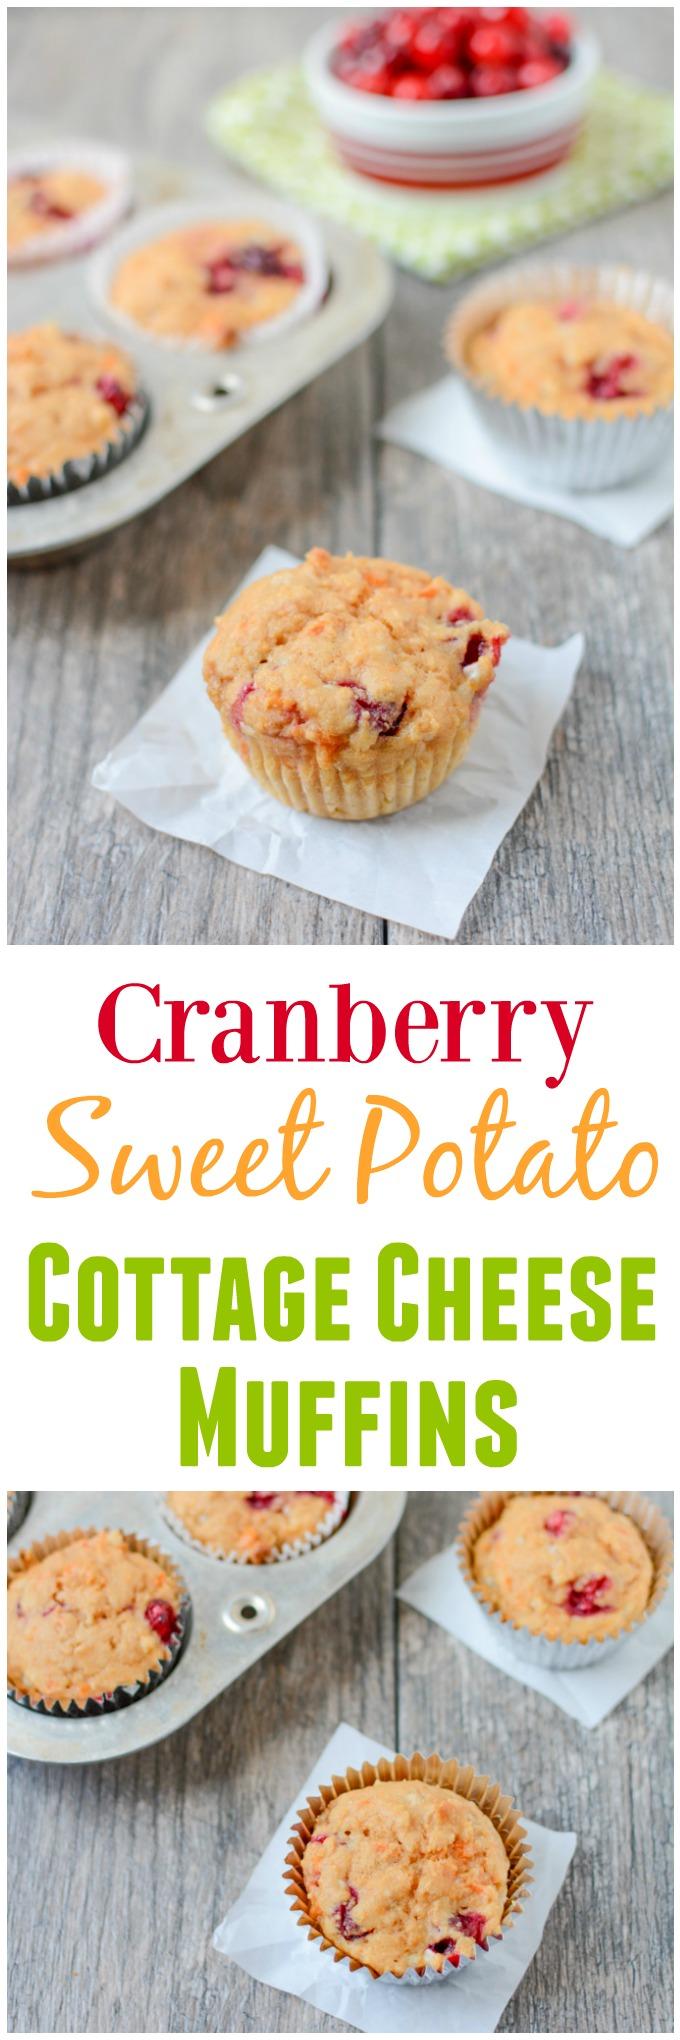
Cranberry Sweet Potato Cottage Cheese Muffins

November 13, 2012 by Lindsay 59 Comments

Lightly sweetened and packed with protein and fiber, this recipe for Cranberry Sweet Potato Cottage Cheese Muffins makes a great grab-and-go breakfast!

Lightly sweetened and packed with protein and fiber, this recipe for Cranberry Sweet Potato Cottage Cheese Muffins makes a great grab-and-go breakfast!

**Photos updated 12/2015**

Hi Friends!

Let’s talk about cottage cheese for a minute, shall we? I’ve never been a fan. There’s something about the little curds that just kinda freak me out. Hubby loves the stuff, however, and it’s a GREAT source of protein so I’ve decided I’m going to give it a fair shot. And by fair shot I mean, you’ll never catch me eating it plain, but I’ve decided to see if I can start to like it by hiding it IN things. First I tried pancakes. Hmmm, they were ok…but I’m still working on them. So we’ll come back to those. *Note- cottage cheese can be quite high in sodium so make sure you compare brands and try to find the one with the lowest sodium!

Next, I tried muffins. When I googled cottage cheese muffins, most of what you find are cottage cheese egg muffins…which are on my list, but I was looking for more like a real muffin…I was envisioning something that maybe replaced greek yogurt with cottage cheese. I started thinking about how I could add some sweetness and I kept coming back to sweet potatoes -one of my favorite fall veggies. So, I decided to just give it a whirl. This is one of the biggest experiments to ever take place in my kitchen!

Here’s the recipe I used:

Print

Cranberry Sweet Potato Cottage Cheese Muffins

Cranberry Sweet Potato Cottage Cheese Muffin 3
Print Recipe

5 Stars 4 Stars 3 Stars 2 Stars 1 Star

3.7 from 3 reviews

Lightly sweetened and packed with protein and fiber, this recipe for Cranberry Sweet Potato Cottage Cheese Muffins makes a great grab-and-go breakfast!

  • Author: Author: Lindsay
  • Prep Time: 10 minutes
  • Cook Time: 30 minutes
  • Total Time: 40 minutes
  • Yield: 10-12 1x

Ingredients

Scale
  • 2 Tbsp butter, melted
  • 1/4 cup brown sugar
  • 1 egg
  • 1 tsp vanilla
  • 1/4 cup skim milk
  • 1/2 cup small curd cottage cheese
  • 1/2 cup cooked sweet potato, mashed
  • 3/4 cup white whole wheat flour
  • 1 tsp baking powder
  • 1 cup fresh cranberries (or frozen)

Instructions

  1. Combine first 7 ingredients in a bowl and mix well.
  2. Add flour and baking powder and stir until just combined.
  3. Stir in the cranberries.
  4. Scoop into greased muffin tins and bake at 350 degrees for 30 min.

Did you make this recipe?

Tag @theleangreenbean on Instagram

Pretty darn easy if you ask me! I have to admit I was skeptical as I put these in. 

Lightly sweetened and packed with protein and fiber, this recipe for Cranberry Sweet Potato Cottage Cheese Muffins makes a great grab-and-go breakfast!

But then I ate one when they came out of the oven…and it was good! And then I ate another one for breakfast on Sunday morning, with my coffee, after heating it up for a few seconds in the microwave.

And it was just as good. And then hubby ate two. And then later in the afternoon, he ate two more. And then I packed one in my lunch for Monday…and then hubby asked me to make another batch 🙂

Lightly sweetened and packed with protein and fiber, this recipe for Cranberry Sweet Potato Cottage Cheese Muffins makes a great grab-and-go breakfast!

So I did. They’re packed with protein, have some fiber and are just the right amount of sweet, without a lot of added sugar. Win!

Let’s chat! Are you a fan of cottage cheese? Have you ever baked with it?

Enjoy!
–Lindsay–

Filed Under: Baking, Breakfast, Snack Tagged With: Sweet Potato

Black Bean & Shrimp Enchilada Stuffed Peppers

November 8, 2012 by Lindsay 17 Comments

pepper1 e1352351623143

Hi Friends!

Just popping in to share a quick recipe with you. These stuffed peppers came about because I had a bunch of leftovers I needed to use up! You may recall that I made these enchiladas last week:

IMG 9336

I only used 1/2 a can of cream of mushroom soup and half a can of enchilada sauce. They’re always so high in sodium that I don’t like to use them very often, and when I do use them in recipes, I try to cut back. So anyways, I had some leftover that I wanted to use up. I also had some leftover quinoa and shrimp in the fridge and I had just bought lots of peppers at Costco. While I was at work, the wheels started turning and I couldn’t wait get home and try out my idea!

Here’s what you do:

Print

Black Bean & Shrimp Enchilada Stuffed Peppers

pepper1 e1352351623143
Print Recipe

5 Stars 4 Stars 3 Stars 2 Stars 1 Star

No reviews

It doesn’t get much more simple than this recipe. With only 5 minutes of prep work, these stuffed peppers are perfect for dinner in a pinch.

  • Author: Lindsay
  • Prep Time: 5 minutes
  • Cook Time: 30 minutes
  • Total Time: 35 minutes
  • Yield: 4 1x

Ingredients

Scale
  • ½ can low-sodium cream of mushroom soup
  • ¼ c low-fat shredded mexican cheese
  • 2 cups frozen vegetables, diced and thawed
  • 2 cups black beans
  • 1 cup quinoa, cooked
  • 8–10 shrimp, cooked and diced
  • 1 tsp paprika
  • 1 tsp cayenne pepper
  • 4 Tbsp enchilada sauce
  • 4 red peppers

Instructions

  1. Slice the tops off the peppers and pull out the seeds. Slice a little off the bottom if necessary to get them to stand up in a pan.
  2. Mix the remaining ingredients except the enchilada sauce in a bowl.
  3. Scoop the mixture into the peppers and top each one with 2 Tbsp enchilada sauce.
  4. Cover with foil and bake at 400 degrees for 30 minutes.

Did you make this recipe?

Tag @theleangreenbean on Instagram

Easy, right? Mix, stuff, bake.

IMG 9379

Eat!

IMG 9380

Aren’t stuffed peppers the cutest?
Bonus:
They’re a great way to eat extra veggies 🙂

pepper3

Enjoy!
–Lindsay–


Filed Under: Dinner

Fitness Friday 37

November 2, 2012 by Lindsay 20 Comments

Hi Friends!

Time for another Fitness Friday!
fitnessfriday1

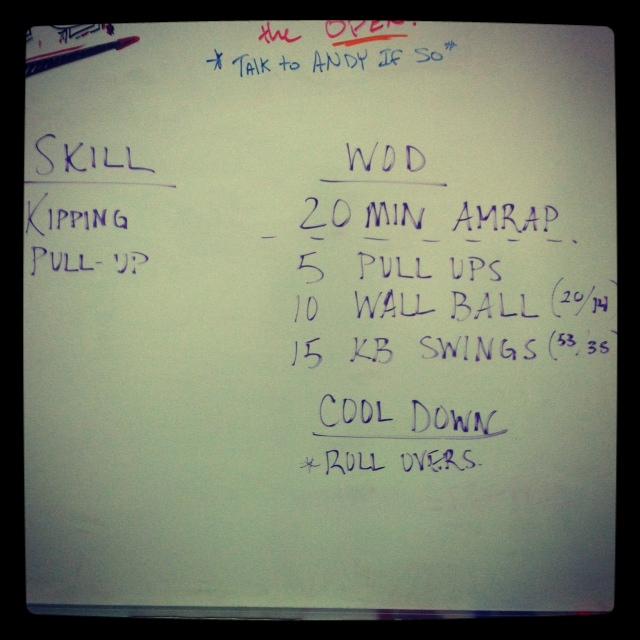
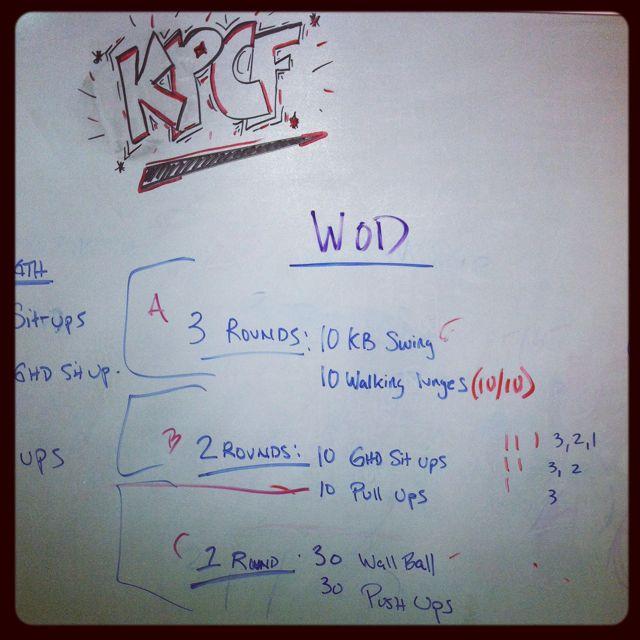
Hubby and I kicked off the weekend with our very first Crossfit class. We were both a little nervous but it ended up being a perfect first class. Since the place we’re going just started offering Crossfit, the classes are still pretty small…so our first class ended up just being the two of us, and one other newbie. We started off with a warm-up and then worked on some skills like squats, wall balls and kettle bell swings to make sure our form was good. Here’s the WOD we did:

ff1

10 minute AMRAP:
10 wall balls
8 hand release pushups
6 kettle bell swings
4 ring rows

I did 5 rounds + 17 reps in the next round.
So I completed the whole circuit 5 times and then did 10 wall balls and 7 pushups of round 6 before the 10 minutes was up

It was awesome. I knew going into it that I was going to like Crossfit.
And I do 🙂 So does hubby!
We were both quite sore for the rest of the weekend!

Sunday I headed back to the yoga studio for the first of my 4 beginner classes!

IMG 9246

It went well! We reviewed some of the stuff we talked about at the class last week and then learned some new poses!

On Monday I headed to the basement for a workout. I broke up my favorite 100 legs workout into rounds since I didn’t feel like doing the whole thing straight through.

photo 304

Tuesday I made up a little Hurricane workout for those of you still stranded inside due to bad weather and power outages. No equipment and minimal space needed!

photo 305

Wednesday we headed back to Crossfit for a Halloween workout before the trick or treaters came.

photo 306

This time it was us plus 4 other people. We started off working on handstands. Let’s just say I am NOT good at them 🙂 I’ve done handstands before, but never up against a wall. For me, the wall seems to be my roadblock because you basically have to just hurl yourself at it and even though your feet are the only part that hit it, I seem to have a mental block about hurting myself….but I’m working on it! I’m pretty close so I’ll get there eventually…then i’ll work on handstand pushups! Hubby on the other hand is quite good at hand stands as it turns out! After that, we did our WOD:

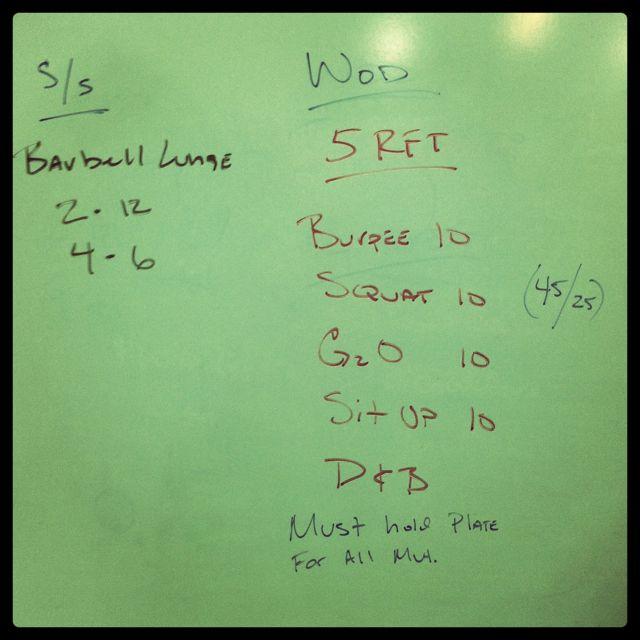
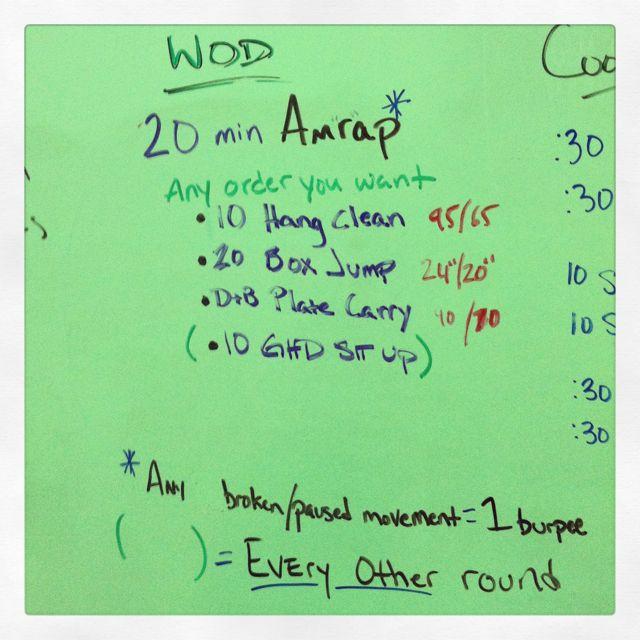
photo 307

I did this in 8:47 with a 25# plate and it was ROUGH, but awesome 🙂

This weekend we’re going back for a 9am WOD
and then they’re offering a 10am skills class
so we get to practice certain skills and work on our form! Should be fun.

Thursday I took a rest day. I went back to the doctor because my ears are still bothering me. Turns out both of them are still infected. It’s been over a month, and i’ve been through two rounds of antibiotics…to no avail. So…working on that…probably going to see an Ear, Nose and Throat specialist soon.

How have your workouts been this week?

Enjoy!
–Lindsay–


Filed Under: Workouts

October Foodie Penpals Reveal Day

October 31, 2012 by Lindsay 20 Comments

Hi Friends!

I can’t believe it’s the last day of October! You know what that means…time for another Foodie Penpals reveal day!

The Lean Green Bean

Are you ready to see what I got this month? My box was packed with lots of goodies from Mollie over at Sprinkles of Life.

IMG 9007

She sent me such a wide variety of things, I loved it!

fpp1

The box included:
A noodle bowl that will be great for dinner in a pinch
Fruit leathers
Homemade caramel dip PLUS the recipe!
Strawberry rhubarb jam that her mom made- my FAV!
Plantain chips that hubby is pumped about
Wasabi peas- hello spicy!
Dried mango to add to my trailmix
Flavored water- a nice treat that I’d never buy myself
A new spice blend from trader joes
Bruschetta mix!

Thank you so much Mollie for all the wonderful goodies! I can’t wait to try them all 🙂
I also LOVED the card she sent!

IMG 9009

So, do you wanna join us?! Here’s the deal:

-On the 5th of every month, you will receive your penpal pairing via email. It will be your responsibility to contact your penpal and get their mailing address and any other information you might need like allergies or dietary restrictions.
-You will have until the 15th of the month to put your box of goodies in the mail. On the last day of the month, you will post about the goodies you received from your penpal! 
-The boxes are to be filled with fun foodie things, local food items or even homemade treats! The spending limit is $15. The box must also include something written. This can be anything from a note explaining what’s in the box, to a fun recipe…use your imagination!
-You are responsible for figuring out the best way to ship your items depending on their size and how fragile they are. (Don’t forget about flat rate boxes!)
-Foodie Penpals is open to blog readers as well as bloggers. If you’re a reader and you get paired with a blogger, you are to write a short guest post for your penpal to post on their blog about what you received. If two readers are paired together, neither needs to worry about writing a post for that month. 
-Foodie Penplas is open to US & Canadian residents.  Please note, Canadian Residents will be paired with other Canadians only. We’ve determined things might get too slow and backed up if we’re trying to send foods through customs across the border from US to Canada and vice versa. 

If you’re interested in participating for November, please CLICK HERE to fill out the participation form and read the terms and conditions.

You must submit your information by November 4th as pairings will be emailed on November 5th!

*If you’re from somewhere besides the US, Canada or Europe and want to participate, send me an email and I’ll see if we get enough interest this month!

———————–

Enjoy!
–Lindsay–

Filed Under: Uncategorized

Baked Apple Chips

October 30, 2012 by Lindsay 43 Comments

Hi Friends!

Try these Baked Apple Chips for a healthy, kid-friendly after school snack!

Just popping in with a quick snack idea! They’re perfect for fall because everyone seems to have a plethora of apples laying around.

Print

Baked Apple Chips

baked apple chips
Print Recipe

5 Stars 4 Stars 3 Stars 2 Stars 1 Star

5 from 1 review

Who says you can’t have your chips and eat them too? These nutritious apple chips are an easy, healthy new way to think about snack food.

  • Author: Author: Lindsay
  • Prep Time: 5 minutes
  • Cook Time: 2 hours
  • Total Time: 2 hours 5 minutes

Ingredients

  • apples
  • cinnamon

Instructions

  1. Core apples if desired.
  2. Slice apples as thinly as possible (I use a mandolin).
  3. Place on a greased baking sheet (or use a silpat).
  4. Sprinkle with cinnamon.
  5. Bake at 225 degrees F for one hour.
  6. Flip apple slices over and bake for 1 hour more.
  7. Transfer to a cooling rack and let cool completely.
  8. Store in an airtight container.

Did you make this recipe?

Tag @theleangreenbean on Instagram

IMG 9216

A delicious healthy snack.

Try these Baked Apple Chips for a healthy, kid-friendly after school snack!

A lot of people sprinkle these with sugar.
Not necessary. They will be naturally sweet.

Try these Baked Apple Chips for a healthy, kid-friendly after school snack!

Let’s chat: What’s your favorite dried fruit?!

Enjoy!
–Lindsay–


Filed Under: Snack Tagged With: Apple

Fitness Friday 36

October 26, 2012 by Lindsay 30 Comments

Hi Friends!

It’s time for another Fitness Friday.

fitnessfriday12

This week has been great in terms of workouts! I feel like I’m really back on track and am pretty excited about. Let’s look back at what I did.

Saturday

On Saturday I headed out for a 1 mile run to warmup. I pushed myself a little bit and did an 8:10 mile which was awesome. Then I came home and did a quick workout in the basement with my kettlebell and medicine ball.

IMG 9048

On Saturday I also did something a little crazy.I saw a crossfit Groupon for 10 classes at a place that’s SO close to my house so I just had to buy it.

IMG 9037

I actually bought one for both the hubby and I so we can learn together. Neither of us have done Crossfit before. I’ve been thinking about it for a while. There just hasn’t been a place close enough to our house. This place is so close that I have no excuse not to go. I think we’re heading to our first class tomorrow morning so i’ll be sure to let you guys know how it goes!

I also took the boys on a walk…I’ve been trying to soak up as much outside time as I can while it’ still nice.

IMG 9058

Sunday

On Sunday I headed out for another run. I did intervals, running 30 seconds and then walking 30 seconds…I covered 2 miles before heading to yoga!

 IMG 9101

That’s right, I also went to my very first yoga class ever. I found a studio near my house that was having an open house so the class was free. I liked the class. I didn’t love it, but i understand that like anything new, there’s a learning curve. I need to learn all the moves and get more comfortable before I can start to love it I think. I signed up for a 4 week beginner series so for the next 4 Sundays I’ll be going to class. By the end I’ll be familiar with a lot of the basic poses and will be able to do some of the other classes at the studio. I also think that i’ll enjoy some of the more flowing, faster moving classes better once I get the basics down so i’m looking forward to trying those! Plus, the studio was having a deal for new customers so I only paid $25 for a one month unlimited pass. They have a relaxation class on friday nights and a stretching class on Wednesdays that’s meant for athletes that I might try. It’s not yoga- the focus is more on stretching…which I really need to work on.

 IMG 9102

On another note, my yoga teacher asked me if I was a dancer because I’m so flexible. I laughed and said nothing could be farther from the truth. I am SO not a dancer 🙂 But I have always been very flexible!

Monday

On Monday, I kicked off the first day of Best Body Bootcamp. Some of you might remember that I also did Tina’s last round of bootcamp. Tina is one of my blogging besties and even though I only loosely follow her bootcamp plan, I still like to support my fellow bloggers. What she does with this bootcamp is amazing and helpful to SO many people!

IMG 9137

I tend to use her workout plans as inspiration and don’t follow them exactly. They provide me with a lot of inspiration. On Monday night I did the first weights workout. My favorite move was the scorpion! Have you tried it? Talk about using your abs!

I also changed up some of the moves to things that I like better- for example, if Tina has us doing lateral raises, I might choose to do shoulder presses…and that’s fine. It’s about doing what’s best for you.

Tuesday

Tuesday I headed out to do intervals. I walked the dogs first and then dropped them off and headed back out. I did 1 min running, 30 seconds walking and covered 2 miles at an 8:51 pace which I was happy with. I also did some abs when I got home.

 IMG 9149

Wednesday

Wednesday, the hubby and I took the boys on a nice long walk and then later in the evening I headed downstairs to do some weights. Again, I made some modifications…but my favorite moves were the hip adductions on the stability ball- they always leave my legs feeling like jello…and squats with shoulder presses is one of my favorite combos!

IMG 9172

Thursday

Rest day. I was sore all over so it was much needed 🙂

So there you have it! Are you a crossfit fanatic or a yogi? Any tips for me as I embark on these new fitness adventures?! 🙂

Enjoy!
–Lindsay–

Filed Under: Workouts

Dietetic Internship: Weeks 6-9

October 20, 2012 by Lindsay 19 Comments

Hi Friends!

I can’t believe i have 4 weeks of my internship to catch you guys up on! i’ve been slacking a little bit so this is going to a be a short and sweet recap.

—————-
Week 6
—————-

Here are some of the things I did:

-Created an updated powerpoint for the presentation that Shelby gives to the in-home childcare providers to give them in-service hours. They review policies and procedures about what kinds of meals are reimbursable, etc as well as educating them about the CARES kits they will be receiving. The powerpoint was old and not very visually appealing so I made it fun and fresh!

oldnew

(Old on the top, mine on the bottom)

-I updated some of the adult ed lessons, making sure the pre/post test questions made sense and reflected what was covered in the lessons. I also added a section to the food safety lesson about safe cooking tempertures because that was not previously covered very well.

-I organized all of the tweets/posts I put together for the marketing department into folders and documents so that it would be easy for them to just copy and paste to various social media outlets when they needed them.

-I made a couple of new handouts for about Whole Grains, Healthy Snacks and Vegetables to go along with the Milk handout i made for child care providers a few weeks ago. They won’t be distributed until next year but CHA wanted a series of handouts that all had the same look to them so they seemed more cohesive.

IMG 8654

IMG 8655

-On friday I led a make-up training session for some of the Americorp members who couldn’t come to the nutrition training sessions during their orientation week. We did the session via webinar which was a new experience for me!

—————-
Week 7
—————- 

During my last week at CHA I spent some time wrapping up loose ends. I finished up most of the projects I was working on and the ones that couldn’t be finished, I provided a status update so that they could be continued after I left.

IMG 8625

In addition, I:

-Develeoped a new lesson plan for Adult Ed about Healthy Cooking. It showed people common substitutions they could make to help make their meals healthier both at home and when they were out to eat.

-For two days I attended the P4 medical conference

-On Friday, I led a training for the AmeriCorps members on how to successfully lead an adult ed class. We went through the process of how to prepare for and teach a class and then also went over some strategies and tips for how to best reach and connect with adults when you are teaching them.

 ——————
Week 8
—————–

On Monday and Tuesday of this week, I was at FNCE.

IMG 87411

When I got home I had Wednesday off and then I spent two days with a supermarket RD. It was fun!

Here are some of the things we did while I was there:

-On Thursday we did several personal consults. The store offers one-on-one private consults for people who pay, as well as free consults to all store employees and their families. We met with two different ladies in the morning. In the afternoon, we met with an employee and talked with him, as well as went on a walk around the store with him to point out some of the different products that we talked about.

IMG 8814

-There was supposed to be a gluten-free store tour on Friday so I spent some time searching for gluten-free holiday recipes that we could distribute. We also prepped for the tour by gathers information and supplies and getting those all ready to go.

-In the evening we met with someone who had missed a couple of the RD’s classes and reviewed the lessons with her.

-On Friday, no one showed up for the store tour so we filled our day with other activities. The theme of the week for the store was gluten-free so we made some pumpkin balls that were made with GF ingredients to distribute in the store as samples and I typed up an announcement that the RD could share over the PA to let shoppers know that we had samples and coupons for them.

pumpkinball1

-We spent a couple of hours passing out samples and talking to customers. The recipe for the pumpkin balls turned out well, except it called for cloves. I usually leave cloves out of recipes because they’re so strong. Even though we added just a little bit, lots of customers found the taste to be overpowering and didn’t like the balls. Interestingly, once we started calling them gingerbread bites instead of pumpkin bites, people seemed to enjoy them more!

-While the RD was in a store meeting, I spent some time reviewing the My Fitness Pal food logs of some of her clients to see how well they were doing with their tracking and intake.

-At the end of the night, the demo kitchen made up a healthy salmon recipe for us and we passed out samples to the store customers.

It was fun to get a look into another type of job that I could potentially do as an RD, even if it was just for a couple of days 🙂 The RD I was with was awesome and it definitely would have been nice to spend more time there. In addition to all the stuff they do at the store during the day, they also teach a lot of classes on topics like Diabetes, weight loss, etc…which helps them reach even more community members!

class

————
Week 9
————

I started my next rotation this past week. For the next 8 weeks I’ll be at an outpatient clinic of the local children’s hospital called the Center for Healthy Weight and Nutrition. The clinic sees overweight/obese children and also bariatric patients. The center is very collaborative and patients see a nurse practitioner, an RD and a physical therapist when they come in. The bariatric patients also see a psychologist and social worker.

On Monday and Tuesday I had to go to new employee orientation for the hospital, even though I’m just an intern, not an employee.

IMG 8946

For the rest of the week I just spent time getting familiar with the clinic. I familiarized myself with the computer system, observed a few sessions the first day and then by the end of the week I was able to start charting for the RD while she was counseling which was really good practice because I haven’t done much online charting recently. In the upcoming weeks I will start counseling the patients and their parents on my own!

One Wednesday of this week some of my fellow interns and I also helped with our first Simple Suppers- it’s a program that is offered at a school/childcare center near campus that provides nutrition education for parents and also provides them with a nutritious meal. We do some of the food prep, but most of the ingredients are portioned and provided to the parents and kids at the table so that they can make the meal together. This week we had chips and veggie sticks with salsa and make your own guacamole, followed by taco salad.

IMG 8990

Stay tuned to find out what other stuff I get to tackle during this rotation.

Enjoy!
–Lindsay–

Filed Under: Uncategorized

Pumpkin Oatmeal Cookies

October 18, 2012 by Lindsay 36 Comments

Hi Friends!

These Pumpkin Oatmeal Cookies taste like fall in dessert form.

The other night I was in the mood for some cookies. And since it IS fall and all, I decided they should be pumpkin cookies. I made some pumpkin cookies last year but this time I wanted them to have oatmeal. I looked at a few recipes for inspiration, but most of them were full of butter and tons of sugar….so I just kinda did my own thing, as per usual 🙂

I mixed, scooped, baked and tasted. The verdict? I loved them! I know they won’t be for everyone, but they’re moist, chewy and taste like fall. They’re not overly sweet…and they’re packed with goodies like pecans and chocolate chips.

These Pumpkin Oatmeal Cookies taste like fall in dessert form.

Confession…i HATE photographing cookies. So I didn’t spend a lot of time doing it. Sorry, friends 🙂

So you’ll just have to settle for the recipe instead!

Print

Pumpkin Oatmeal Cookies

DSC 04341
Print Recipe

5 Stars 4 Stars 3 Stars 2 Stars 1 Star

No reviews

Add a little fall flavor to your oatmeal cookies with this super simple recipe!

  • Author: Author: Lindsay
  • Prep Time: 5 minutes
  • Cook Time: 12 minutes
  • Total Time: 17 minutes
  • Yield: 36 1x

Ingredients

Scale
  • 1 cup pumpkin puree
  • 1 egg + 1 egg white
  • 1/2 c unsweetened applesauce
  • 1 tsp vanilla
  • 1.5 cups white whole wheat flour
  • 2.5 cups rolled oats
  • 2/3 cup brown sugar, not packed
  • 1 tsp baking powder
  • 1 tsp baking soda
  • 1.5 tsp cinnamon
  • 1 tsp ground ginger
  • pinch salt
  • 1/2 c dark choc chips
  • 1/2 c chopped pecans

Instructions

  1. In a large bowl, mix the pumpkin, eggs, applesauce and vanilla.
  2. Add the flour, oats, baking powder, baking soda, cinnamon, ginger and salt. Stir until just combined.
  3. Mix in the chocolate chips and pecans.
  4. Scoop onto greased baking sheets and flatten slightly with a fork.
  5. Bake at 350 degrees for 10-12 minutes.

Did you make this recipe?

Tag @theleangreenbean on Instagram

There you have it! What’s your favorite pumpkin cookie recipe?

Enjoy!
–Lindsay–

Filed Under: Baking, Dessert Tagged With: Pumpkin

Crockpot Lentil Vegetable Lasagna

October 16, 2012 by Lindsay 35 Comments

Hi Friends!

Did you know you can make lasagna in the slow cooker? Try this vegetarian Crockpot Lentil Vegetable Lasagna next time you're craving Italian!

Let’s talk about lasagna for a second.. It is, traditionally, a comfort food. It’s not always healthy. And it tastes delicious. I don’t make lasagna all that often…but when I do, I always try to make it healthier with a couple of changes:

  • I look for a sauce that it low in sodium, or I make my own sauce by using no-salt-added crushed tomatoes and adding garlic and italian spices.
  • I ALWAYS add extra vegetables. I mix them right into the sauce. Fresh, frozen…doesn’t matter. Whatever you have on hand.
  • I add a lean protein. When I ate meat, it was usually ground turkey. Now that I don’t, I use white beans or lentils. I mix them right into the sauce as well.
  • I use part skim ricotta, and I add frozen spinach to it (more veggies!)
  • I use low-fat and limit the amount of mozzarella cheese I use.

This weekend I tried something different. I made lasagna in the crockpot. And it worked like a charm! I used regular lasagna noodles and didn’t cook them beforehand. I’ll admit I was a bit skeptical that they would cook, but they did!

Print

Crockpot Lentil Vegetable Lasagna

DSC 04561
Print Recipe

5 Stars 4 Stars 3 Stars 2 Stars 1 Star

No reviews

Put your crockpot to good use and whip up this easy veggie lasagna. It’s a nutritious spin on a classic comfort food, perfect for chilly winter dinners.

  • Author: Author: Lindsay
  • Prep Time: 15 minutes
  • Cook Time: 4 hours
  • Total Time: 4 hours 15 minutes
  • Yield: 8 1x

Ingredients

Scale
  • 1 jar pasta sauce (24–32 oz)
  • 21/2 c cooked lentils
  • 21/2 c mixed vegetables (fresh or frozen)
  • 2 cloves garlic, minced
  • 1 tsp oregano
  • black pepper, to taste
  • 1– 16 oz tub part skim ricotta
  • 1 c frozen spinach (defrosted & squeezed to remove water)
  • 2 Tbsp pesto
  • 9 lasagna noodles, uncooked
  • 1 c shredded low-fat mozzarella cheese

Instructions

  1. In a bowl, mix together the pasta sauce, vegetables, lentils, garlic and oregano.
  2. In a separate bowl, mix together the spinach, ricotta and pesto.
  3. Spoon a thin layer of sauce onto the bottom of the crockpot.
  4. Break 3 lasagna noodles to fit in the crockpot.
  5. Top with some of the ricotta mixture, sauce and a little mozz cheese.
  6. Repeat 2 more times.
  7. Cook on low for 4 hours or until noodles and vegetables reach desired tenderness.

Did you make this recipe?

Tag @theleangreenbean on Instagram


Easy peasy. Comfort food at its finest…and healthified to boot!

Did you know you can make lasagna in the slow cooker? Try this vegetarian Crockpot Lentil Vegetable Lasagna next time you're craving Italian!

A word of warning. Some of the moisture from the sauce is absorbed to cook the noodles, so this lasagna may not have as much sauce as you’re used to. I personally like mine with less sauce, but I left a bit of sauce in the jar when I made the lasagna and then I just heated it up and added it to the top of my hubby’s before serving because he likes his with more sauce than I do.

Also, please note that you don’t have to use all the ricotta cheese mixture. I’m not a huge ricotta fan so I usually only use about 2/3 of it. Perfectly acceptable.

Did you know you can make lasagna in the slow cooker? Try this vegetarian Crockpot Lentil Vegetable Lasagna next time you're craving Italian!

Enjoy!
–Lindsay–

Filed Under: Dinner, Slow Cooker

Fitness Friday 33

October 12, 2012 by Lindsay 57 Comments

Hi Friends!

fitnessfriday1

Many of you long time readers may remember when I got my fitbit way back in April for my birthday. The first day I got it, I walked about 4,000 steps. The next day I set a goal for myself to start walking at least 10,000 steps every day. I did really well for a while. I was running a lot, walking the dogs, and easily fitting in those steps, especially on days that I was working at the assisted living facility and walking to and from several classes.

Then I graduated…and I quit my job at the assisted living facility…and it got a little harder to get those steps in- but I was still doing it. Then it started getting even harder as I started my internship. I started getting obsessive. I was pacing around the kitchen or the basement, running 3 miles and then walking an extra two late at night just to get that number to hit 10,000.

Then I got sick. And after 5 1/2 months of walking at least 10,000 steps every single day, there was a day that I only walked 3,600 steps. I was sick, I had a fever, I was exhausted, and I let myself rest. 

Quite honestly, I can’t tell you what a relief it was. It was like a huge amount of pressure had been lifted off my shoulders…which is silly, because the only reason the pressure was there in the first place was because I put it there.

It’s been about 3 weeks since that 3,600 step day. Since then, there’s only been a handful of days that I’ve reached 10,000 steps. And I’m ok with it. After I broke my 10,000 step streak, I decided to take some time to reassess my goals. I looked back at the past several months and thought about what had been going well and what was missing.

Here’s what I realized:

  • I missed circuit workouts. And tabatas. And sprints. And intervals.
  • I missed hard and heavy workouts I could do in my basement…the ones that got my heart pumping but really didn’t require a whole lot of space.
  • And I missed lifting weights.

I realized that in my quest to get in 10,000 steps every day….I had given up some of my favorite workouts in favor of running, simply because running gave me more steps. I stopped lifting weights because it didn’t involve moving around enough to get me the steps I needed.

And that was silly.

So here’s my new plan:

  • Lift weights 2-3 times per week
  • Run 1-2 times per week
  • Circuit/interval/tabata workouts 2-3 times per week

I realize this is a pretty loose training plan. It doesn’t define which workouts I do on which days. It gives me a lot of freedom. But I’ve done this in the past. I know that it works best for me. It gives me enough variety to keep me interested and enough freedom to be realistic. I have loose guidelines…I know what I need to accomplish over the course of the week. But I have the freedom to choose what I want to do on certain days, based on how I’m feeling that day, my mood, when I feel like I need to rest, etc.

As for my fitbit, I will still wear it. I was still (loosely) aim to get 10,000 steps each day because I believe that it’s important to MOVE MORE…but I won’t kill myself to do it. I will makes small changes throughout the day to move more. I will walk the dogs regularly. I will use my fitbit as a motivational tool…But I will also realize that some day I can get in a killer workout, lift AND walk the dogs and I still won’t reach 10,000 steps…AND THAT’S OK. 

So there you have it!

To celebrate this reassessment, I jumped back into my beloved tabata workouts by doing the following- it was short & sweet and I loved it!

shortandsweet

Let’s chat:

How often do you reevaluate your workout routine?

Happy Friday!

–Lindsay–

 

Filed Under: Workouts

Mexican Quinoa Bites

October 11, 2012 by Lindsay 50 Comments

These Mexican Quinoa Bites make a great appetizer and can also be eaten as a main meal. They're vegetarian,  packed with protein and fiber and taste great with a variety of dipping sauces!

Hi Friends!

As promised, things are back on schedule today! I was going to write my FNCE recap but I ended up spending most of the day yesterday playing catchup- on sleep, on emails, on hubby time. This upcoming weekend will be the first weekend in a month that hubby and I have both been at home together. I can’t wait! Anyways, I whipped up the tasty little bites pictured above for dinner last night and just HAD to share them today!

These Mexican Quinoa Bites make a great appetizer and can also be eaten as a main meal. They're vegetarian,  packed with protein and fiber and taste great with a variety of dipping sauces!

One of the things I miss most when I’m traveling is cooking my own food. I’m a sucker for being in control so I can only tolerate eating out so many times before I get a little stressed out. So, even though I hadn’t been grocery shopping, I headed straight to the kitchen last night to see what I could come up with. The end result was delicious and that’s good news for me because it means that all of the ingredients are things that I almost always have on hand, no matter whether I’ve just gone grocery shopping or haven’t gone for a few weeks.

Print

Mexican Quinoa Bites

mexicanquinoabite
Print Recipe

5 Stars 4 Stars 3 Stars 2 Stars 1 Star

No reviews

Throw your taste buds a miniature fiesta with these easy Mexican bites.

  • Author: Author: Lindsay
  • Prep Time: 20 minutes
  • Cook Time: 15 minutes
  • Total Time: 35 minutes
  • Yield: 24 1x

Ingredients

Scale
  • 1/2 c quinoa, uncooked
  • 1 c black beans, cooked
  • 1/4 c avocado, smashed
  • 1 egg
  • 1 red pepper, diced
  • 1/2 c corn kernals, cooked
  • 1/2 c onion, diced
  • 1 tsp cumin
  • 1 tsp paprika
  • 1/2 tsp cayenne pepper
  • 1/3 c ground pepitas (or breadcrumbs)
  • 1/2 c low-fat mexican shredded cheese

Instructions

  1. Rinse quinoa and cook according to package directions.
  2. Combine beans, avocado, peppers, corn and onion in a small bowl and mix well.
  3. Add spices and stir to combine.
  4. Add cooked quinoa (cooled slightly), egg and ground pepitas and mix well.
  5. Spray mini muffin tins with cooking spray and spoon in quinoa mixture.
  6. Bake at 375 degrees for 15 minutes.
  7. Remove from oven and let cool 5-10 min in pan.
  8. Gently remove from pan and serve with bbq sauce or salsa.

Did you make this recipe?

Tag @theleangreenbean on Instagram

Aren’t they cute? I’m love bite-sized foods. These would make a great party appetizer, tailgate snack or dinner entree!

These Mexican Quinoa Bites make a great appetizer and can also be eaten as a main meal. They're vegetarian, packed with protein and fiber and taste great with a variety of dipping sauces!

I dipped mine in bbq sauce,
hubby topped his with sriracha.

These Mexican Quinoa Bites make a great appetizer and can also be eaten as a main meal. They're vegetarian, packed with protein and fiber and taste great with a variety of dipping sauces!

Next time I might try mixing the bbq sauce in before baking!

Let’s chat!

Bite-size or full-size?
What’s your favorite appetizer?

Enjoy!
–Lindsay–

 

Filed Under: Appetizer, Dinner

  • « Go to Previous Page
  • Page 1
  • Interim pages omitted …
  • Page 50
  • Page 51
  • Page 52
  • Page 53
  • Page 54
  • Interim pages omitted …
  • Page 65
  • Go to Next Page »

Primary Sidebar

Lindsay Livingston The Lean Green Bean Healthy Living Tips and Tricks

I'm a Registered Dietitian and mom of three from Columbus, Ohio. I use this blog to share simple, healthy recipes, nutrition tips, and an honest glimpse of motherhood!

Learn More →

Questions? Comments? Email me: [email protected]

The Lean Green Bean Facebook The Lean Green Bean Instagram The Lean Green Bean Pinterest The Lean Green Bean Twitter The Lean Green Bean Feed
footer-logo
The Lean Green Bean Facebook The Lean Green Bean Instagram The Lean Green Bean Pinterest The Lean Green Bean Twitter The Lean Green Bean Feed
Recipes

Breakfast
Dinner
Snack
Slow Cooker

Kids

Cooking With Kids
Favorite Gifts
Toddler Meals
Indoor Activities

Resources

Easy Packed Lunches for Kids
Dinner Spark
Snack Spark
Ultimate Guide to Food Prep

About

Meet Lindsay
Become an RD
Work with Me

The Lean Green Bean is a participant in the Amazon Services LLC Associates Program, an affiliate advertising program designed to provide a means for sites to earn advertising fees by advertising and linking to amazon.com.
Read the full privacy and disclosure policy here.

Copyright © 2022 · The Lean Green Bean

table talk series

Learn how food affects your body.

Get my free Table Talk email series where I share bite-sized nutrition information about carbs, protein, and fat, plus bonus information about snacks and sugar!

[email protected]